How to Mark All as Read in Apple Mail on Mac
There are a few different ways to mark all emails as read in Apple Mail on Mac, so you can use whichever is most convenient for you.
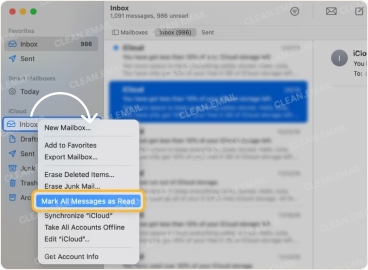
- Right-click a mailbox in the sidebar and choose Mark All Messages as Read.
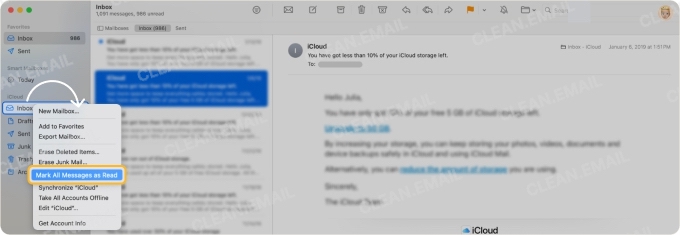
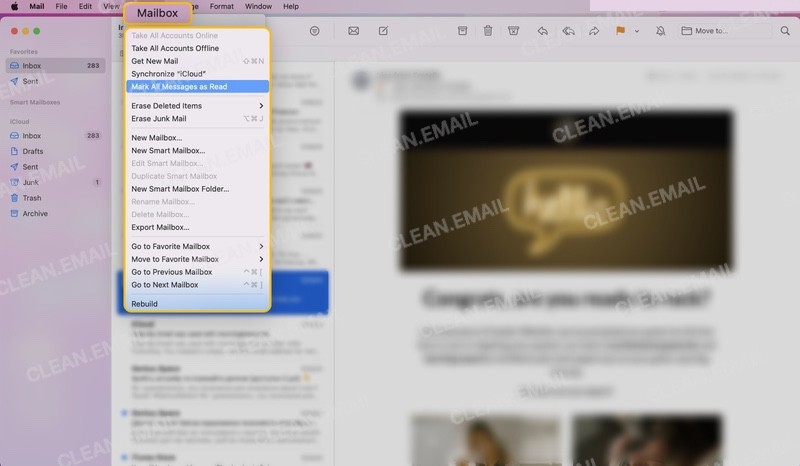
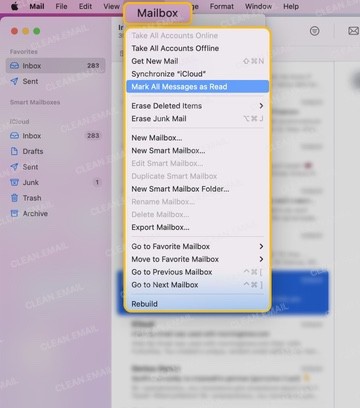
- Choose a Mailbox in the sidebar and pick Mailbox → Mark All Messages as Read in the menu bar.
- Select all visible messages with Command + A and then use Shift + Command +U to mark the emails as read.
Tip: If you have junk mail that you don’t want, it’s better to mark the emails as Spam in Apple Mail and get rid of them rather than to mark them as read and hang onto them.

Automatically Mark Opened Messages as Read
In Apple Mail on Mac, you can automatically mark email conversations as read after opening them and you can choose from two settings.
- Select Mail → Settings in the menu bar.
- Go to the Viewing tab.
- At the bottom, choose the Mark as Read Behavior from the following:
- Default: Mark visible emails as read after opening a thread.
- All Messages: Mark all emails as read after opening a thread.
How to Mark All Emails as Read on iPhone
If you’re using Apple Mail on your iPhone, you can mark all messages as read there as well.
- Open a mailbox or select All Mailboxes.
- Pick Select → Select All.
- Use the flag button on the bottom left to choose Mark as Read.
If you want to do a quick review of the unread emails before marking them, do the following:
- Tap the filter button at the bottom and choose Unread.
- Pick Select and drag down the left side to select the emails quickly.
- Use the flag button to choose Mark as Read.
To mark specific emails in your message list, you can use a swipe gesture.
- Open Settings → Apps → Mail.
- Select Swipe Options.
- Pick Mark as Read for either the Swipe Left or Swipe Right action.
Then, use your chosen swipe direction to mark an email as read.
How to Mark All Emails as Read on iPad
Wondering how to mark all emails as read in the Mail app on iPad? The steps are basically the same as on iPhone with a couple of small adjustments.
- Open a mailbox or select All Mailboxes.
- Tap the three dots in the sidebar and pick Select.
- Choose Select All.
- Use the flag button on the bottom left to choose Mark as Read.
To use the Unread filter:
- Tap the filter button at the top and choose Unread.
- Pick three dots → Select and drag down the left side to select the emails.
- Use the flag button to choose Mark as Read.
Automatically Mark Specific Emails as Read
To save time, you can automatically mark specific emails as read when they arrive. This might be messages from a certain sender like a newsletter or promotion, or with a keyword in the subject for receipts or confirmations.
On Mac, go to Mail → Settings → Rules.
On iPhone and iPad, you can create rules for iCloud accounts only. Go to Settings → Mail Accounts → iCloud and choose iCloud Mail Rules.
Then enter the condition(s) and choose Mark as Read for the action.
For complete details and options, check out our guide to Apple Mail rules.
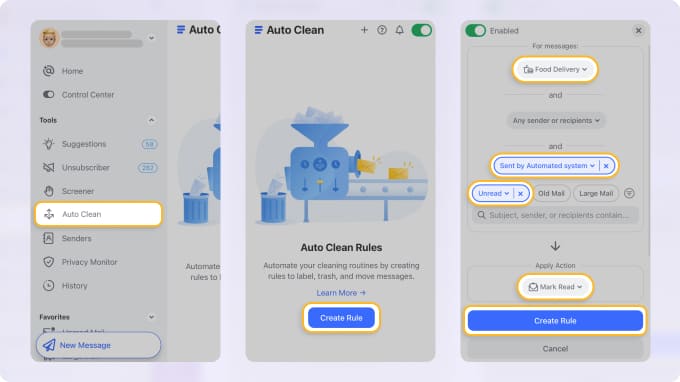
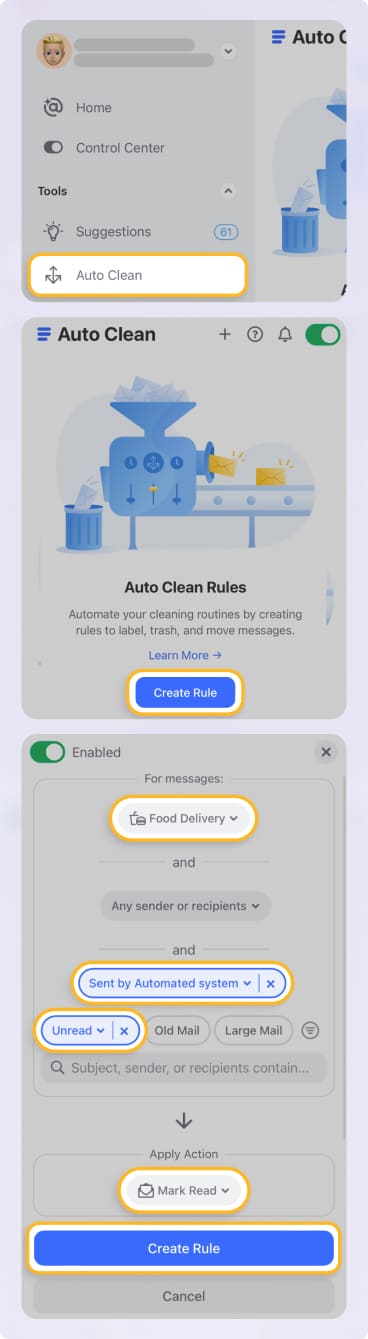
Another way to automatically mark emails as read is using the Clean Email app. With the Auto Clean feature, you can create advanced inbox rules based on an array of conditions and with Mark Read for the action as well.
Troubleshooting: Marking All as Read in Apple Mail
Having problems when trying to mark all emails as read in Apple Mail? Whether on your Mac or iPhone, there are a few common issues.
Mac shortcut not working: When you use the keyboard shortcut Shift + Command +U to mark the emails as read and it doesn’t work, it’s likely because you haven’t selected any emails.
- Select the messages first using Command + A for all visible emails.
Mail action menu lag in iOS 26: Some users have reported issues where they tap once in the action menu and must wait before tapping again. If you’ve updated your iPhone to iOS 26 and notice the same problem, there are a couple of potential fixes.
- Force restart your iPhone or clear the app and network caches.
Unread Count not updating on Mac: If the Unread Count for your messages appears to be stuck or simply not updating, you can fix this easily.
- Go to Mail → Settings → General and make sure the Unread Count is set to All Mailboxes or choose a mailbox and pick Mailbox → Rebuild in the menu bar.
More Options to Mark as Read With Clean Email
Clean Email provides a variety of helpful tools and smart features for managing unread messages. You can easily mark a bulk of emails as read and also, set up inbox rules to mark your messages.
You can view and mark emails using Unread Mail in the menu. Then, simply select all of the messages and pick Mark Read in the action bar.
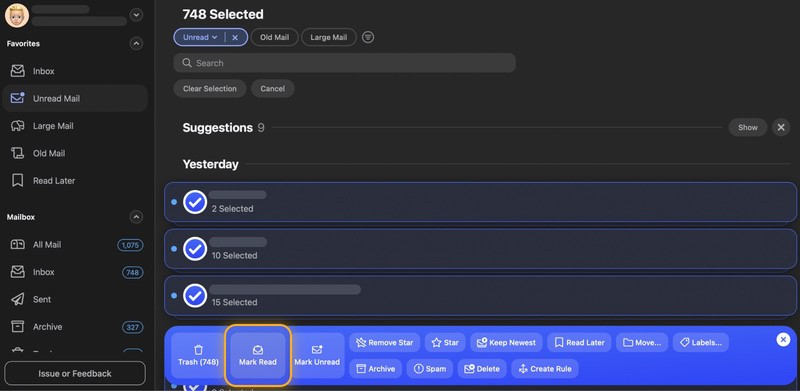
- Without any lag or delays, you can mark hundreds or thousands of emails at once.
You can also set up an Auto Clean rule for future emails, as mentioned earlier. For example, you mark messages as read from a particular sender as they arrive.
Mark the checkbox next to an email from the sender (or senders) and pick Create Rule in the action bar. Choose Mark Read for the action and select Create Rule.
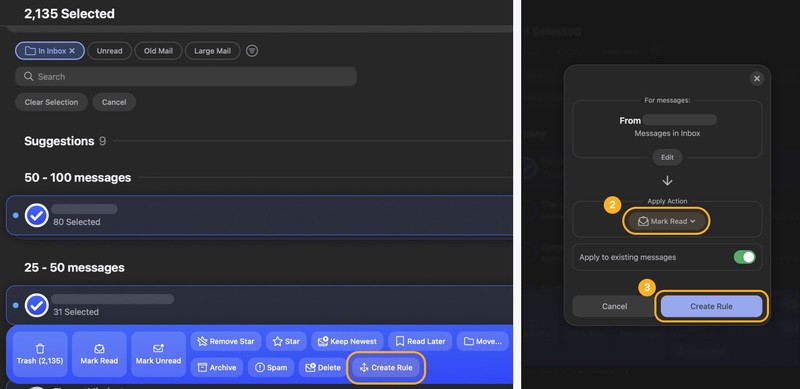
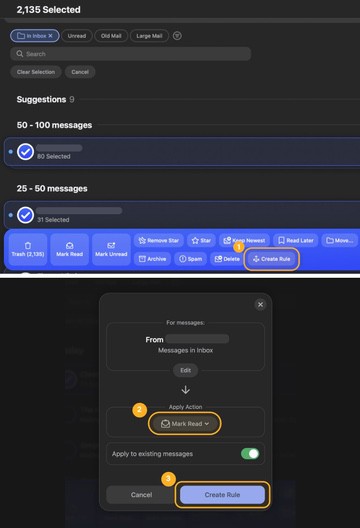
- What’s nice about this option is that not only can you automatically mark incoming emails, but also mark existing messages and create rules in minimal steps on any device, for any IMAP account.
Conclusion
Over time, unread emails can create a distracting inbox. That status should be reserved for new emails or messages that you plan to open later, not spam or emails you won’t ever read.
Luckily, you have various ways to mark unread emails in Apple Mail and can take advantage of the advanced feature set of Clean Email.