


How Does Outlook Auto Archive Work?
Before you walk through the guides for using Outlook auto archive, it’s important to learn how the feature works and where it’s available.
As you’ve probably guessed, auto archive is a tool for automatically archiving emails in Outlook. It works based on the age of the message and runs as often as you like. For example, you can move messages to the archive that are one-year or older on a monthly basis.
Additional features:
- Enable or disable auto archive anytime.
- Adjust the timeframes for old emails and archive frequency.
- Find emails in the Archive Outlook folder on your device or a different location you select.
- Receive a notification before auto archive runs.
- Customize the automatic archive for specific Outlook folders.

Auto Archive Availability
As of this writing, Auto Archive is only available in the classic version of Outlook on Windows.
If you use the new Outlook on Windows, Outlook on the web, or on macOS, you must set up rules to automatically archive emails.
You cannot currently create rules in the Outlook mobile app. Instead, consider using Clean Email rules on Android or iPhone.
📌 Tip: If you’re a Microsoft 365 enterprise customer, you can also use Microsoft’s Exchange Online Archiving service. Contact your account administrator for more information.
How to Set Up Auto Archive in Clean Email
Before we walk through the guides for archiving emails in the Outlook client, it’s important to note the advanced and flexible features Clean Email offers for accomplishing this task. Not only can you automatically archive Outlook messages but do so with any conditions you want and on all of your devices.
While you can choose from specific criteria for your Outlook auto archive rule, you may want to start with an overarching rule to cover your inbox.
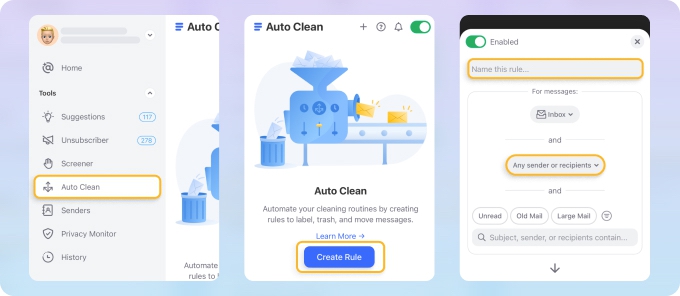
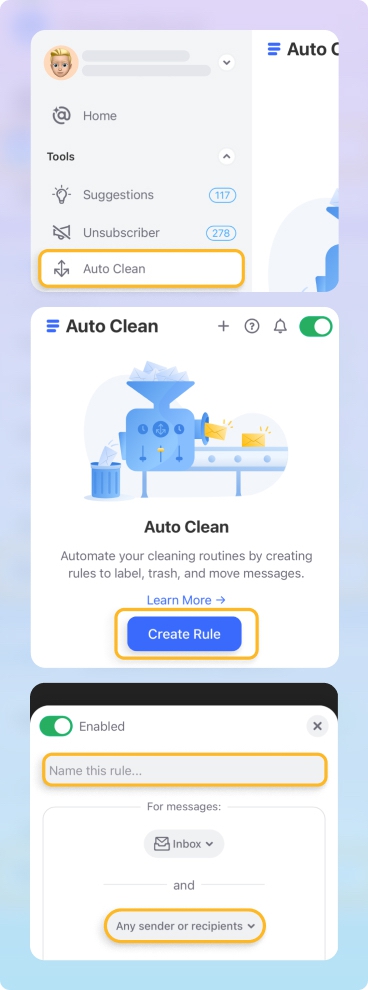
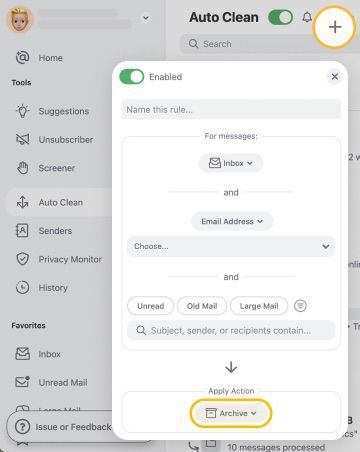
- Go to https://app.clean.email/ and log in with your email account.
- Select Auto Clean in the menu.
- Choose Create Rule or the plus sign on the right.
- Give your rule a name and pick a location if you prefer something other than Inbox.
- Specify your conditions.
- Use the Choose action box to select Archive.
- Optionally turn on the toggle for Apply to existing messages and click Create Rule.

You can also create a rule directly from any folder, such as your Inbox, to archive old emails:
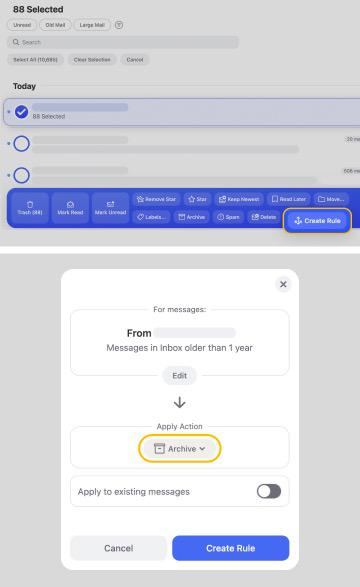
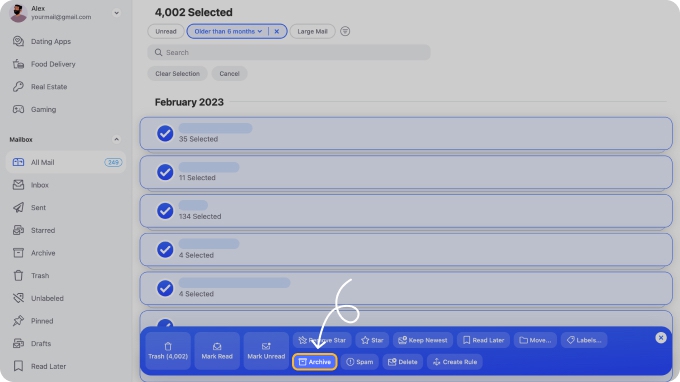
- With Clean Email open, select Inbox, All Mail, or any other folder.
- Choose the Old Mail filter on top and specify the timeframe. Notice that you choose from one day up to 10 years.
- Select the message bundles you want to delete or click Select All.
- Choose Create Rule in the blue action menu.
- Pick Archive under Apply Action.
- Finish the setup by clicking Create Rule.
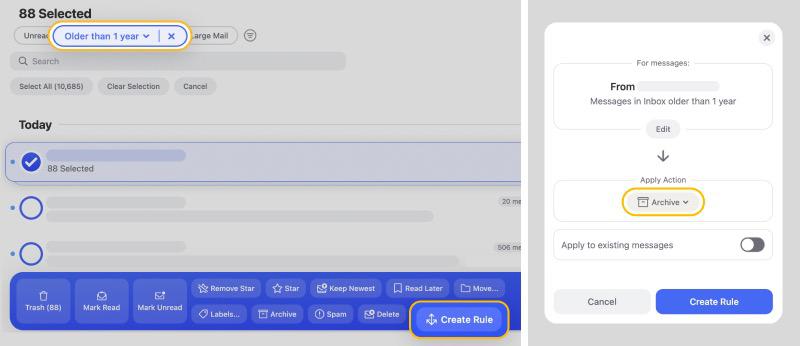
That’s all there is to it! All messages matching the timeframe you selected will automatically move to the archive.
Create Advanced Archive Rules in Clean Email
With Clean Email, you can use whatever combination of conditions you like. And remember, you can set up these rules on the web, desktop, and your mobile device for complete flexibility.
Here are just a few auto archive examples:
- By sender: Select Senders in the menu and pick one. Click Create Rule and then choose Archive for the action. To include more conditions, just pick Edit to add them.
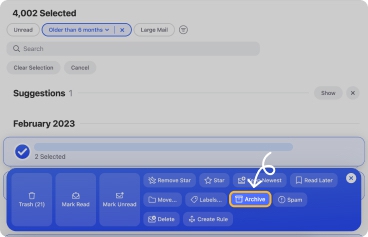
- By size: Select Large Mail in the menu and then pick a size on the top right. Use Select and then Select All to choose all messages of that size. Click Create Rule at the bottom and complete the setup.
- By folder: Select a folder or Smart Folder in the menu. Use Select and then Select All at the top to choose all messages in the folder. Simply click Archive in the action bar, or choose Create Rule for a more customized setup.
How to Set Up Auto Archive in Outlook Classic, 2010, 2007
Now that you see the options you have for automatically archiving Outlook emails in Clean Email, let’s walk through how to set up auto archive in the Outlook application.
Automatically Archive in Outlook Classic
When you set up auto archive in the classic version of Outlook on Windows, you choose the run frequency and timeframe for old messages. Unfortunately, email age is the only criteria available for the built-in automated feature.
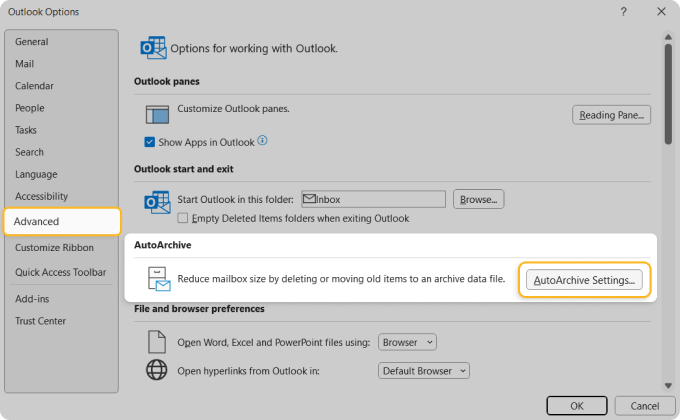
- Go to File → Options and in the pop-up window, pick Advanced.
- Choose AutoArchive Settings in the AutoArchive section.
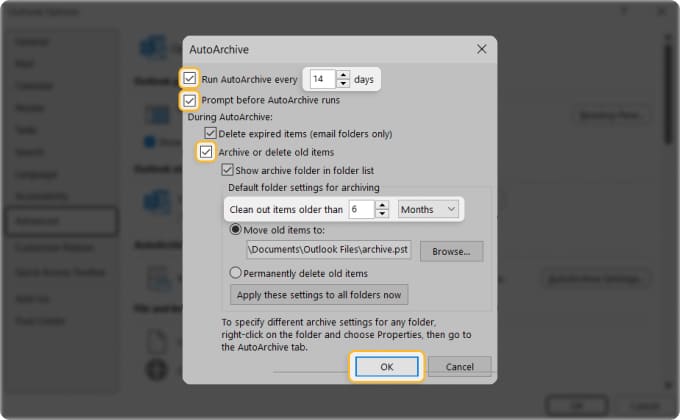
- In the small window, check the top box for Run AutoArchive every and enter the number of days. Optionally, check the box if you’d like to be prompted before the process runs.
- In the During AutoArchive section, check the box for Archive or delete old items.
- Enter the timeframe for determining older items.
- Use the Browse button to select a folder other than the default if you prefer.

- Mark the other optional items per your preference including Delete expired items and Show archive folder in folder list.
- Click OK when you finish.
To change these options later, follow the same steps to reopen the Outlook auto archive settings.
Set Up Auto Archive in Outlook 2010
- Head into Outlook and select the File tab; then choose the Options tab within the File menu.
- Choose the Advanced tab.
- Select AutoArchive Settings within the Advanced tab.
- Click the AutoArchive Every box, type in the number of days into the box to choose how often you want the feature to run.
- Be notified before the archiving process by selecting the Prompt Before AutoArchive box.
- Type a file name in the Default archive file box to specify where to transfer the items or browse and select from the list.
- Finally, select OK two times to confirm.
Set Up Auto Archive in Outlook 2007 and older
- Go into Outlook and click on the Tools menu, then select Options → Other.
- Select AutoArchive.
- Select the AutoArchive Every box and decide how often you want the feature to run by typing a number in the days box.
- Select the Prompt Before AutoArchive box if you want to be notified when the action is about to take place.
- Type a file name in the Default archive file box to transfer archived items into or select from a list when choosing browse.
- Confirm by selecting OK two times.
Remember: Although the AutoArchive feature is turned on, you must now set properties for each folder within Outlook.
📌 Tip: Learn how to auto-delete emails in Outlook for those that you want to remove completely.
Automatically Archive in Other Outlook Versions
If you’re using the new Outlook on Windows, the web, or Mac, you can set up rules in place of the (missing) automatic archive feature. Unfortunately, you cannot choose how often to run the rule, it runs daily like other rules. You also cannot select a timeframe to determine the old items, it’s based on date.
Create Auto Archive Rules in Outlook Web
There are two ways you can create rules within Outlook.com. One way to create rules is directly through your mailbox:
- Open your mail account and sign in.
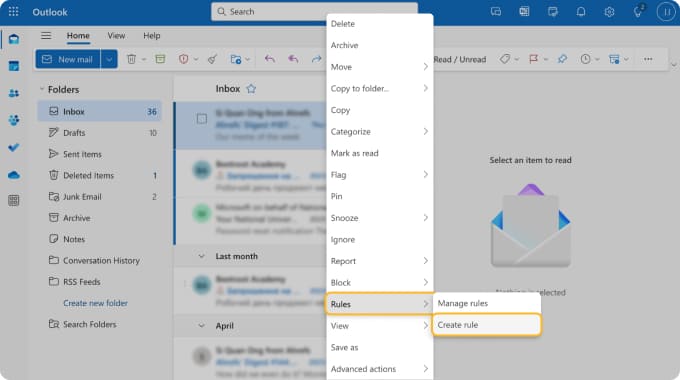
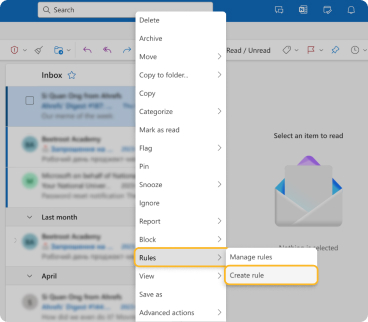
- Right-click an email from a sender you would like to be archived.
- Choose Rules and select Create rule.
- Here you can create a rule to automatically archive in Outlook.
💡 Note: You can perform the same action with an already opened email by clicking on the three dots at the top, then Rules → Create rule.
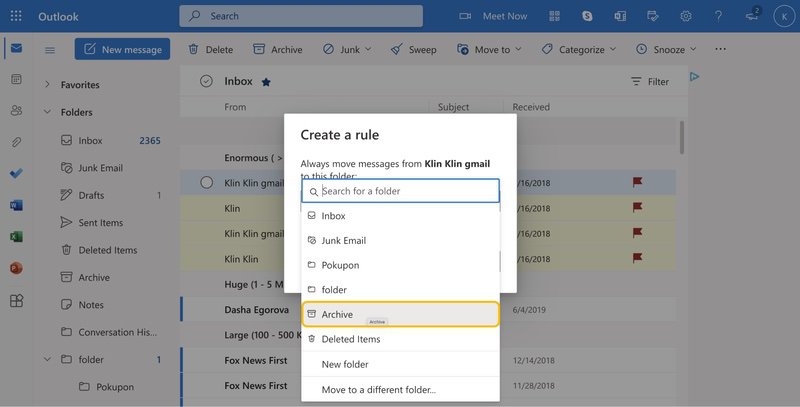
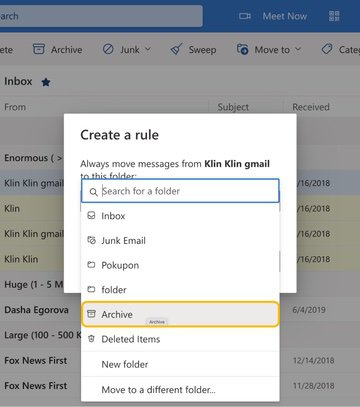
When you create this kind of rule, ALL emails from this sender will automatically archive. However, you may not want to do that if some emails from that sender are sometimes important.
Here’s how to create automated rules to archive emails with a specific subject or body:
- Go into your mail account on the web and open Settings.
- Go to Mail → Rules, and click Add new rule.
- Name your rule and complete the Add a condition section.
- Choose to Archive in the Add an action section, then hit Save.
Setting Up Archive Rules on Windows and Mac
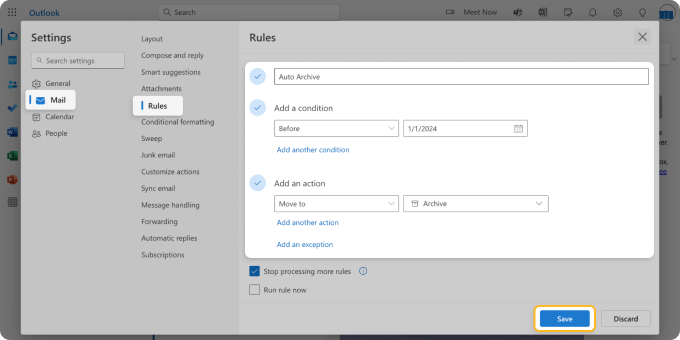
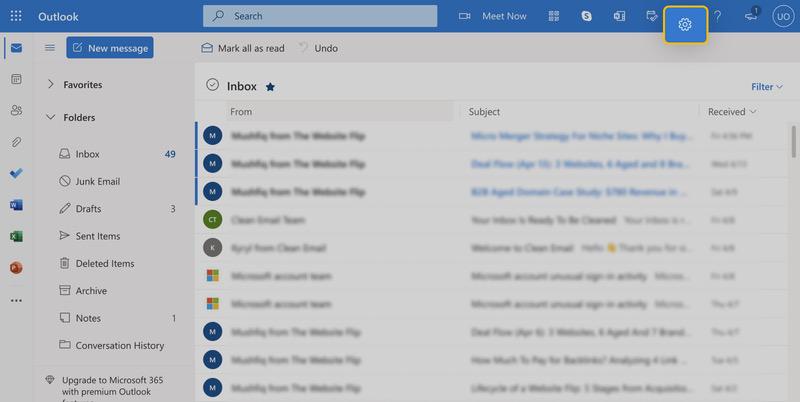
In the New Outlook on Windows, click the Settings icon (gear) on the top right.
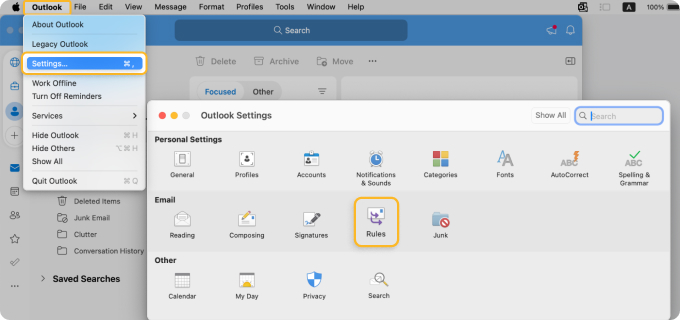
On Mac, simply select Outlook → Settings in the menu bar and choose Rules.
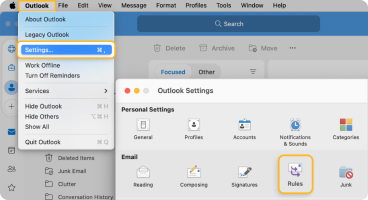
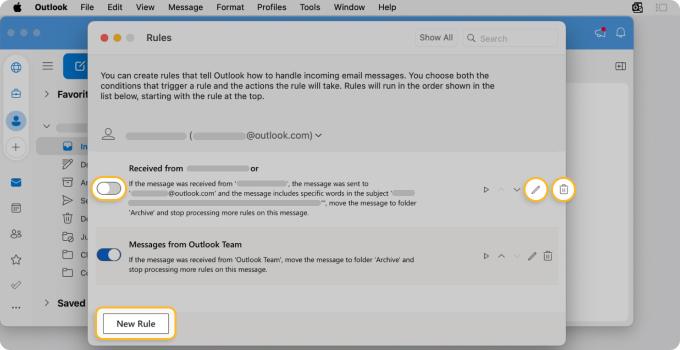
Then, follow these steps to set up the rule:
- Choose the email account you want to use in the drop-down menu, if you have more than one.
- Select Add a Rule or New Rule. You can also edit or delete the rules you have already set up from there.
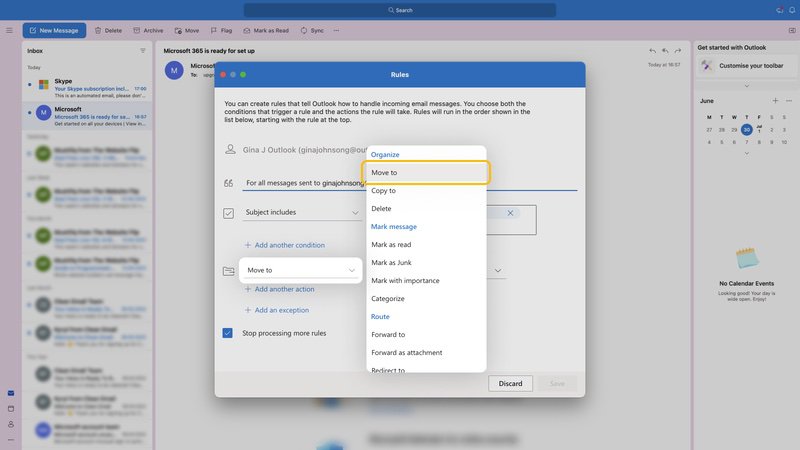
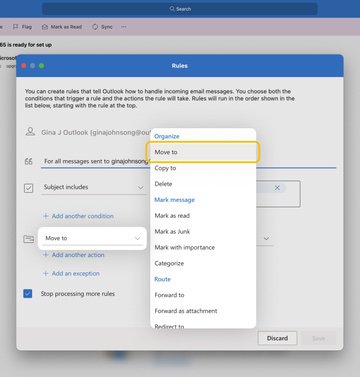
- Name your rule and choose the first condition. For timeframe, pick Before or After and the date. To include more criteria, select Add another condition.
- For the action, select Move to and then pick Archive. Note that you can use the Search box to find Archive if needed.
- You can then include exceptions and stop processing more rules if you like.
- Click Save when you finish.
To adjust the rule later, follow the same steps to reopen the settings.
📌 Tip: Find out how to automatically move emails to a folder in Outlook too!
Do More With Clean Email for Outlook
Earlier, we showed you how to set up Outlook auto archive rules using one of the best Outlook cleanup tools, Clean Email. But this application can do even more to help with email and inbox management.
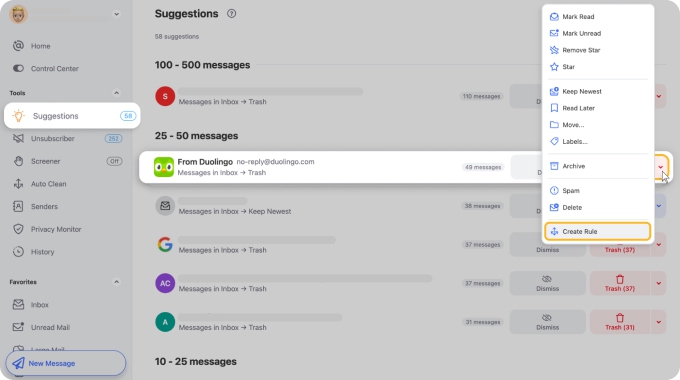
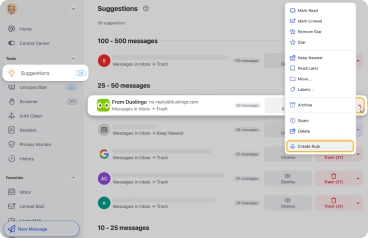
Suggestions: Use predefined Cleaning Suggestions based on previously cleaned similar messages to trash or archive old emails or automate the process by clicking Create Rule. This is a great alternative to manually setting up archive rules in Outlook!
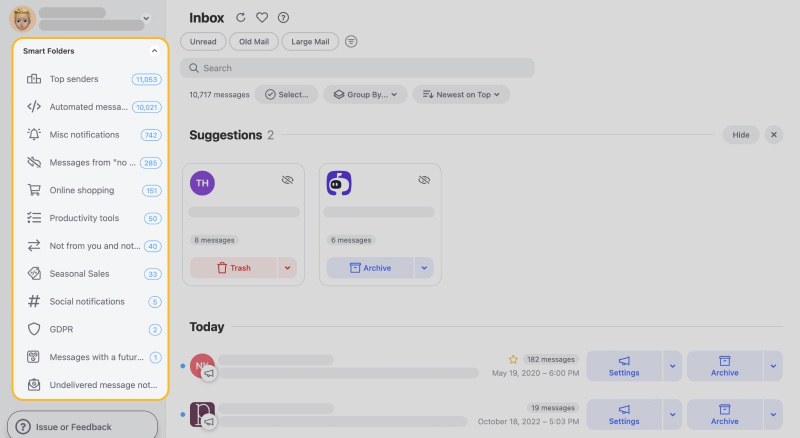
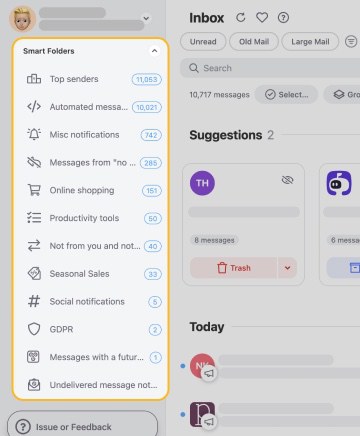
Smart Folders: View related messages filtered into 30+ folders automatically. These include Online shopping, Newspapers and Magazines, Travel, and more.
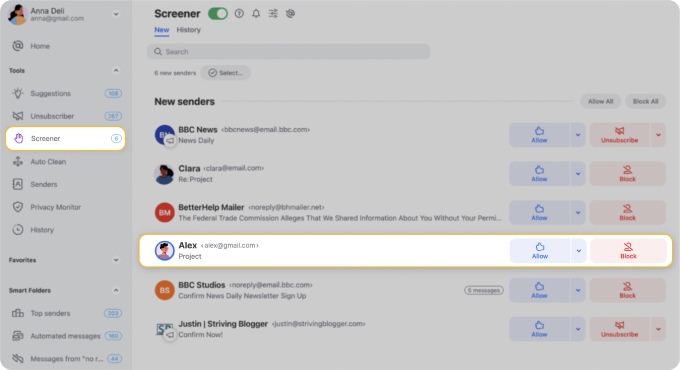
Screener: See all emails from unknown senders in one spot. Then, choose to Allow or Block them.
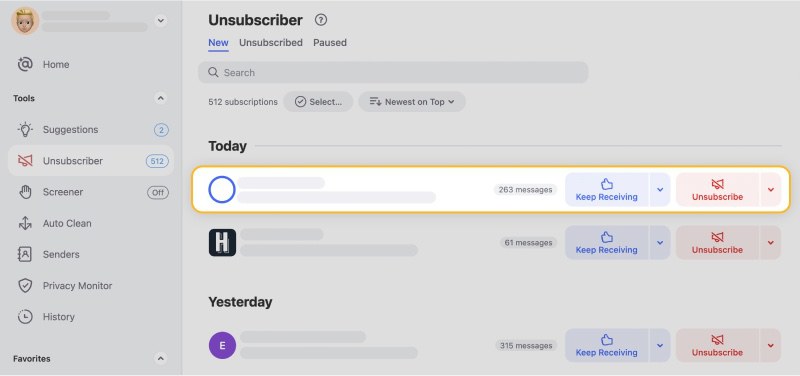
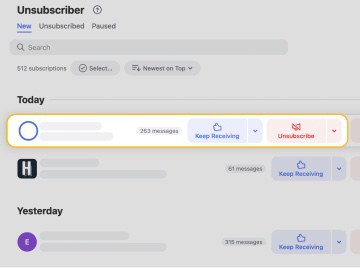
Unsubscriber: Remove yourself from mailing lists in bulk and easily resubscribe if you change your mind.
Each of the Clean Email features you see here, along with many more, are available for your Outlook account on all devices.
Related Posts
Outlook AutoArchive - FAQs
What is AutoArchive in Outlook?
AutoArchive helps manage mailbox space by automatically moving items to an archive location or deleting them after a specified period.
How do I automatically archive emails in Outlook?
To automatically archive emails in Outlook, go to File → Options → Advanced → AutoArchive Settings and configure your preferences. Alternatively, create a rule by right-clicking an email, selecting Rules → Create Rule, and specifying conditions for archiving.
Where are archived items stored?
Archived items are stored in a separate Outlook Data File (.pst) located at C:\Users\YourUserName\Documents\Outlook Files\archive.pst.
How often does AutoArchive run?
AutoArchive can be set to run at specified intervals, such as every 1 to 60 days.
Can AutoArchive be turned off?
Yes, you can turn off AutoArchive by clearing the "Run AutoArchive every n days" checkbox in the settings.
Does the Archive folder free up space in Outlook?
No, the Archive folder does not free up space. It simply moves emails to a different location within the same mailbox, which does not reduce the overall size of your mailbox.
What are the default aging periods for AutoArchive?
- Inbox and Drafts: 6 months
- Sent and Deleted Items: 2 months
- Outbox: 3 months
- Calendar, Tasks, Notes, Journal: 6 months


