


How to Add Attachment to an Email on iPhone
Adding an attachment to your email on iPhone is straightforward once you know where to look. The Mail app gives you several easy options, especially if you’re familiar with how to find and access email settings on iPhone.

Step-by-Step: Add an Attachment in the Mail App
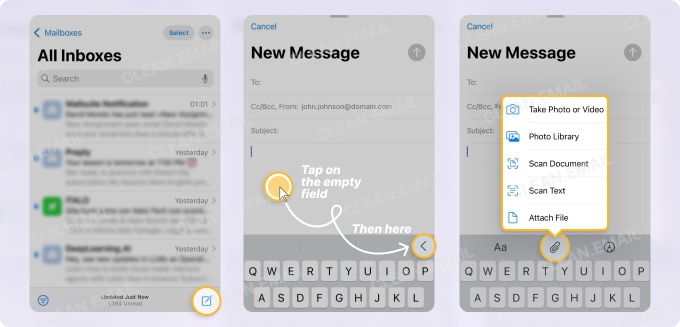
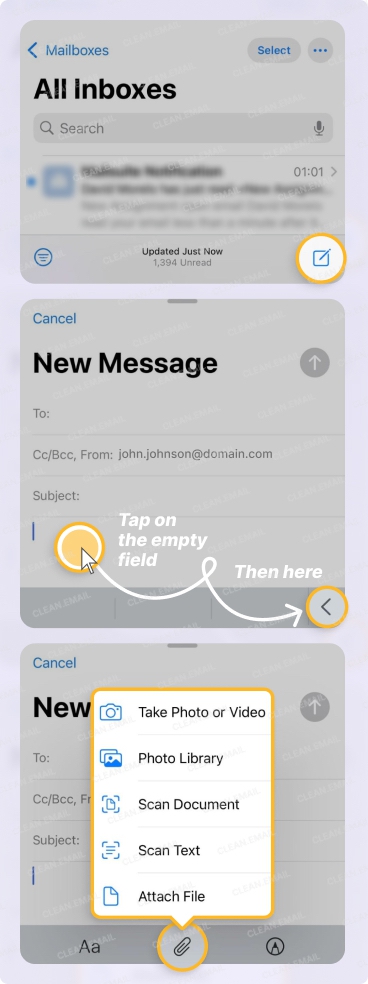
- Open the Mail app on your iPhone.
- Tap the compose icon to start a new email.
- In the message body, tap the screen to bring up the formatting toolbar.
- Tap the gray arrow on the right-hand side of the toolbar to see more options.
- Tap the paperclip icon (to attach files) or the photo icon (to attach images or videos).
- From here, you can choose to:
- Take Photo of Video: Capture a new image or video on the spot and attach it directly to your message.
- Photo Library: Select content directly from your iPhone’s photo library.
- Scan Document: Use your iPhone camera to scan a physical document, which gets automatically saved as a PDF and can be added to an email.
- Scan Text: Use your camera to scan printed or handwritten text, which is then inserted into the email as editable text.
- Attach File: Browse your device’s storage, iCloud Drive, or other connected services like Dropbox or Google Drive.
- Tap on the file or image you want to attach. It will be added to your message immediately.
This method works across most versions of iOS and is the quickest way to attach nearly any kind of file when using Apple Mail on your iPhone.
How to Use an iPhone to Add an Attachment to an Email Reply
Adding attachments to new emails is straightforward enough, but what about the process for adding attachments to email replies?
Step-by-step: Reply to an email with an attachment
- Open the Mail app and tap the conversation or message you want to respond to.
- Tap Reply.
- In the message window, long-press the body of the email.
- A formatting menu will appear. Tap the gray right arrow to reveal more options.
- Choose either:
- Take Photo of Video: Capture a new image or video on and insert it into your reply.
- Photo Library: Pull images or videos from your photo library.
- Scan Document: Use your iPhone camera to scan a physical document, which is saved as a PDF and added to your message.
- Attach File: to browse and attach files from the Files app or cloud services. You can use this if you need to know how to attach a document to an email on iPhone.
- Select the file or image you want to attach, and it will be inserted directly into your reply.
💡 This method is especially useful when responding to ongoing conversations that require documents or additional context. It also comes in handy when you need to use your iPhone to attach an email to an email in your reply.
How to Add a Photo as an Attachment on iPhone Email
Photos on iPhone can be attached or embedded. In most cases, though, they’ll still function as attachments when sent. To understand how to add a photo as an attachment on iPhone email, know that the difference is visual. Embedded photos appear inline, while traditional attachments show up as files.
📌 To add one, open the iPhone Mail app. Go through the process described in the guide above. Pick an image from your Photos app and it’ll appear in the message body.
💡 If you need help with storage limits when sending images, here’s how to send large files via Gmail without hitting the cap.
How to Attach File to Email on iPhone in Gmail
The Gmail app on iPhone has its own built-in file picker, so you won’t be using the standard iOS gestures. You can make it your main email portal when you change the default browser and email app on Mac, iPhone, and iPad.
Here’s how to attach file to email on iPhone through Gmail:
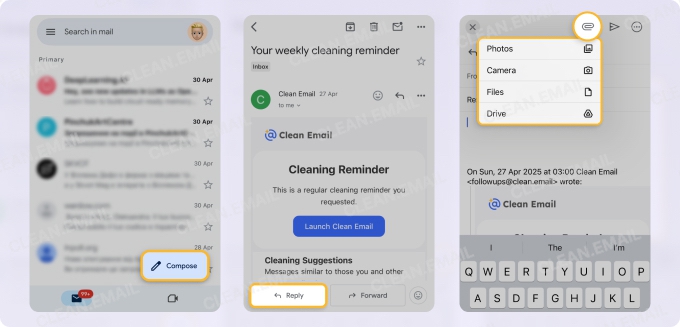
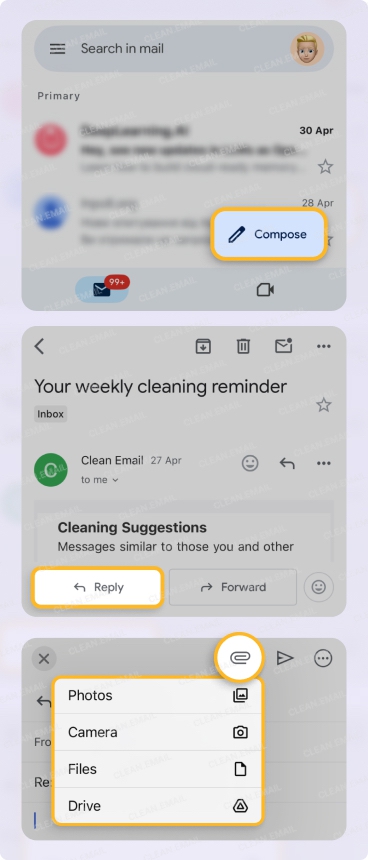
- Open Gmail, then tap Compose or Reply, depending on the type of email you want to send.
- Tap the paperclip icon.
- Choose from:
- Photos (from your photo library)
- Camera (take and attach a new photo or video)
- Files (browse local or cloud storage)
- Drive (attach files from Google Drive)
📌 Even if photos appear inline, they’re treated as standard attachments.
💡 If your inbox feels cluttered after sending and receiving so many emails, Clean Email can help. Features like Unsubscriber and Auto Clean reduce noise so you know how to attach a file to an email on iPhone, especially when trying to delete Gmail attachments for space.
📌 Learn how to find, resend, or delete unsent emails on iPhone here.
How to Add Attachments to Outlook Emails
Outlook’s iPhone app handles attachments a bit differently than Mail or Gmail. Here’s how to add an attachment to an Outlook email on iPhone:
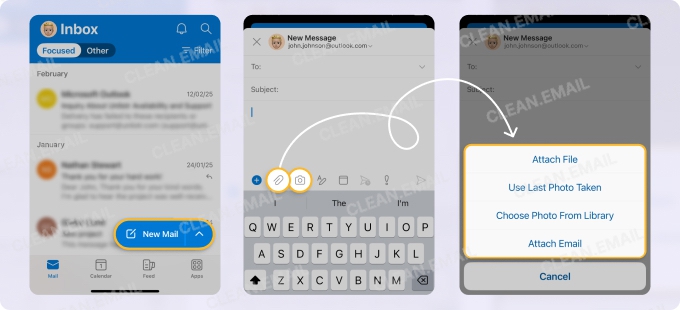
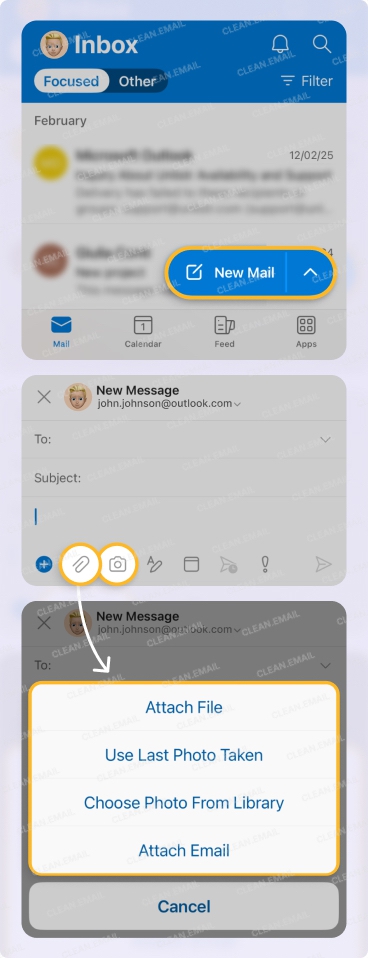
- Open Outlook and tap New Mail.
- Tap the paperclip icon. Choose from:
- Attach File
- Use Last Photo Taken
- Choose Photo From Library
- Attach Email
- Instead of the paperclip, you can tap the camera icon and choose to:
- Capture a document
- Take a photo
- Capture a whiteboard
- Select a photo from Media Library
- Select your file and send your email.
You can use the same steps when replying to emails. And if you’re regularly hitting size limits, here’s how to increase the Outlook attachment limit so large files won’t bounce. If you’re wondering, “Why am I not receiving emails on my iPhone?” it’s best to also check your phone storage to see if you’ve hit the storage cap.
How to Attach a Scanned Document to an Email on iPhone
Scanned documents can be sent directly from the Mail app or Files app. Here’s how to attach a scanned document to an email using an iPhone:
In Mail:
- Tap the email body → gray arrow → Scan Document.
- Capture your doc using the iPhone camera.
- Tap Insert to add the scan as a PDF.
In Files:
- Open the scanned document.
- Tap the share icon.
- Choose Mail or Gmail to send it.
💡 It’s a fast way to send receipts, forms, or handwritten notes. If you regularly send time-sensitive items, don’t forget to delete unsent emails that may be sitting in your drafts.
Manage Emails with Attachments in Clean Email
If you send and receive attachments often, your inbox can quickly fill up with large emails. Over time, this takes up storage space and may even affect your ability to send or receive new messages.
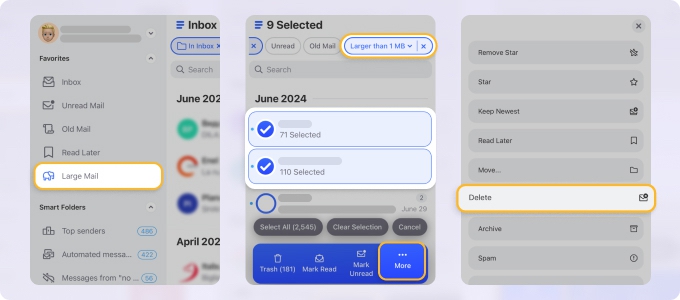
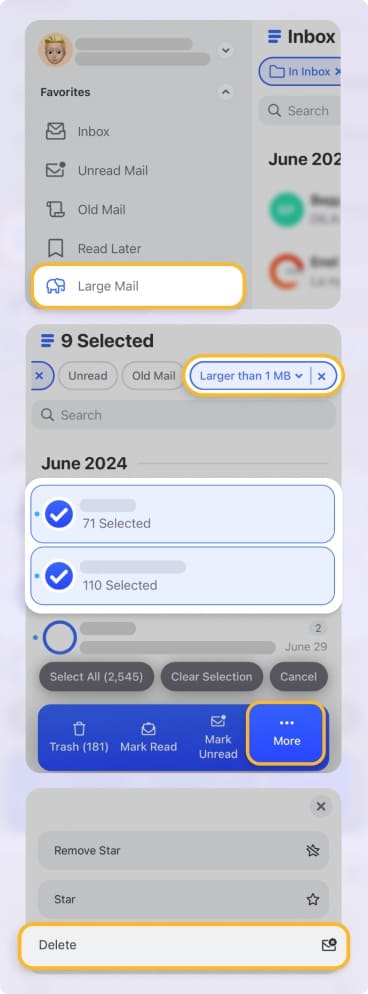
Clean Email helps address this by focusing on bulk email management and advanced filtering. Its Large Mail folder highlights the biggest emails in your account, which are often messages with attachments, so you can quickly review and remove what you no longer need.
As your inbox grows, finding specific threads or keeping your mailbox within limits can become more time-consuming. The tool’s powerful features automatically organize your inbox into easy-to-navigate categories, so you can quickly jump to the exact conversation that contains an attachment.
Clean Email is available not only on iPhone but also on macOS and via the web, so you can manage your inbox from whichever device you use.


