


Outlook Categories Make Inbox Management Easier
Sometimes, it’s hard to organize email in Outlook when you have hundreds of messages flooding your inbox. Did you know there’s a better way to sort messages without a ton of effort? And it is by using categories in Outlook.
If you learn how to categorize emails in Outlook, your inbox will turn into a color-coded system which is easy to sort. Those colorful labels will let you move messages elsewhere or delete them from your inbox. However, you first need to learn how to add and edit categories in Outlook so you can take advantage of them.


Outlook Categories vs Folders
Many users know that there are lots of ways to customize Outlook. In fact, this mail provider offers three tools that help you sort Outlook messages: folders, categories, and flags.
Unfortunately, many people get confused about the differences between folders and categories. Since each of these organizational tools works differently, it’s important to know which option makes the most sense for each message in your inbox.
Outlook folders are a way to organize and store messages. When you create folders in Outlook, you can organize emails by moving them out of your inbox and into designated folders. To locate a message later, open the appropriate folder and either scroll through the contents or perform a search within the folder.
Meanwhile, Outlook categories are a way to visually organize, or color code, messages within your inbox. When you assign a category to a message in Outlook, it doesn’t leave your inbox. Instead, they are just assigned a color label that makes them easy to see.
Using categories in Outlook makes it easier to search your inbox by filtering messages by type, helping you locate specific emails more efficiently.
How to Add Categories in Outlook
One of the best Outlook tips and tricks you can master is how to add categories in Outlook. Once you create them, you can use these categories to group messages and locate them directly in your inbox, just like you can with categories in Gmail.
But first, you need to know how to add your own categories in Outlook on the web, desktop, or mobile.
Web
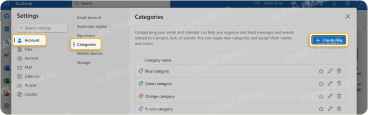
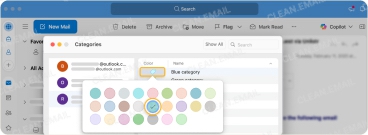
- Log in to your inbox at https://outlook.live.com/.
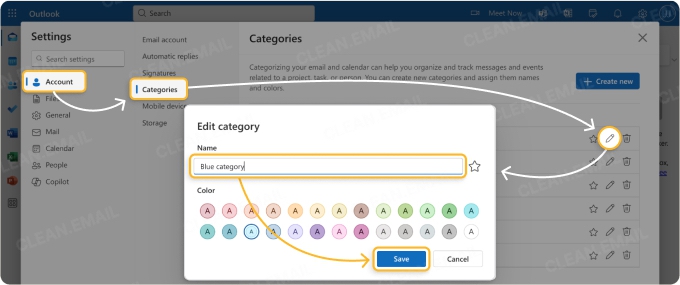
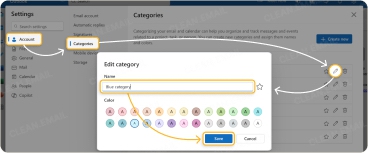
- Go to Settings, then select Account → Categories.
- Press + Create New at the top of the category list.
- Name the category, select a color for it, then press Save.

Desktop Client
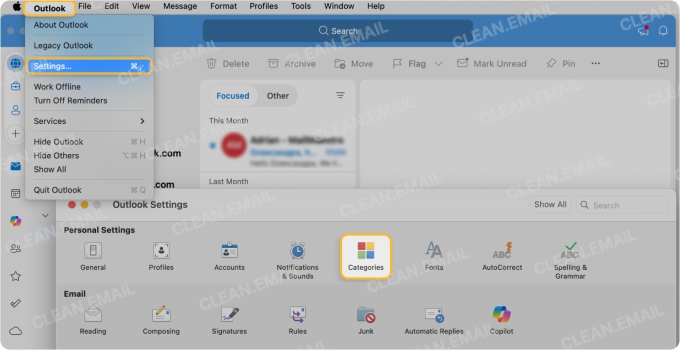
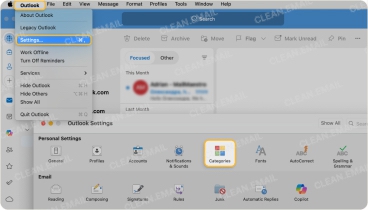
- Open the Outlook desktop app.
- Go to Settings and select Categories.
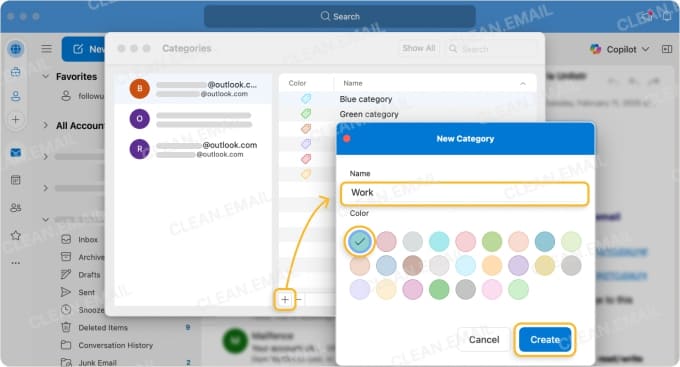
- Click ✚ to add a new category, then enter a name, and select a color for it.
- Press Create to save.

Mobile (Android and iOS)
⚠️ The official Outlook mobile app does not support full category management. You cannot create new categories, and rename or delete the existing ones directly from the mobile app.
You can only view and filter by existing categories if they were previously created on desktop or web, or assign the existing categories to emails in your inbox.
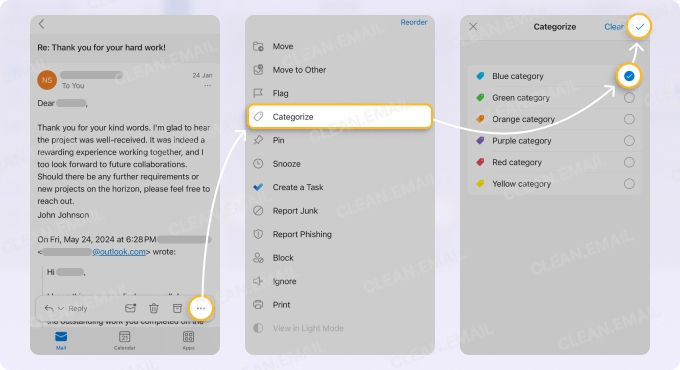
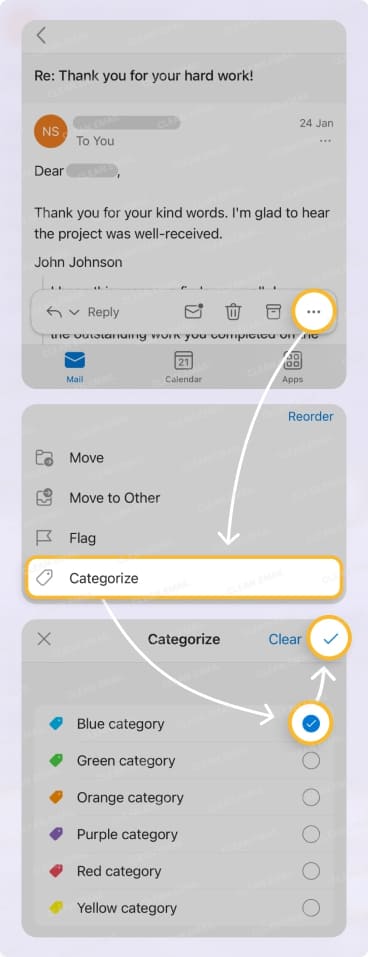
📌 Note: The Categorize option only appears if categories have already been defined via desktop or web Outlook.
Mobile (using Clean Email)
The Clean Email app offers Smart Folders, which function similarly to categories in Outlook. A major advantage of Clean Email is that Smart Folders are fully available and functional on iOS and Android mobile devices, with no limitations.
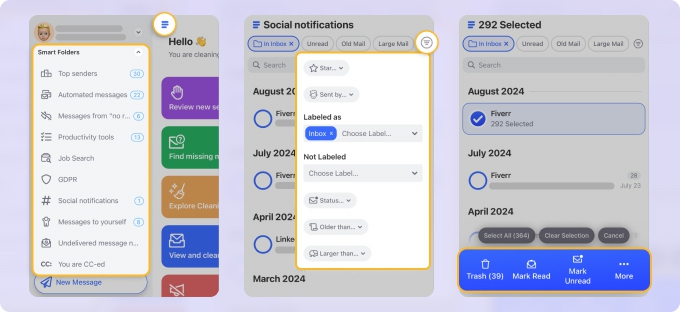
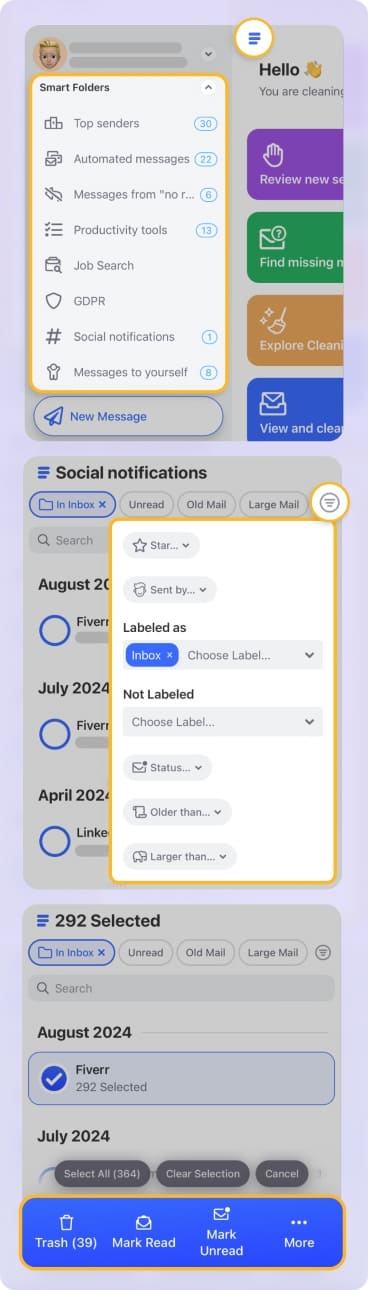
While Outlook categories require manual assignment, Clean Email’s Smart Folders are automatically generated based on email metadata, such as sender, subject patterns, and content type.
For example, messages from social networks, finance services, or software subscriptions are grouped into predefined Smart Folders like Social Notifications, Finance and Insurance, or Productivity Tools.
💡 This system saves time by eliminating the need to manually tag or move emails. You can immediately view all related messages in one place without needing to create more filters or rules.
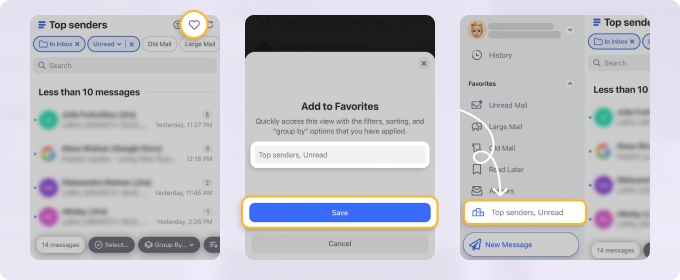
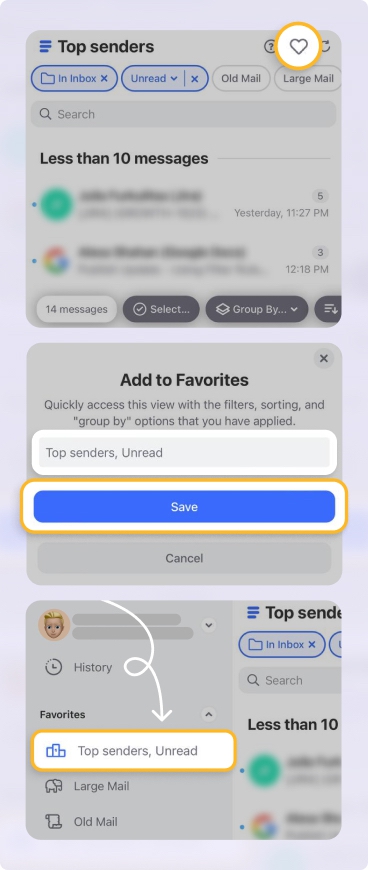
However, if you want to, you can create a custom view using any combination of filters (e.g., sender, subject, age, read status), and then save it to Favorites. This acts like a dynamic, personalized category—except the app automatically filters emails for you based on the conditions you set.
How to Edit Categories in Outlook
As you use Outlook, you may find that you need to edit existing categories in Outlook to make them better for your organizational needs. Luckily, you can edit Outlook categories just as easily as you add them on the web, desktop client, or mobile app.
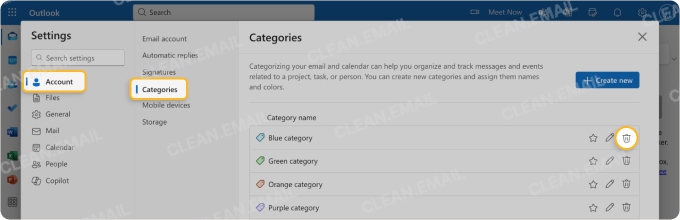
Web
- Log in to your inbox at https://outlook.live.com/.
- Go to Settings, then select Account → Categories.
- Locate the category you want to edit, then press the Edit category pencil.
- Make the changes you’d like to the name and color, then press Save.
Desktop Client
- Open the desktop client application.
- Go to Settings → Categories.
- In the Categories name list, select the category you want to edit and select Rename.
- Make the changes, then press OK.
📌 Note: The Microsoft Outlook client for Mac does not support editing category names. You can only change the color or delete the category and create a new one with a different name.

Mobile
As mentioned above, you can only assign existing categories in the Outlook mobile app, but you cannot edit them, or perform other actions.
How to Delete Categories in Outlook
If you find that you no longer need a category you’ve created, you can go into the Categories section and delete the ones you don’t want on the web or desktop app.
Web
- Log in to your mail account.
- Go to Settings, then select General → Categories.
- Locate the category you want to edit, then press the Delete button (trash can).
- The category will then disappear.
Desktop Client
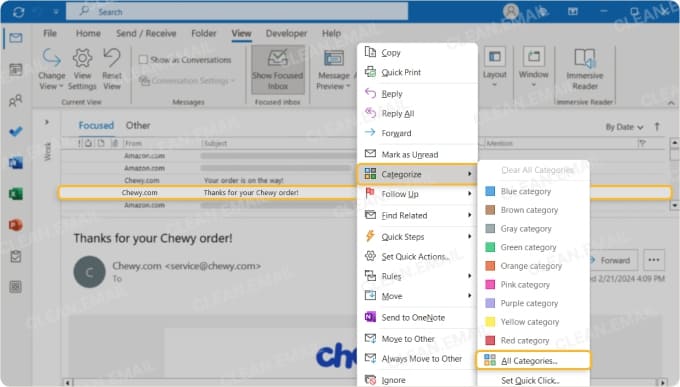
- Open the desktop application.
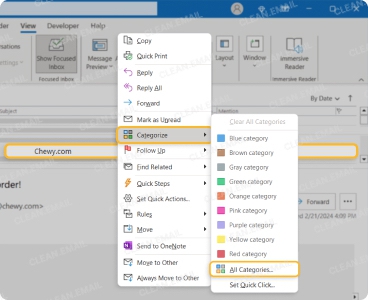
- Right-click any email and select Categorize, or choose the option in the top ribbon, then select All Categories.
- Select the category you want to delete, and then select Delete.
Best Practices for Using Categories in Outlook
- Use clear names for new Outlook categories (e.g., "Finance," "Clients") to keep labels meaningful.
- Assign distinct colors to each category to make messages easy to spot.
- Avoid clutter by limiting the number of categories in Outlook.
- Use filters and search with categories in Outlook to locate emails quickly.
- Review categories regularly and remove any you no longer use.
Using categories in Outlook this way keeps your inbox organized and efficient.
How to Use Categories in Outlook - FAQs
What is the purpose of Outlook categories?
Outlook color categories let you assign colors to messages so they stand out in your inbox. It also makes it easier to search and locate items when they have a category label.
How do you effectively use categories in Outlook?
You should use categories in Outlook to label messages with similar components so they are sorted in a way that makes sense to you.
How to rename categories in Outlook?
You can easily rename them by navigating to the Categories section of your inbox settings. The exact location of this varies based on which version of Outlook you use.
Should I use categories or folders in Outlook?
Categories and folders serve different functions within Outlook. You can use both, since categories keep messages in a folder, whereas folders provide a new location to move messages.
How to enable categories in Outlook 365?
To enable categories in Outlook 365 on the web, go to Settings → Account → Categories, then click + Create new to add and manage categories. On the desktop app, go to the Home tab, click Categorize in the ribbon, then select All Categories. From there, you can create, rename, or assign categories.


