


Start with the Gmail Security Checkup
For a solid way to better protect your account, start with the easily-accessible built-in Gmail security features. By reviewing your security dashboard, you can access a host of tools and configurations in one spot.
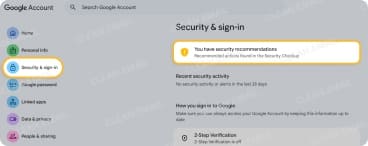
To review your Google security options:
- Click your profile icon on the top right.
- Choose Manage your Google Account.
- Select Security & sign in on the left.
📌 Tip: To see a summary of suggestions, you can also click You have security recommendations at the top, if available, or go directly to your Google Security Checkup dashboard.

You can then adjust the following Gmail security settings:
Recent Security Activity: Choose a device or select Recent security activity to review actions by date, time, device, location, and operating system.
- You can then pick an activity and sign out if you don’t recognize it.
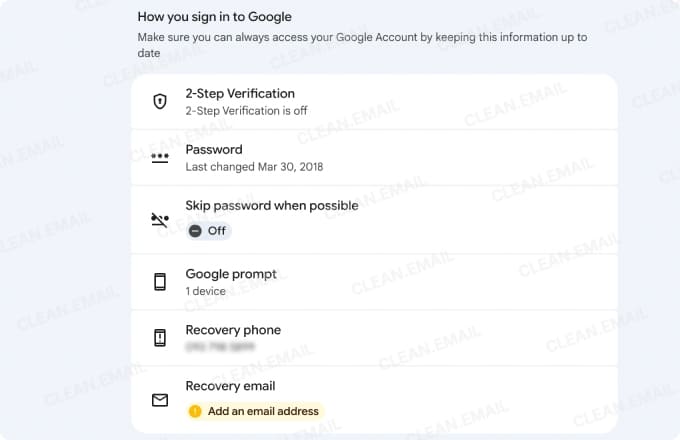
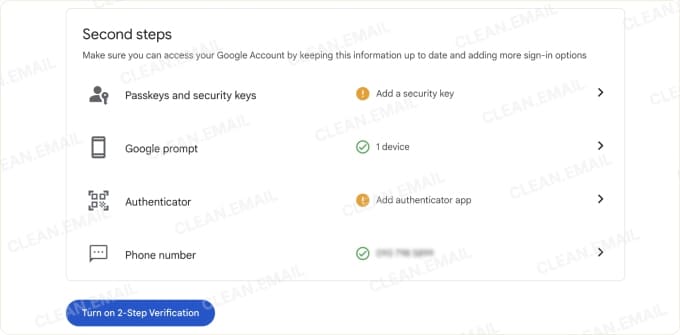
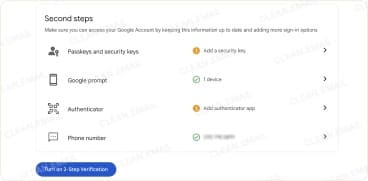
How You Sign In to Google: This section includes several settings for 2-step verification status, passkeys and security keys, password, skip password, Google prompt, and recovery details.
- Select a setting in the list to review and adjust. You can also choose an item to add to your sign-in options such as recovery contacts, authenticator, and a 2-step verification phone.

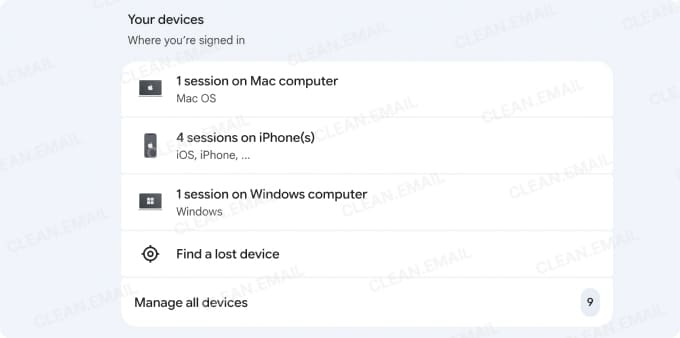
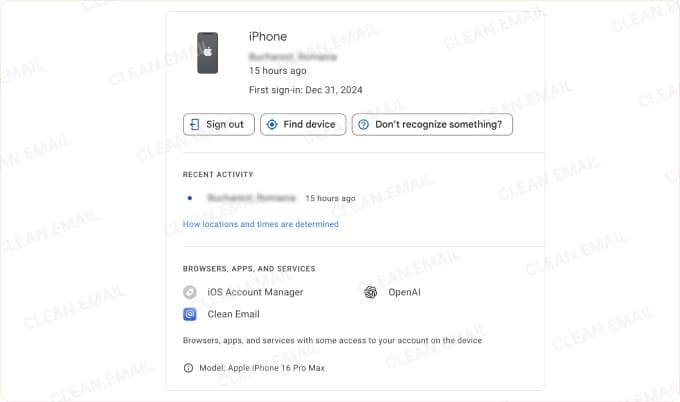
Your Devices: You’ll see all devices where you’re signed in to your Google account. Choose a device to view all details including operating system, location, browser or app, date, and number of sessions.
- You can also select Find a lost device to check for security activity, find, lock, or call the device, and sign out.
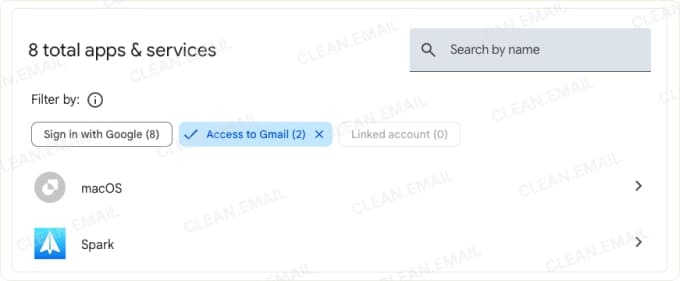
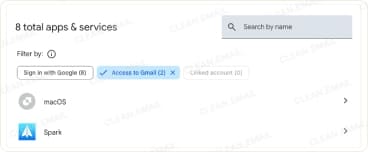
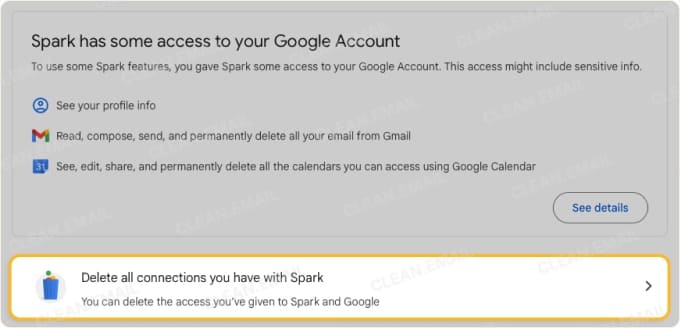
Your Connections to Third-Party Apps & Services: Pick an app or service to review the details such as when you gave access, the web address (if applicable), the option to stop using Sign in with Google, and the ability to delete all connections.
- You can also choose See all connections to review all connections, filter the list, and search by name.
Additional items: You may see more items at the bottom of the security screen for things like enabling enhanced safe browsing and a password manager.
Next, we’ll go into more detail on some of those items you see above.

Two-Step Verification — and Which Method Actually Matters
Two-step verification (2SV) adds a layer of email security to your Gmail account. With it, you’ll be required to confirm your identity in order to log in which can keep unauthorized people from accessing your data.
To enable 2SV for your Google account:
- Click your profile icon on the top right.
- Choose Manage your Google Account.
- Select Security & sign in on the left.
- Pick 2-Step Verification on the right.
- Choose one or more methods and click Turn on 2-Step Verification.
There are a handful of ways to use 2SV to secure your account:
- Google Prompts: Notifications sent to your mobile phone asking you to confirm your identity.
- SMS codes: Six-digit codes sent via SMS to your mobile phone you can add when you sign in.
- Apps like Google Authenticator or Authy: Time-sensitive codes generated by an app on the fly to be entered at login.
- Passkeys: Account authentication with biometrics such as a fingerprint or facial ID.
- Hardware security keys: Keys you can purchase (YubiKey) that use cryptography to create a secure sign-in with a physical action like a tap or button press.
Each method has its benefits and level of security. For example, SMS codes are simple, but are susceptible to SIM swap attacks, so they aren’t as secure as a passkey which requires biometrics.
For a solid mix of convenience and security, an authentication app covers most standard Gmail users. However, for high visibility accounts, you should consider using a hardware security key.
Audit and Revoke Third-Party App Access
One overlooked security step is checking access you’ve granted to third-party apps and services. This is especially important as things change over time --- you may discover that you’ve given permissions to an app you’ve forgotten about.
To review the Google account permissions you’ve granted:
- Click your profile icon on the top right.
- Choose Manage your Google Account.
- Select Linked apps on the left.
- Pick the Access to filter at the top and choose a service such as Gmail.
Review the list of apps and services and select one for more details.
You can then pick one of the following:
See details to review the access you’ve provided to your account; for example, reading, composing, sending, and deleting emails in Gmail. You’ll also see when you granted access and can remove it or report the app if you see something suspicious.
Delete all connections you have with your Google account and the app or service.
What to look for: Apps or services that you did not grant permissions to or those that require broad access to your account.
If you notice one of the above or spot an app or service you no longer use, select Remove all access to revoke the permissions. Note that this does not delete the data you’ve shared with the app or service; contact them directly or visit their website to request deletion of your data.
Check Account Activity and Set Up Suspicious Sign-in Alerts
Keeping an eye on your account activity is another Gmail account security best practice. With simple checks for suspicious activity, you can stop potential hackers in their tracks.
To check your Google account activity:
- Click your profile icon on the top right.
- Choose Manage your Google Account.
- Select Security & sign in on the left.
- Scroll to Your devices on the right.
- Pick a device or select Manage all devices to review them all.
You’ll then see:
- Each device with the location, date, operating system, and app where you logged in.
- Your current session.
- Inactive devices.
When you select a device, you can:
- Review the details of your sign in again.
- See the location of recent activity and when it was.
- View the browsers, apps, and services with your account access on that device.
- Sign out of the device.
- Find the device (mobile).
- Report unrecognized details.
What to look for: Devices you don’t recognize, activity that wasn’t yours, and sessions on a lost device.
If you see any of the above, you can select Sign out to remove access to your Google account on that device or Don’t recognize something? to sign out of your account on that device.
📌 Tip: Learn what to do if your email is hacked.
Recovery Email and Phone — Your Safety Net
Using a recovery email and/or phone number gives you a way to recover your account should it become locked or hacked. This basic security method helps protect your account, emails, and overall online presence.
With these details, you can recover your account, if necessary, by receiving a code via email or phone and then providing it to Google to reset your password and regain access.
What to look for: Outdated or missing recovery details such as your phone number, email address, or security question.
If you need to add or change a recovery detail, select it to enter the information and keep in mind that you may be asked to verify it.
Google Advanced Protection Program
If you’re in a position of high online visibility, you can also enroll in Google’s Advanced Protection Program. The free program requires a security key/passkey to log in and protects your account from phishing and other threats.
What it does: It restricts access to sensitive data for third-party apps, provides enhanced scans for downloads and Google Play app installations, and uses stringent account recovery with an improved identity verification process.
Who it’s for: The program is intended for those at high risk of being targeted for online attacks such as business executives, journalists, activists, and election personnel.
While Google’s Advanced Protection Program is ideal for those at a high risk, it’s important to note some trade-offs. You cannot access your account on a new browser or device without your security key/passkey, some apps that require access to your data may be blocked, and the account recovery process is much stricter.
Clean Email as the Last Layer
Now that you know how to protect a Gmail account with built-in tools, consider Clean Email for one final safeguard. This email management app addresses the inbox-level risk layer reducing exposure from emails like newsletters, promotional messages, and those from forgotten or unknown senders.
While not a security tool per se, Clean Email helps decrease the amount of risk with fewer senders accessing your email and thus, fewer phishing vectors for concern.
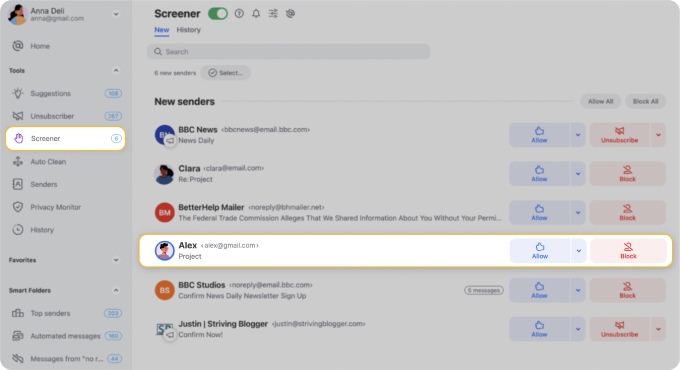
Screener isolates emails from unknown senders in one spot. You can review and either Allow or Block messages from senders you don’t know before they reach your inbox.
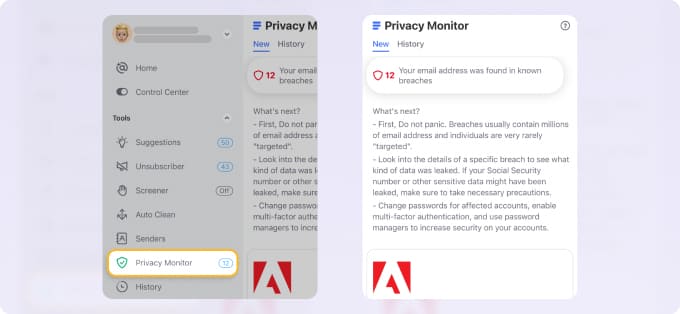
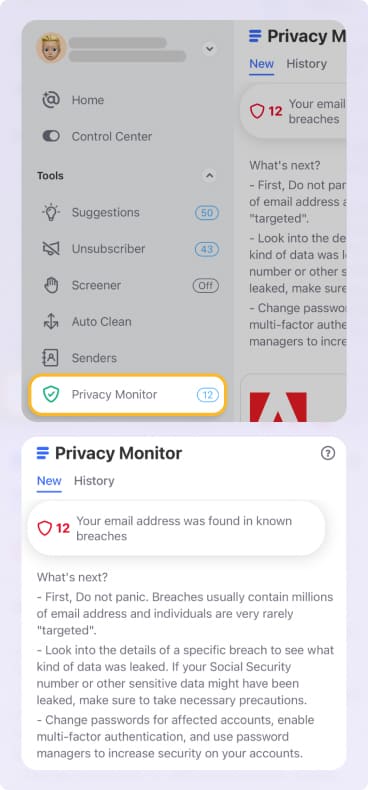
Privacy Monitor keeps you abreast of security incidents involving your email address. It shows you the number of identified occurrences, details about known data breaches, and a history of all previous incidents.
Clean Email is committed to the privacy and security of its users and is available on desktop and mobile for any IMAP service provider.


