


How Clean Email Helps Where Setting Changes Can't
While knowing where mail settings on iPhone are located is an important piece of knowledge, many common problems, such as overflowing inboxes, limited storage space, and an endless stream of subscription messages, aren't solved by tweaking options alone.
The real solution for many mail-related headaches is better inbox management and organization. That’s where Clean Email—a specialized inbox organization tool—comes in to provide features that go far beyond what your iPhone's native email settings can offer, including:
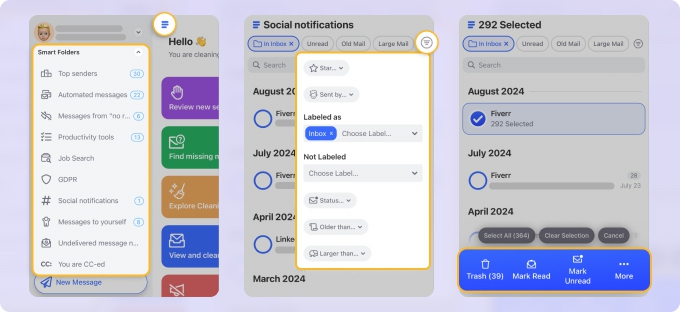
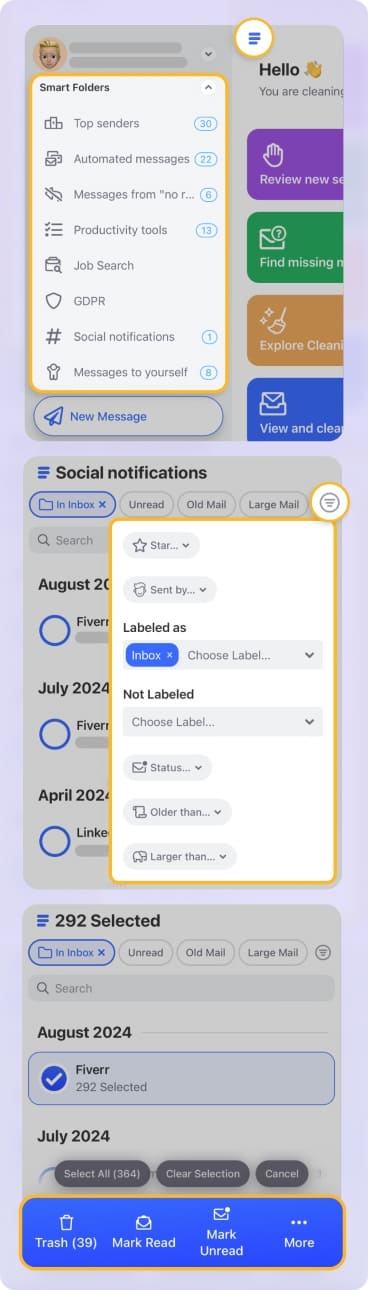
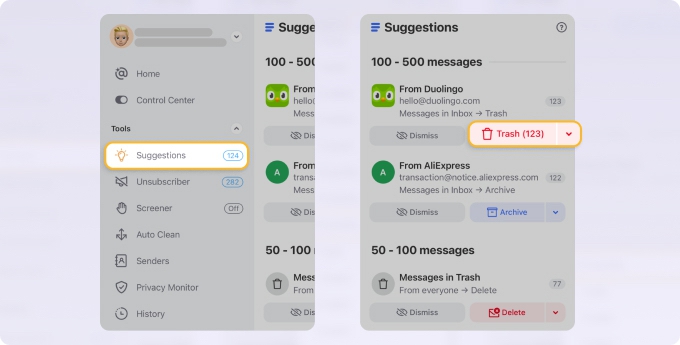
- Smart Folders automatically group messages from categories like Social notifications, Ride sharing, Online shopping, and more to make it easier to clean up related messages in one go. You don’t even need to adjust any settings; everything is ready for you to review and take action.
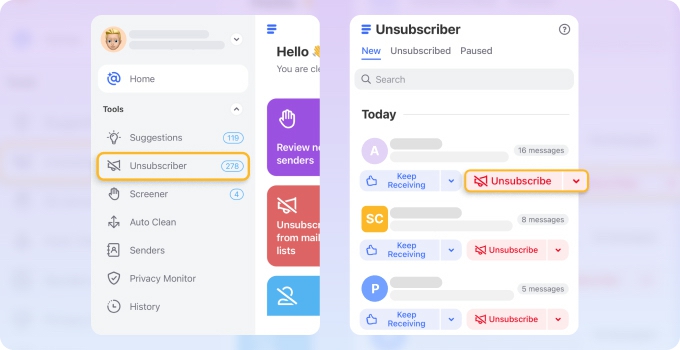
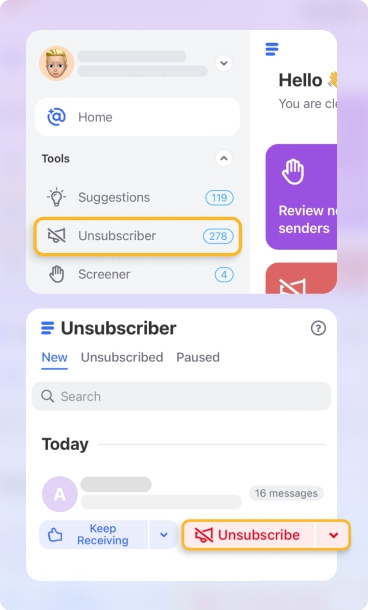
- Unsubscriber feature to quickly remove yourself from unwanted newsletters and promotional lists regardless of if their senders honor unsubscribe requests and generally play by the rules.
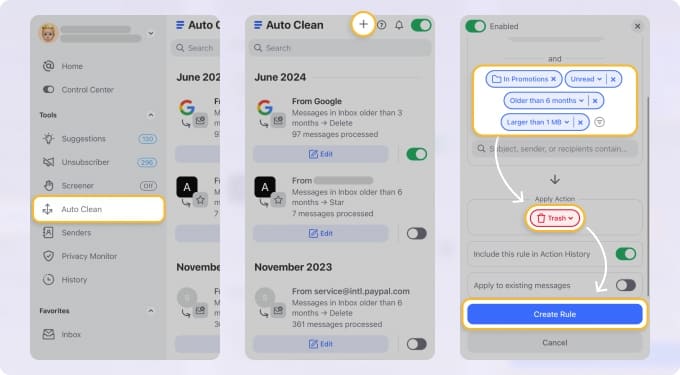
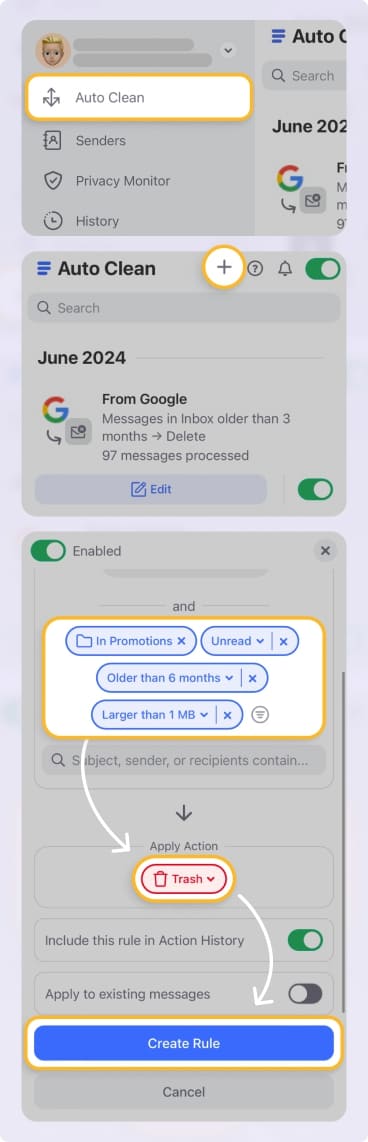
- Auto Clean rules that make it possible for you to automatically label messages from specific senders, archive messages you don't need in your Inbox, delete old unread promotional emails, or star messages you can't afford to miss.
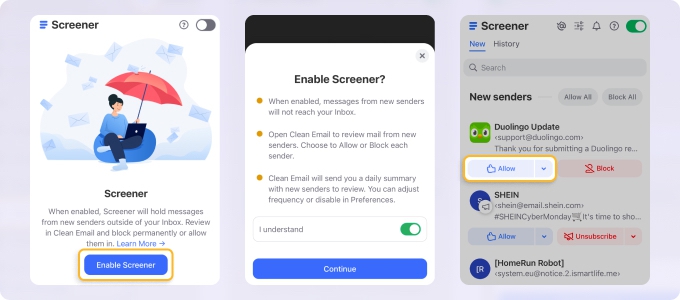
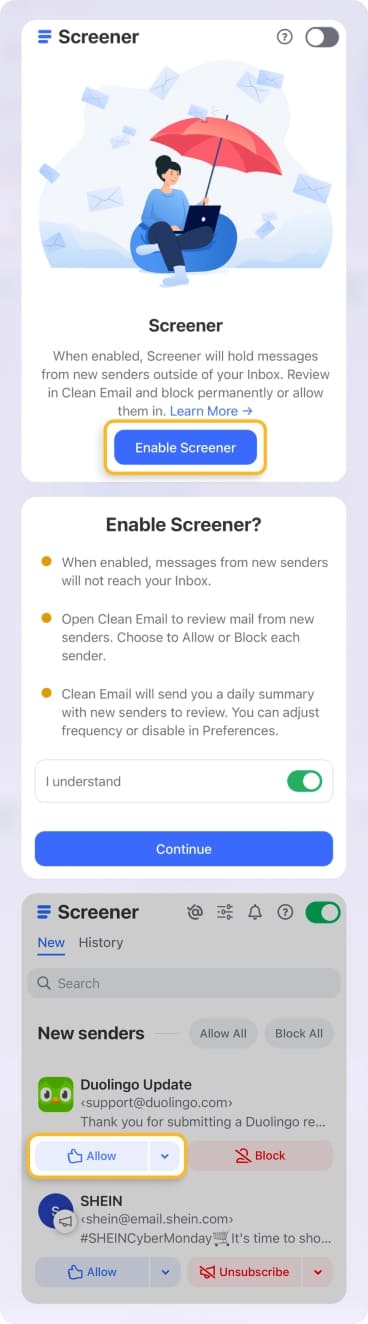
- Screener that filters messages from unknown senders before they reach your inbox, letting you review and decide which ones deserve your attention.
- Cleaning Suggestions that analyze your email habits and provide personalized recommendations to help you maintain a clutter-free inbox with minimal effort.

With tools like these, Clean Email gives you real control over how your inbox behaves, and they're all so intuitive that you won't need a guide to put them to good use, which can't be said about iPhone email account settings. Just sign in with your existing credentials on your iPhone, iPad, Mac, or via the web app, and let Clean Email do all the heavy lifting for you.
💡 Note: Clean Email works with Gmail, Yahoo, AOL, iCloud, Outlook, and any other provider that supports IMAP—including live.com, GoDaddy, Verizon, SBCglobal, att.net, Cox, Windstream, Spectrum, Charter email, Centurylink, Mediacom, Network Solutions, Hostinger, MSN email, TalkTalk, G Suite, Office 365, Hotmail, Xfinity, Comcast, Roadrunner, and more.

Where Is Email Settings on iPhone?
Whether you need to check your account details, change push notifications, or fix connection problems, you need to know where the email settings category is on your iPhone.
The only complication is that mail options are not all found in the same place. Some are located in the main Mail app settings, while others are buried within individual account configurations. To fully manage your mail, you'll often need to visit both sections.
iOS Settings App Mail Options
Here's how to get to general Mail settings in the Settings app:
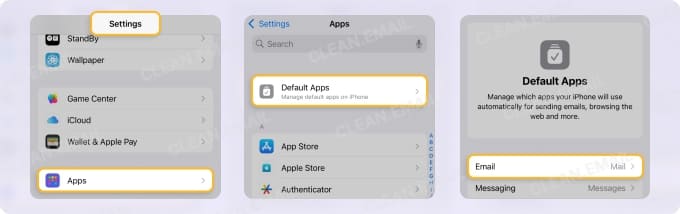
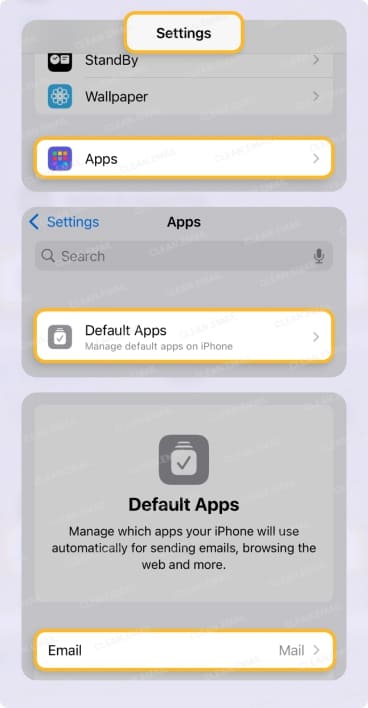
- Unlock your iPhone and tap the Settings app (the gray gear icon).
- Scroll down and tap Apps.
- Find and select Mail.
There, you can adjust global mail preferences that apply to all your accounts, including:
- Default email app: If you're using a third-party mail client like Outlook or Gmail and want to make it your default, go to Default Mail App (or Apps → Default Apps → Email), then select your preferred app. For example, I use Gmail, so that's what I've changed the settings to.
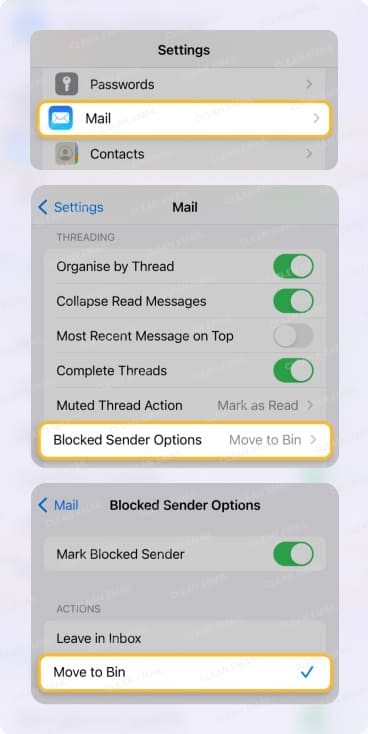
- Threading and message list options: Customize how your inbox is displayed and how message threads appear. To edit these preferences, go to Message List and/or Threading. You can choose to show To/Cc labels, change preview length, enable "Organize by Thread," or mute conversations you don't want to be disturbed by.
💡 Interestingly, the Threading section is also where you can edit your list of blocked contacts and choose how to handle messages from them (I move them directly to Trash, but you can also leave them in your Inbox).

- Undo send delay: Mistyped a message or changed your mind seconds after hitting Send? You can delay message sending to give yourself time to cancel next time. Head to Undo Send Delay at the bottom, then choose a time delay of 10, 20, or 30 seconds. For me, 10 seconds is enough, but I can see why someone might find it useful to set the delay to 30 seconds.
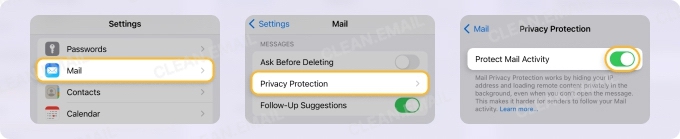
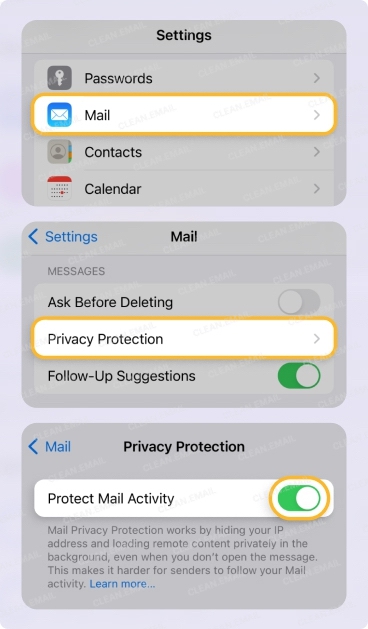
- Privacy protection settings: Control how remote content loads in mails and protect your privacy by going to Messages → Privacy Protection. This prevents senders from knowing when you've opened their emails and helps when iPhone mail network settings prevent content from loading by giving you options to load content privately or directly.
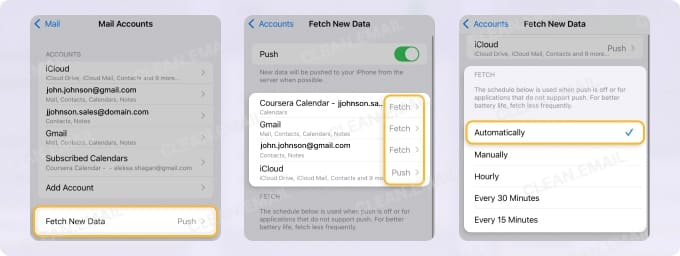
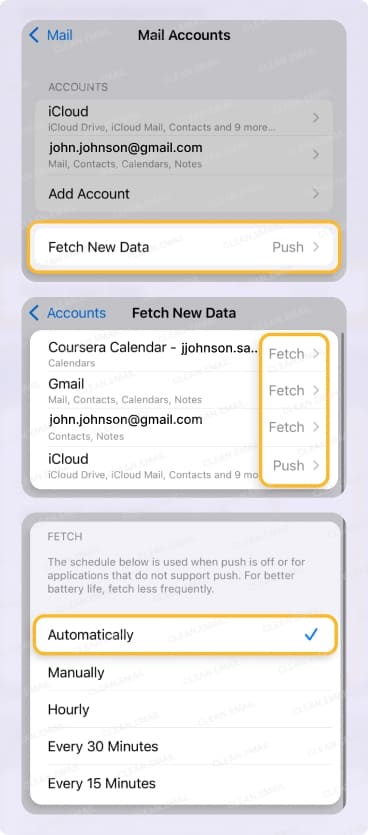
- Push and fetch settings: Change how frequently your device checks for new emails by tapping Mail Accounts → Fetch New Data. Here, you can change email push settings on your iPhone to determine whether emails arrive instantly (Push) or if your device checks on a schedule (Fetch) to conserve battery life and/or data, which is exactly what I did when I traveled across Eastern Europe a few years ago.
- Attachment handling: Manage iPhone email attachment settings by changing the options in the Composing category. For example, you can set Always for Include Attachments with Replies. This determines whether original files are included when you reply to messages with attachments.
- SSL settings for outgoing mail: Secure email connections rely on SSL (Secure Sockets Layer), especially for sending messages through your provider's SMTP server. To adjust these settings, go to Mail Accounts → select your account → Account → SMTP → tap your outgoing mail server → toggle Use SSL. The port number will automatically update to the secure port (usually 465 or 587), protecting your emails from potential interception.
Email App-Specific Settings
Beyond the iPhone's main Settings app, each mail app has its own set of configurations that control how that specific account functions and can be important for troubleshooting iPhone mail account setting issues.
Gmail users on iPhone can access the Gmail app options by following these steps:
- Launch the Gmail app.
- Tap the hamburger menu icon in the top-left corner.
- Scroll down and select the Settings option.
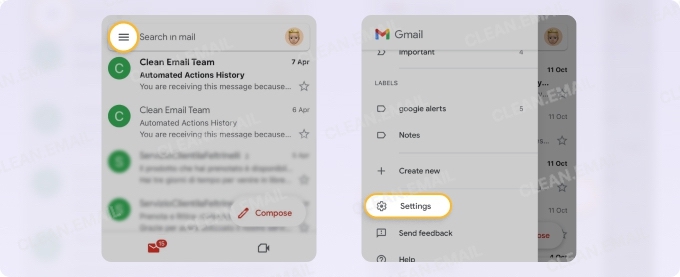
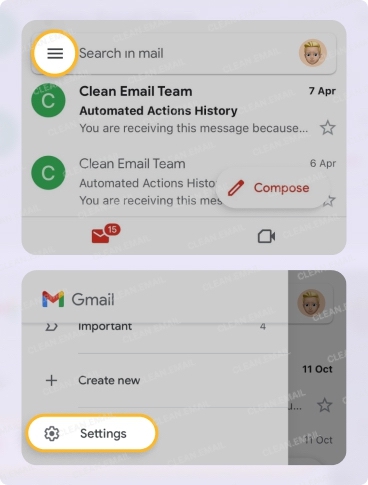
The Gmail app settings option allows you to configure everything from notifications to inbox layout to your mail signature.
Similarly, the users of the Outlook iOS app can access settings by following these steps:
- Open the Outlook app on your iPhone.
- Tap your profile icon in the top-left corner.
- Select the gear icon (Settings) at the bottom of the sidebar.
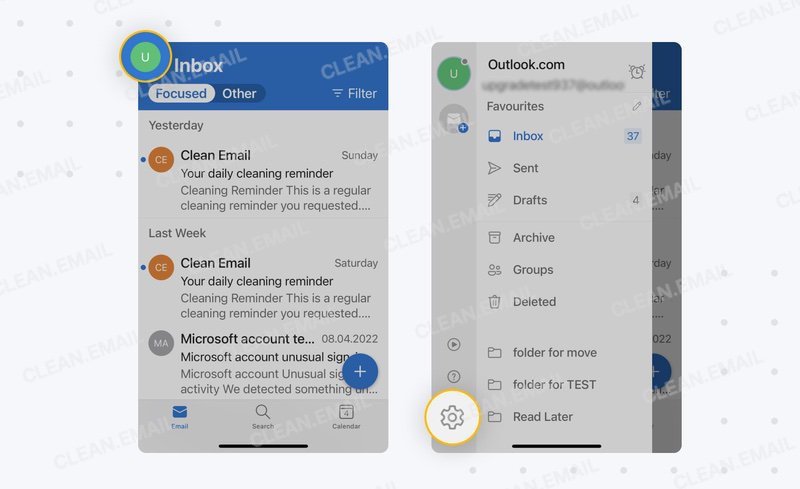
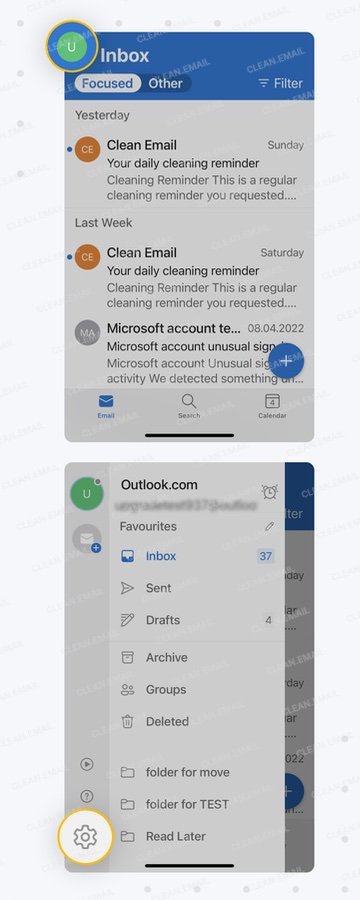
Here, you can adjust notification preferences, signature settings, focused inbox options, swipe actions, and much more.
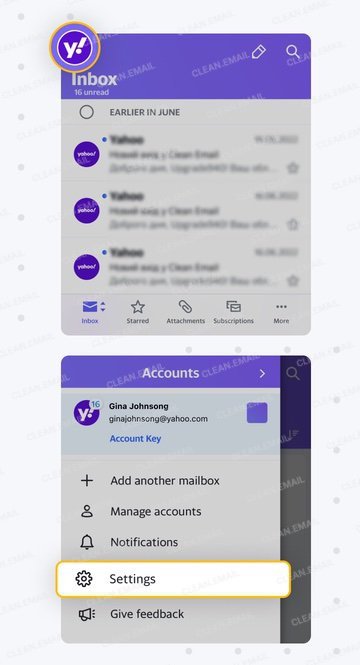
Finally, this is how Yahoo Mail users on iOS can access app-specific settings:
- Open the Yahoo Mail app.
- Tap on your profile picture or icon in the top-left corner.
- Select Settings at the bottom of the menu.
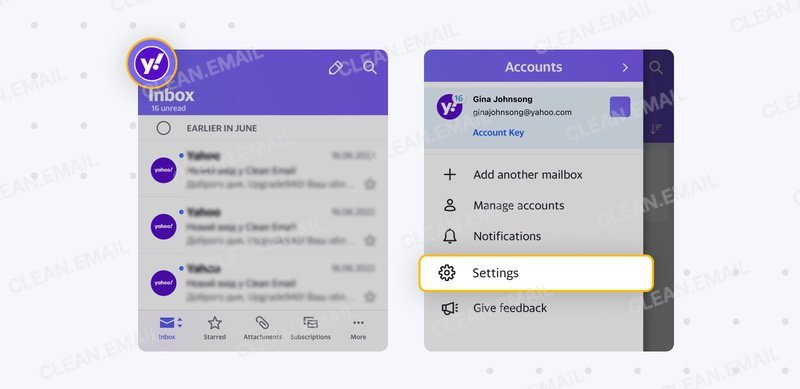
Once you're in the Settings section, you can manage your Yahoo accounts, change your security configuration, customize filters, pick a different theme, or block images, just to give a few examples.
The account settings access and change process follows similar patterns across most email providers. While specific options may vary, the navigation remains consistent on newer models like iPhone 16 and iPhone 15, as well as older devices like Apple iPhone 11, 12, 13, and iPad (keep in mind there are some minor differences between iOS 18 and earlier versions).
For detailed, provider-specific setup guides, check our comprehensive resources:
- AOL Email Settings
- AT&T Email Settings
- CenturyLink Email Settings
- Charter Email Settings
- GoDaddy Email Settings
- iCloud Email Settings
- Outlook/Office 365 Email Settings
- RoadRunner Email Settings
- Spectrum Email Settings
- Xfinity/Comcast Email Settings
- Yahoo Email Settings (also applies to Cox, which has migrated all email services to Yahoo)
Additional Mail-Related Settings on iPhone
In addition to app-based and account-level controls, there are a couple of important mail-related settings that can affect how you receive messages on your iPhone.
Sometimes, iPhone mail network settings prevent content from loading, especially when switching between Wi-Fi and cellular data, or when traveling. If you're having trouble loading images, downloading attachments, or sending/receiving messages, try the following steps:
- Go to Settings → Wi-Fi and make sure you're connected to a stable network.
- Next, go to Settings → Cellular enable Cellular data and check if Mail is enabled under Cellular Data Usage.
- Finally, you can also toggle Airplane Mode on and off to refresh all connections if you're experiencing sync issues instead of editing your iPhone email account settings.
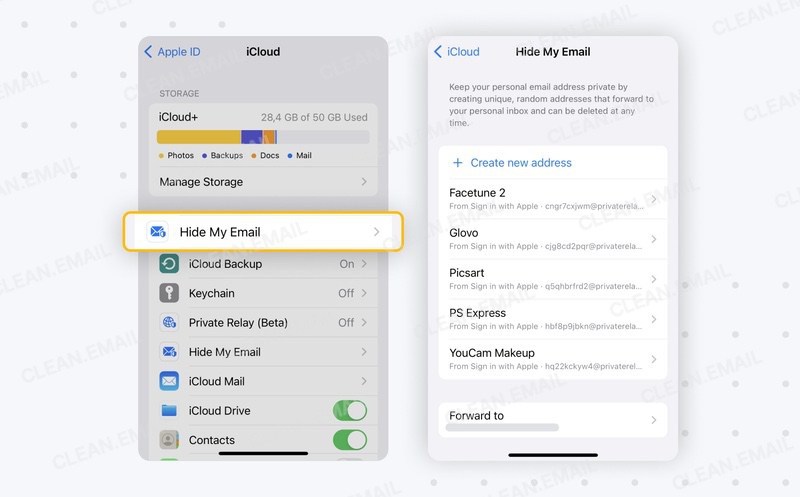
There are also Hide My Email settings on iPhone, which offer an excellent way to protect your privacy when signing up for online services by generating unique forwarding addresses that send mail to your real inbox without revealing your actual email address. To change these options:
- Open the Settings app on your iPhone.
- Tap your Apple ID name at the top of the screen.
- Select iCloud.
- Tap Hide My Email.
- From here, you can view all your random mail addresses, create new ones, or deactivate ones you no longer need.
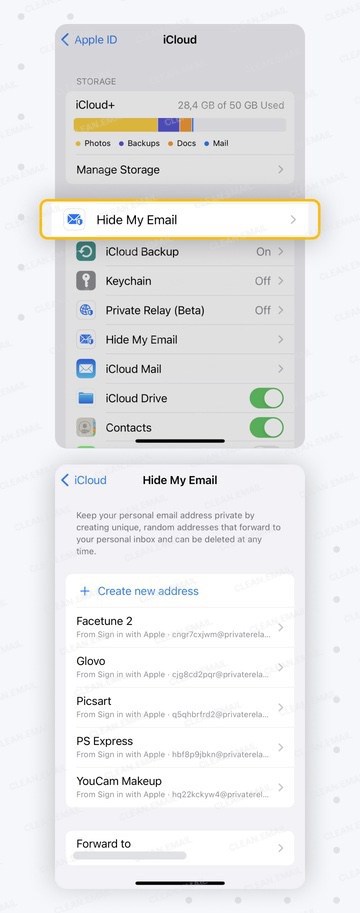
If you've deactivated a forwarding address by mistake, don't worry. Apple saves them in an Inactive Addresses section within the same Hide My Email settings. Just scroll down, tap the address, and choose Reactivate to start receiving mail again.
Wrapping It Up
Keep this guide bookmarked for those moments when you need to change email settings to solve a technical problem or customize your experience. Just remember that your email experience is determined by more than just your settings. It's also about how you manage your inbox and the tools you use to stay organized.
While properly configured settings create the foundation, services like Clean Email provide ongoing maintenance that keeps your digital communication flowing smoothly.
FAQs
What is SSL on iPhone email settings?
SSL (Secure Sockets Layer) encrypts your email data during transmission to protect it from interception. To enable SSL on iPhone, go to Settings → Mail → Accounts → select your account → Account → SMTP → Primary Server, then toggle Use SSL to ON. The port will usually update to 465 or 587 automatically.
How to change email privacy settings on iPhone?
To enhance email privacy, open Settings → Mail → Privacy Protection. From here, you can hide your IP address and prevent senders from knowing when you’ve opened an email. This helps protect you from tracking pixels and unwanted data collection.
How do I adjust email sync settings on my iPhone?
To change how often your iPhone syncs emails, go to Settings → Mail → Accounts → Fetch New Data. You can enable Push for real-time updates (if your provider supports it), or choose a Fetch schedule like every 15 minutes, 30 minutes, hourly, or manually. Adjusting these settings can help save battery or reduce data usage when needed.
Where can I find iPhone email authentication settings?
Authentication settings are located under Settings → Mail → Accounts → [Your Account] → Account. From there, you’ll see your incoming and outgoing server info, including username, password, and SSL toggles. Make sure these match the recommended settings from your email provider to avoid login or sending issues.
How can I customize iPhone email thread settings?
To manage how email threads appear, go to Settings → Mail → Threading. You can enable options like Organize by Thread, Collapse Read Messages, or Most Recent Message on Top. You’ll also find the option to mute conversations and manage blocked senders from this section.
How do I change iPhone outgoing email settings?
Outgoing mail settings are found under Settings → Mail → Accounts → [Your Account] → Account → SMTP → Primary Server. Here, you can check or edit your SMTP server address, SSL preference, port number, and authentication method. This is helpful when troubleshooting sending errors or setting up custom domains.


