


How to Create an HTML Signature for Gmail
There are no official Gmail HTML signature templates for users of the popular email service to choose from and customize, but that doesn’t really matter because you can easily create a great-looking sig without them.

Method 1: Gmail HTML Signature Generators
If you’re looking for the easiest way to create a sig, then free email signature generators are the way to go. Examples include the free mail sig generator by HubSpot, MySignature, and WiseStamp.
The great thing about these and other online sig generators is that they make it possible to create professional sigs without any coding or design skills. Here’s how they generally work:
- First, you choose from a range of available templates.
- Then, you customize the template to include your contact information, picture, social media links, and other information.
- Finally, export the sig so that you can add it to Gmail.
Some generators let you create Gmail signature HTML code for free, while others charge a small fee.
Method 2: Word processing software
To create a professional email signature without actually writing HTML code, you can also use word processing software like Microsoft Word or Google Docs.
The trick is to use a tool like Word to HTML to convert the .doc or .docx file to clean HTML code, stripping it of all unnecessary formatting added by your word processing software. You can then add the resulting HTML email signature in Gmail just as easily as a sig created by an online generator.
There are many free and paid .doc and .docx Gmail signature HTML templates that you can quickly and easily customize to save time and obtain professional results.
How to Add an HTML Signature in Gmail
Is your HTML sig ready? If so, then you can follow the instructions provided in this section to learn how to insert an HTML email signature in Gmail. If not, then click here for instructions on how to create one.
Add HTML Signature to Gmail in a Web Browser
To add your HyperText Markup Language sig to Gmail in a web browser, you need to follow these steps:
- Log in to your Google mail account.
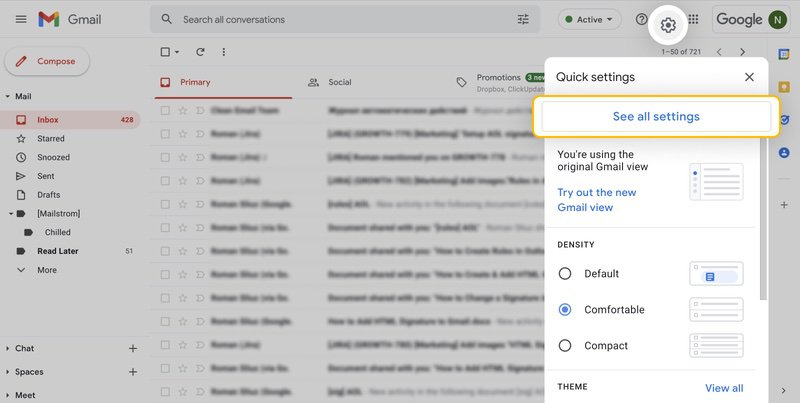
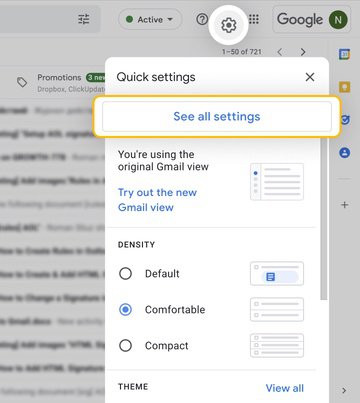
- Click the Settings gear icon.
- Choose the See all settings option.
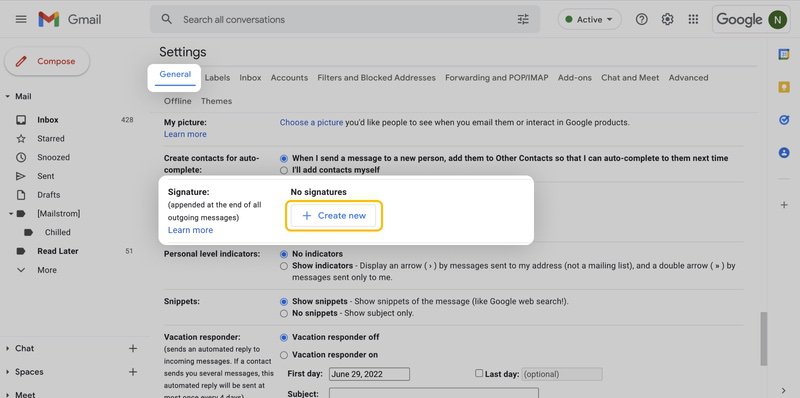
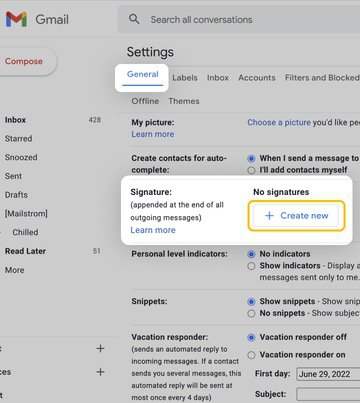
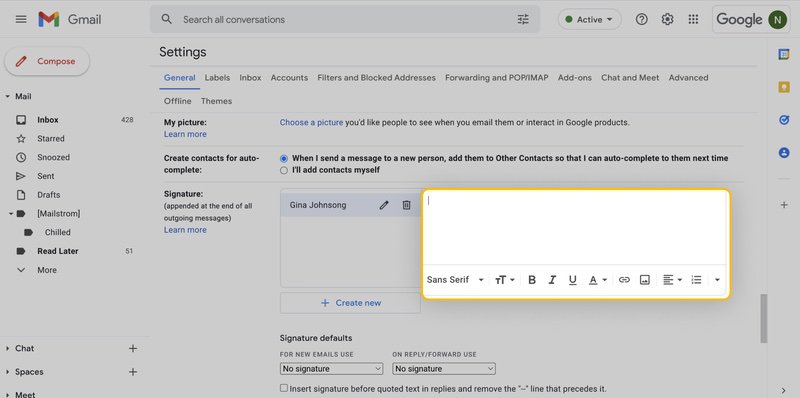
- In the general tab, scroll down until you see the sig option.
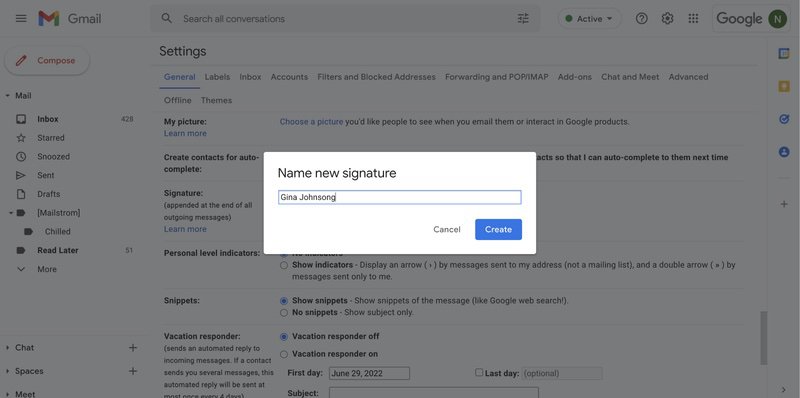
- Click Create new.
- Name your new sig and click Create.
- Copy and paste your HyperText Markup Language sig into the text box.
- Scroll all the way down and click Save Changes.
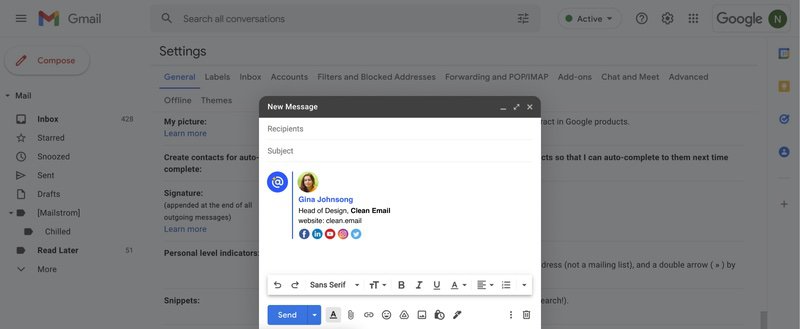
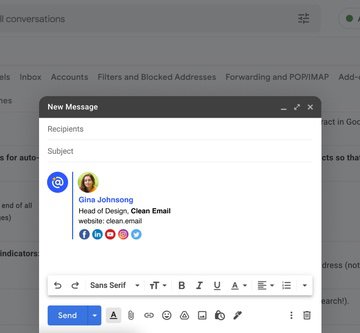
From now on, your new sig will be automatically appended at the end of all outgoing messages. To see how it looks, you can send a message to yourself.
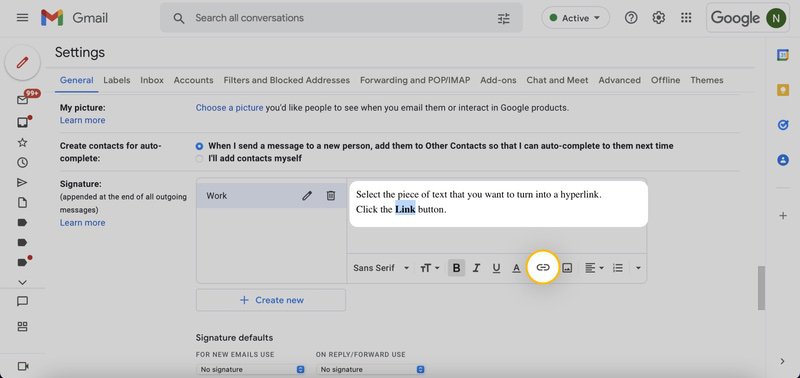
Add a Hyperlink to a Gmail Signature
To add a hyperlink:
- Log in to your mail account.
- Click the Settings gear icon and select the See all settings option.
- Scroll down until you see the Signature section.
- Select the one you want to adjust.
- Select the piece of text that you want to turn into a hyperlink.
- Click the Link button.
- Enter the URL to which you would like to refer and click OK.
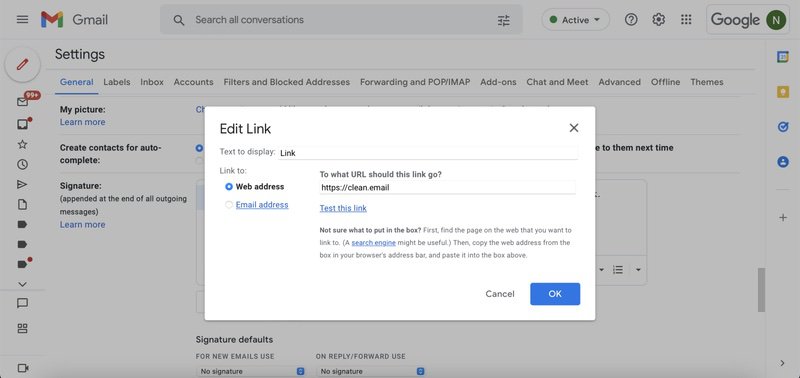
You can use the Email address option to link to an email address, making it easier for others to contact you.
Set Up a Gmail Mobile HTML Signature
Messages sent from the Gmail mobile app won’t include the sig added in a web browser. You have to add a mobile-specific sig in the Gmail app by following the instructions below:
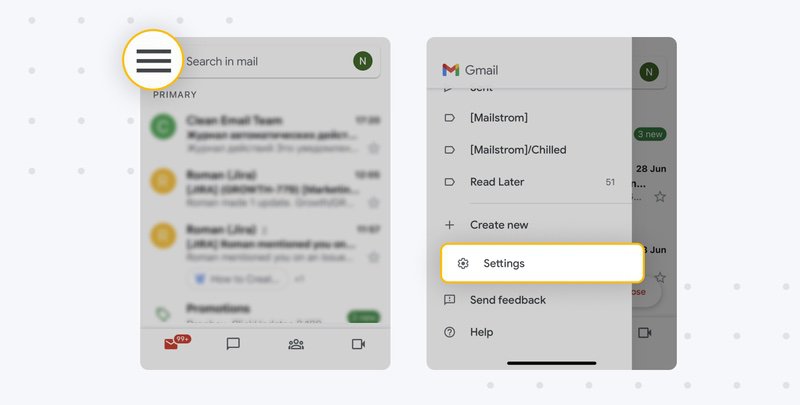
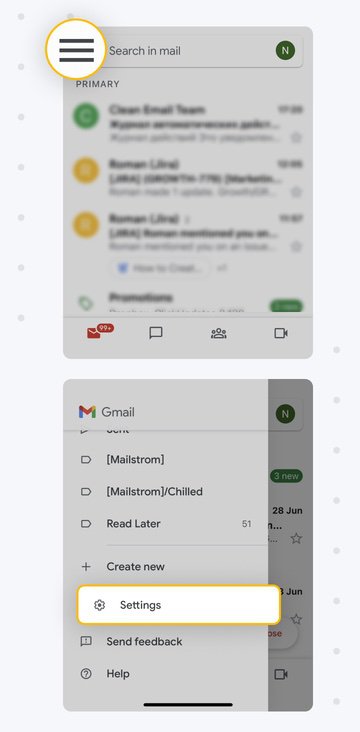
- Launch the Google mail app on your mobile device.
- Tap the hamburger menu icon.
- Select the Settings option.
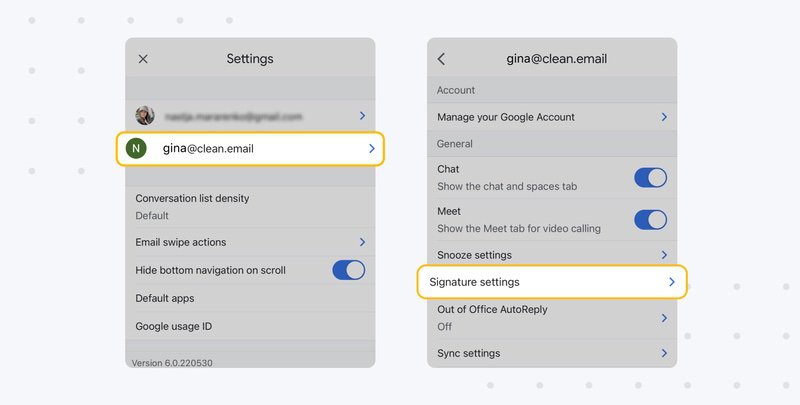
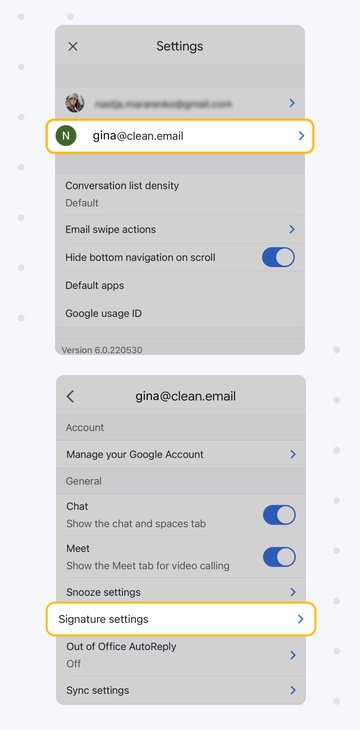
- Choose the account where you want to add the sig.
- Tap Mobile signature under General.
- Enter your signature and tap OK.

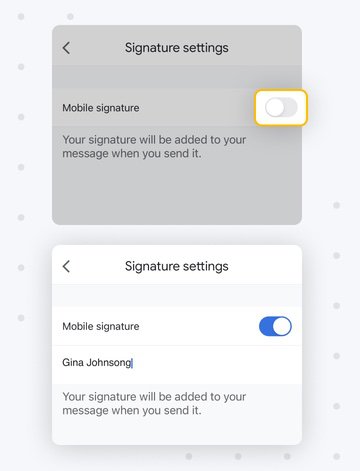
Unfortunately, the mobile app doesn’t support Gmail Android signature HTML code-based sigs and iOS HTML sigs. Only plain text sigs are supported.
If you want to use HyperText Markup Language sigs on your mobile device, then a third-party email client is your only option.
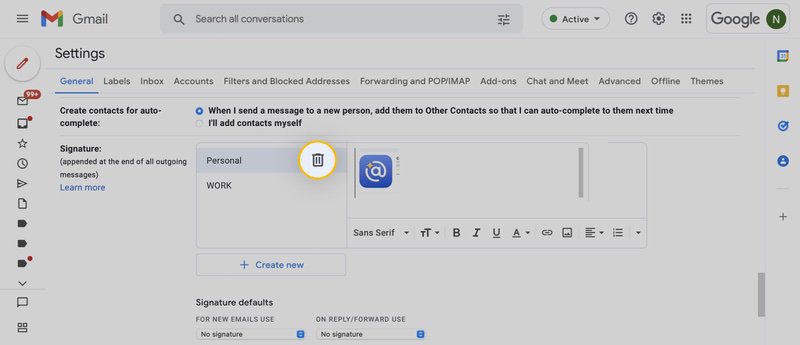
How to Change a Signature in Gmail
Users who know how to make a signature in Gmail usually start with a basic plain text, but they soon discover Gmail signature templates.
At that point, they want to know just one thing: how to edit a signature in Gmail. Here’s how:
- Log in to your mail account.
- Click the Settings gear icon. Then choose the See all settings option.
- Scroll down until you see the Signature section.
- Select the one you want to edit.
- Make your changes.

💡 Note: Don’t forget to click the Save Changes button at the end of the Settings page whenever you’re done experimenting with templates and Gmail signature generators (many of which let you export Gmail HTML signatures).
How to Remove a Signature from Gmail
You can do it in two different ways:
- Delete the signature itself: Go to Settings and select the signature you want to delete. Click the Delete icon next to it.
- Change signature defaults settings: Go to Settings and change your signature defaults settings to No signature. This will turn off the signature for all future emails unless you manually re-enable it.
Tips to Delete a Signature in Gmail with No Issues
If you're having trouble and can't get rid of your Gmail signature on the desktop, and signature reappears after deletion, try these steps:
- Clear the Gmail app data. App data can sometimes interfere with signature settings, causing the signature to reappear. To clear the app’s data, go to your device’s settings, then select the Gmail app. Finally, tap on Storage and choose Clear data or Clear storage.
- Clear browser cache and cookies. Outdated cache or cookies can cause problems with signature settings. Clear your cache and cookies or switch to a different browser.
- Disable browser extensions. Some browser extensions, such as ad blockers, might interfere with Gmail settings. Disable them temporarily and try to delete your Gmail signature again.
- Switch to Gmail's basic HTML view. If the issue persists, switching to Gmail’s basic HTML view can help resolve signature deletion problems.
Organize Your Messages (With and Without Signatures)
Now that you know how to create an HTML signature for Gmail, you should learn how to organize your messages to keep your inbox nice and usable.
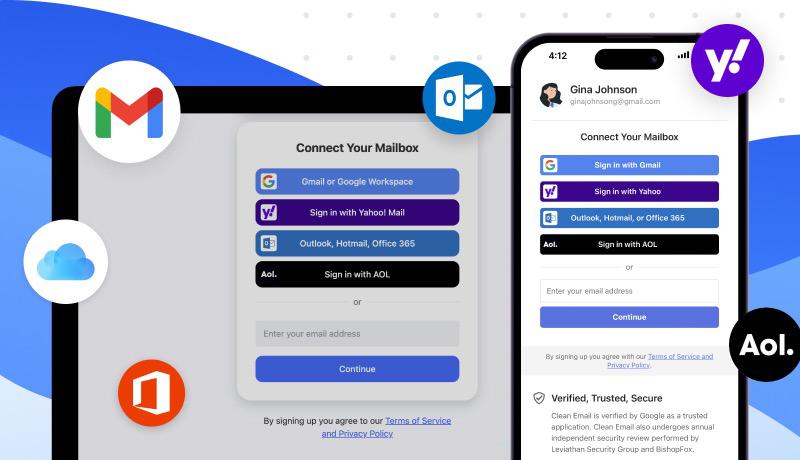
Clean Email is a leading inbox organizer, and it offers a range of features that make it easy to get rid of unwanted and unnecessary messages.


When you log in to Clean Email for the first time, it will automatically organize all of your messages into easy to review bundles. You can then delete, move, archive, label, and do other things with all emails that have something in common, instead of having to organize your inbox message by message.
Any action performed with Clean Email can be automated with a single click, and removing subscriptions that don’t include an unsubscribe link or blocking annoying senders is just as easy.
Here’s an example of how simple the inbox organizer makes it to delete all emails that are larger than 10 MB:
- Go to: https://app.clean.email/
- Sign in with your Gmail credentials (don’t worry: the app will keep them securely protected).
- Select the “Emails larger than 10 MB” Smart Folder.
- Click Select all to select all matching messages.
- Click the Trash button.
Besides Gmail, you can use this inbox organizer with all other major email service providers, such as Yahoo, Outlook, AOL, and even your company email accounts.
Add HTML Signature in Gmail - FAQs
Why is my Gmail HTML signature not working?
If your HyperText Markup Language sigs are not working correctly, then it’s possible that you’re sending them in plain text mode. To disable it, click the three vertical dots in the bottom-left corner of the new message compose window and disable the Plain text mode option.
Why does my Gmail signature display incorrectly?
It’s easy to make a mistake when creating a HyperText Markup Language sig, and even a small typo can cause major issues. If your sig is displaying incorrectly, when we recommend you copy & paste it again. If that doesn’t help, create it again from scratch using an online generator or template.
How can I display a Gmail signature that’s hidden by three dots?
To ensure that your sig is visible each time you sent a new message:
1. Open Gmail settings in your web browser.
2. Go to the General tab.
3. Click the “Insert signature before quoted text in replies and remove the ‘--’ line that precedes it” checkbox under Signature.


