


Top 10 Gmail Hacks for 2026
If you've ever thought there must be better ways to organize, search, or optimize Gmail and your email experience in general, you're right! Dive into these Gmail organization hacks to revamp the way you handle your inbox.

1. Master Keyboard Shortcuts
One of the best Gmail email hacks you can adopt is mastering Gmail's keyboard shortcuts. They're the secret weapon of power users. Not only do they cut down on time spent clicking around, but they also enhance the flow of your tasks.
While some of the most useful keyboard shortcuts supported by Gmail work right out of the box, some require a bit of initial setup. Here are some Gmail hacks on how to unlock the full potential of your keyboard arsenal:
- Open your browser and visit Gmail.
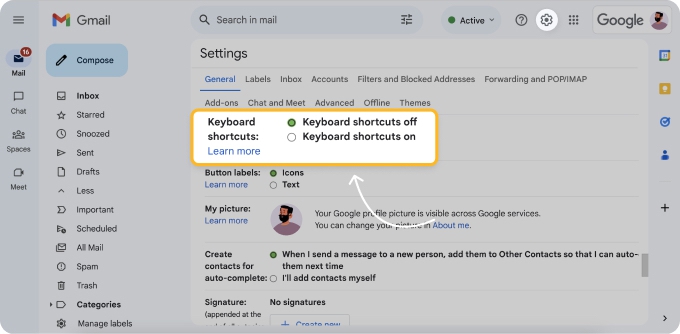
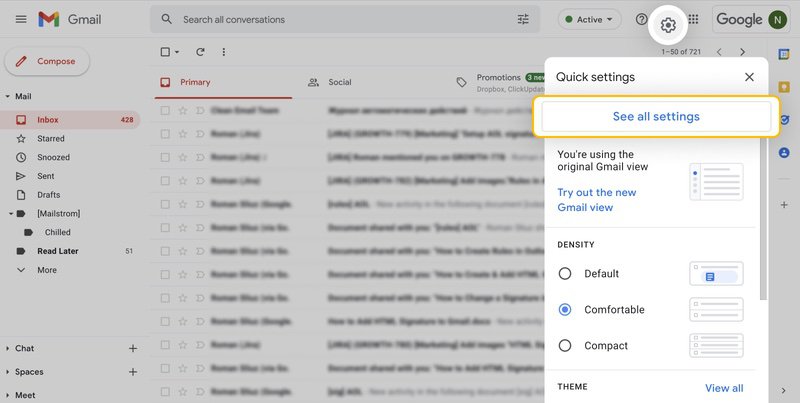
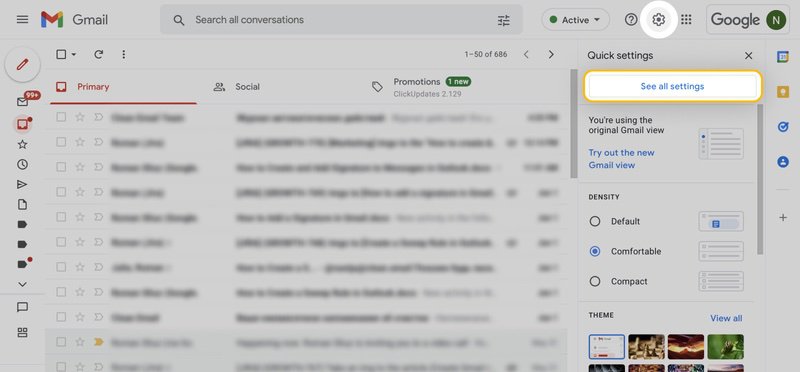
- Click the Settings gear icon and choose See all settings.
- Scroll through the options until you hit the Keyboard shortcuts section.
- Click on the radio button next to Keyboard shortcuts on.
- Click Save Changes at the bottom.
Now you can use these and other Gmail keyboard shortcuts:
| Action | Shortcut |
|---|---|
| Send an email | ⌘/Ctrl + Enter |
| Reply to an email | r |
| Forward an email | f |
| Move to next chat or compose window | Ctrl + . |
| Add cc recipients | ⌘/Ctrl + Shift + c |
| Add bcc recipients | ⌘/Ctrl + Shift + b |
| Delete an email | # |
| Archive an email | e |
| Mark an email as read | Shift + i |
| Mark an email as unread | Shift + u |
2. Sort Your Emails for an Easy Cleanup
Drowning in emails? There's no denying that a cluttered inbox can bog down your productivity. But here's the good news: alongside some of the best Gmail hacks, there's Clean Email, a versatile inbox organizer. With it, you can swiftly sift through the mess and make sense of your emails. This app enables you to organize Gmail and categorize your messages effortlessly without having to deal with the intricacies of creating complicated search filters.
Unlike Gmail, which only has 5 email categories (‘Primary’, ‘Social’, ‘Promotions’, ‘Updates’, and ‘Forums’), Clean Email offers 33 Smart Folders that quickly organize your emails into groups like ‘Top Senders’, ‘Productivity tools’, ‘Online Shopping’, ‘Seasonal Sales’, and many more.
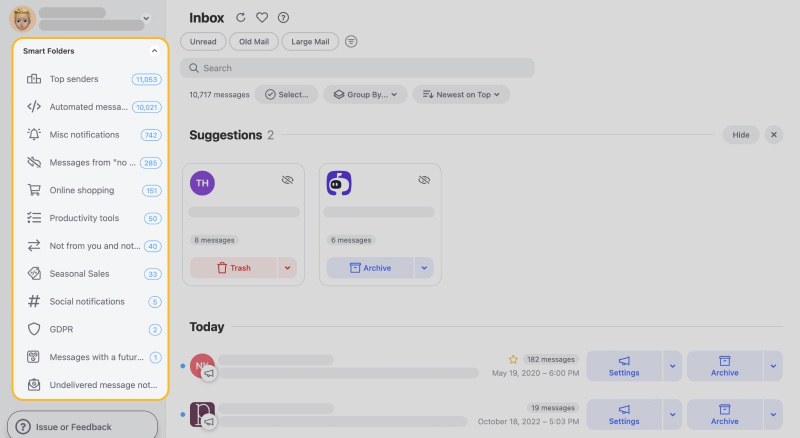
With Smart Folders, you don't have to manage each email individually. Instead, you can rapidly locate relevant messages and delete, archive, or label all messages in a folder with just one click, and more.
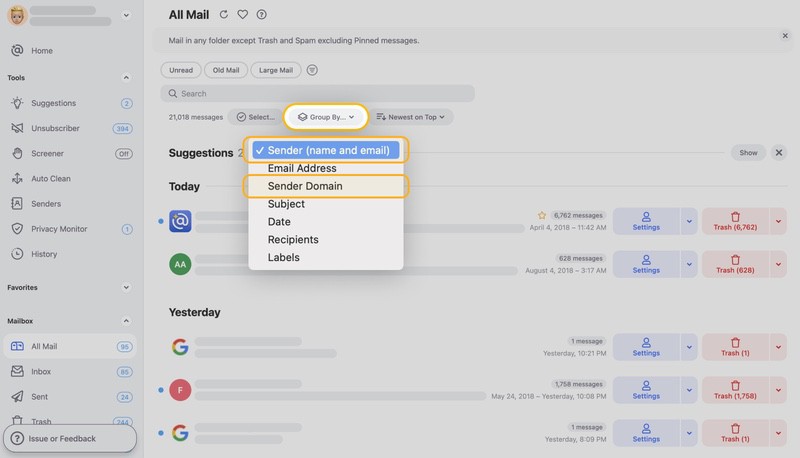
But if you prefer to have full control over sorting your messages, Clean Email gives you another option to do it manually. Here's an example of how you can sort your Gmail emails using Clean Email:
- Sign in to Clean Email with your Gmail address.
- Select the All Mail tab located in the left sidebar.
- Click on the Group By… filter and pick options like Sender (name and email) or Sender Domain.
- Fine-tune your sorting by opting for Newest on Top or sorting by criteria like Number of messages or Total size.
- Go through your messages and organize them using Clean Email's convenient actions, which can be applied to multiple emails at once.
Whether you're looking to delete, archive, or apply other bulk actions, this structured view makes it a breeze.
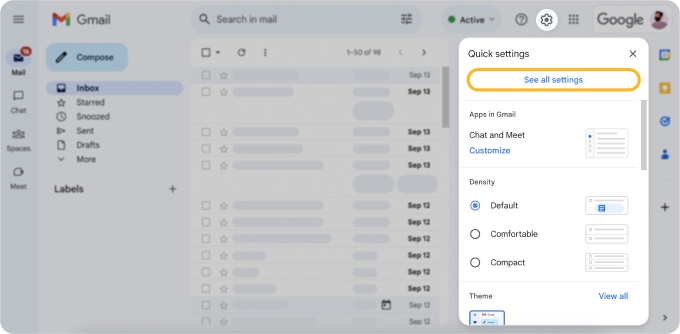
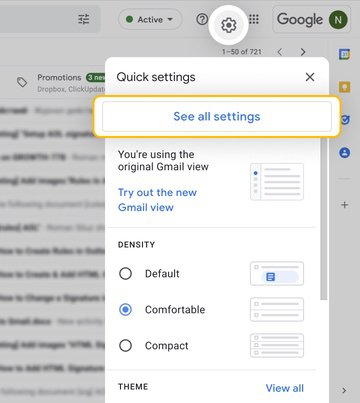
3. Increase View Density to See More Emails at Once
One of the simplest Gmail hacks for productivity is adjusting your inbox's view density. Using this option to customize Gmail account allows you to see more emails in your inbox at once without endlessly scrolling.
To increase view density in Gmail, do the following:
- Log in to your Gmail inbox in your preferred web browser.
- Click the Settings gear icon located in the top-right corner.
- Select Compact to maximize the number of emails you see without scrolling.
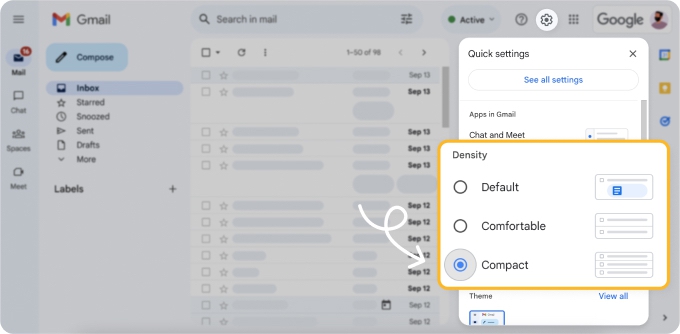

📌 Tip: While Compact offers the most emails on a single screen, feel free to experiment with Comfortable if you want a balanced view.
4. Archive Old Emails So They Don't Clutter Your Inbox
It's astonishing how quick old emails can pile up, taking up valuable space and cluttering your inbox. Not only does it make it challenging to find recent and essential emails, but the visual chaos can also add unnecessary stress to your day. Let's not even talk about the toll it takes on productivity.
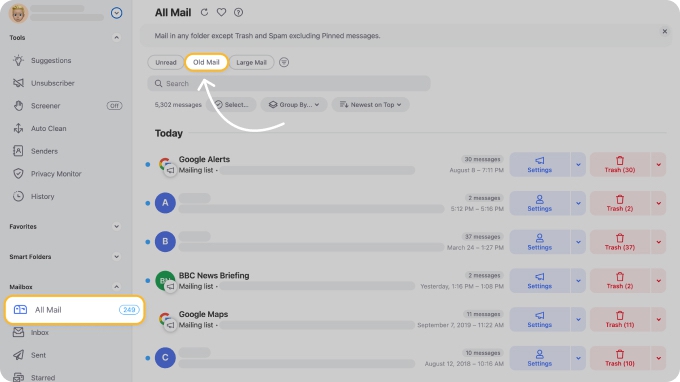
Fortunately, you can easily counter this by archiving old emails in bulk with the help of Clean Email:
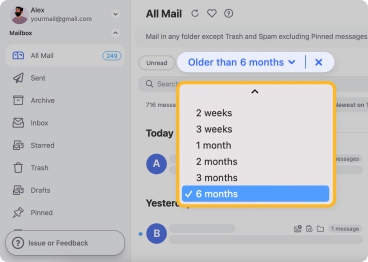
- Log in to Clean Email using your Gmail email address.
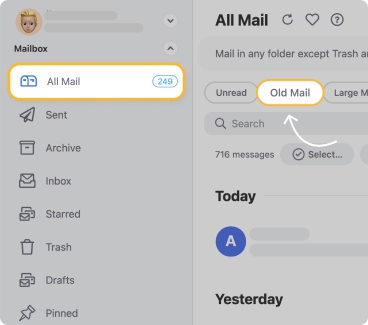
- Select Inbox or All Mail folder from the left-side panel.
- Click the Old Mail filter located above the search box.
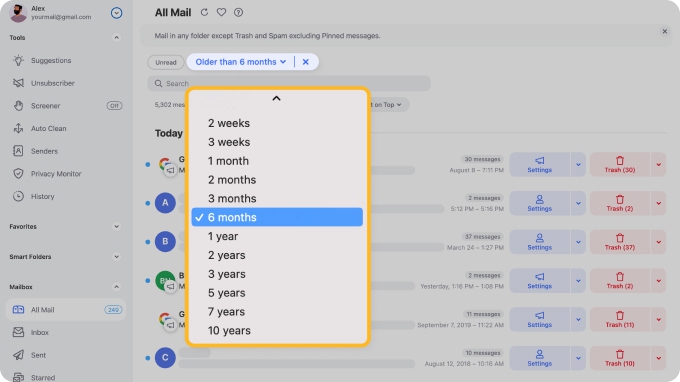
- Click the 'Older than 6 months' filter, which is chosen by default. You can click the down arrow to specify how old an email should be to consider it for archiving.
- Click on the Select button followed by Select All. This will highlight all emails fitting your age criterion.
- Click the Archive button located in the bottom blue toolbar.
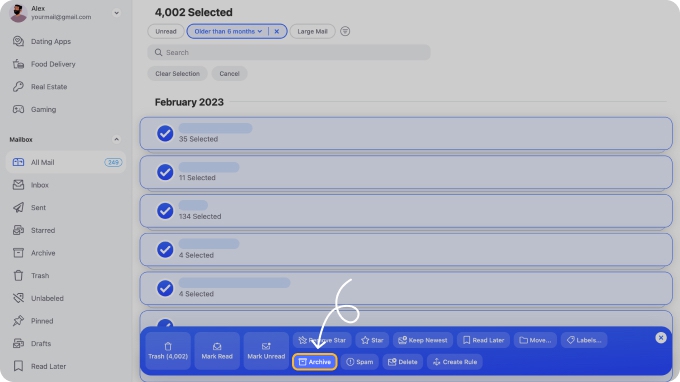
💡 Note: Archived emails aren't gone forever. Instead, they're simply moved out of your main inbox. If you want to get rid of them permanently, then you need to delete them.
5. Let AI Help You Write Emails
Have you ever wished someone could help you compose emails? Well, Google's got your back with its Smart Compose feature, one of the coolest Gmail tips and tricks because it integrates artificial intelligence to offer real-time writing suggestions. It's like having a mini assistant tucked right into your Gmail!
Try this Gmail email hack to turn on the Smart Compose feature:
- Open your browser and visit Gmail.
- Click the Settings gear icon and choose See all settings.
- Locate the Smart Compose section in the General tab.
- Enable Writing suggestions.
- Click Save Changes.
- Start writing an email and watch as Gmail predicts the next part of your sentence and displays it in a lighter text. If the suggestion fits, simply hit the Tab key to accept it and continue typing.
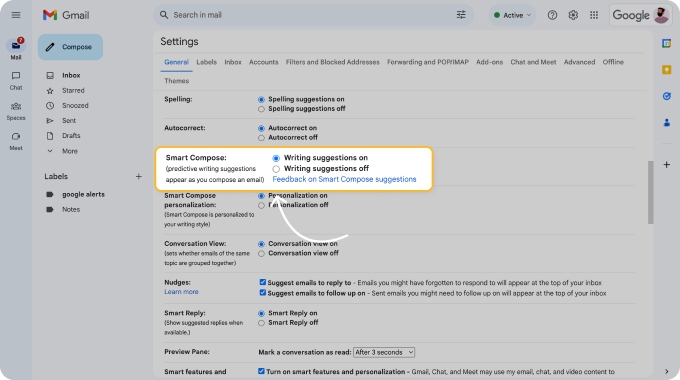
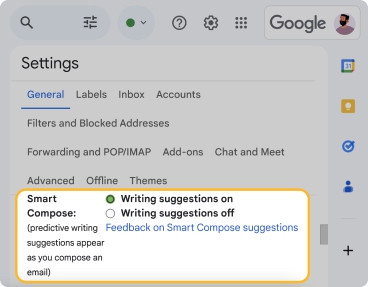
💡 Note: At the time of writing, Smart Compose supports English, Spanish, French, Italian, and Portuguese.
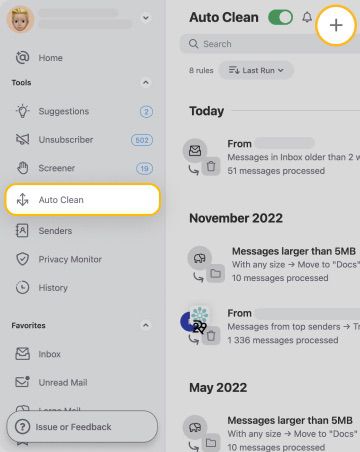
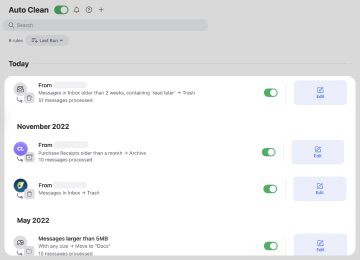
6. Automate Frequently Performed Inbox Management Actions
If there are certain inbox management actions that you perform on a regular basis, then you should automate them by creating inbox rules, also known as email filters. This is one of the essential Gmail hacks for efficiency.
While Gmail does support the creation of inbox rules (and even includes newer smart tools like the “Most Relevant” search with AI), the process is so unintuitive that most Gmail users should use a third-party solution instead, and Clean Email is the best choice thanks to its fantastic Auto Clean feature.
With Clean Email's Auto Clean, you can automatically trash, star, mark as read or unread, change labels, archive, delete, and more with just a few clicks.
Here's how to harness the power of Clean Email's Auto Clean:
- Log in to Clean Email using your Gmail address.
- Select the Auto Clean tool from the left pane.
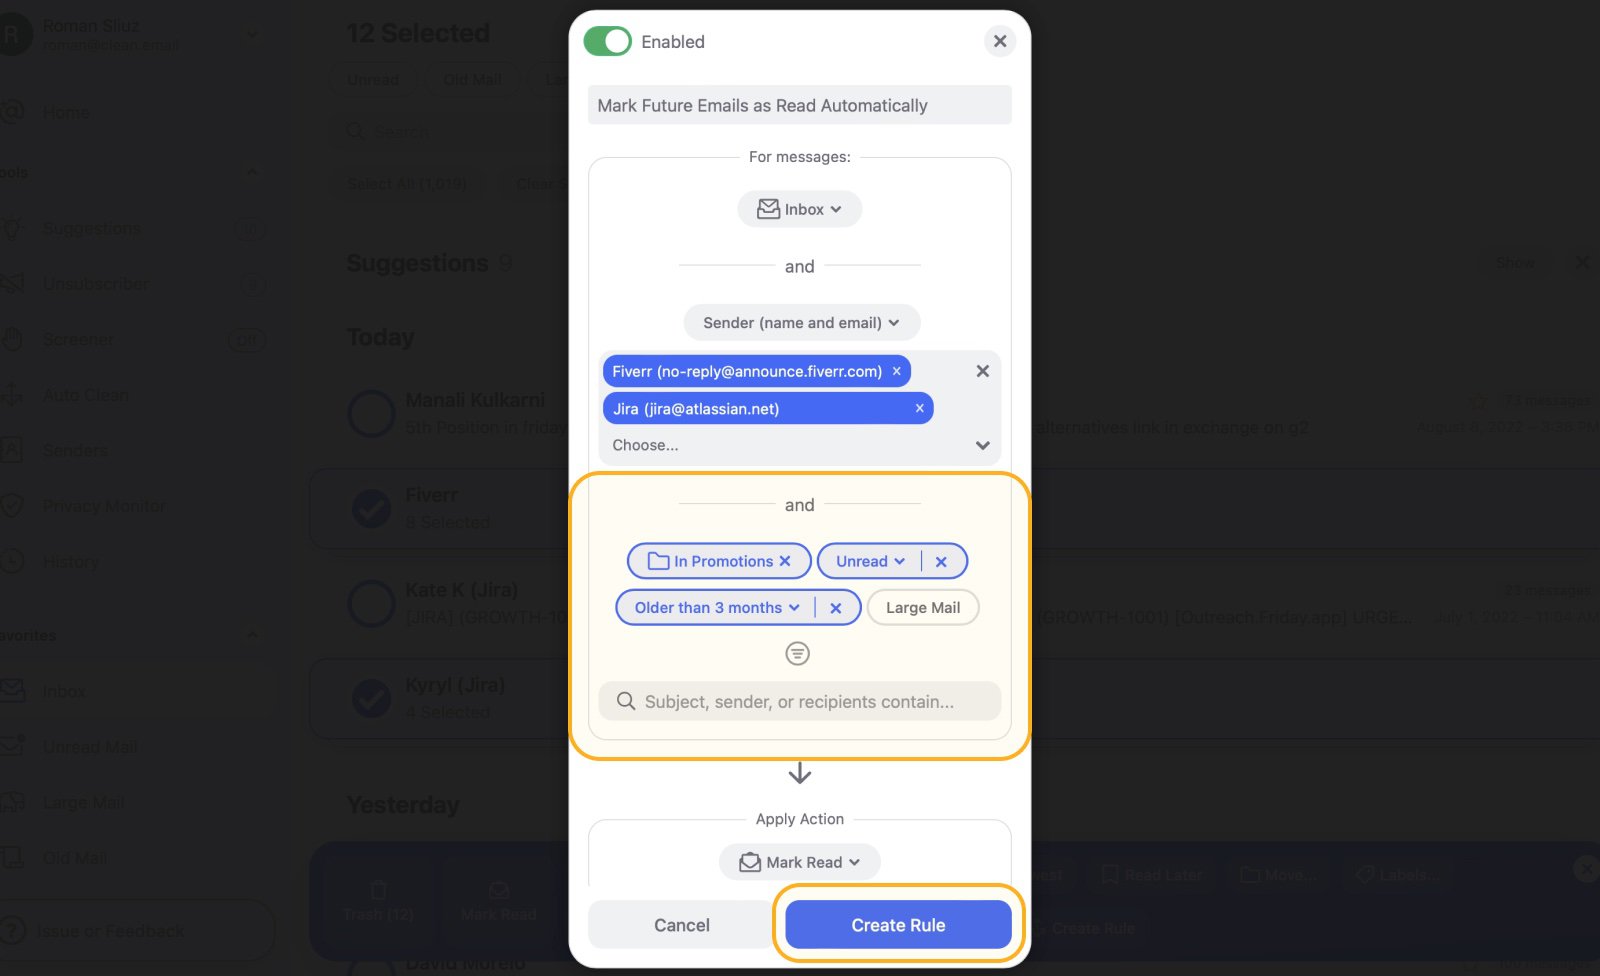
- Click the “+” button to create a new rule.
- Choose the criteria for emails whose management you would like to automate in the For messages: section. This can be based on folder location, sender details, read status, age, size, or specific text within the email.
- Pick your desired action from the list in the Apply Action section.
- Click Create Rule.
- From now on, Clean Email will automatically apply your chosen action to incoming emails that match your criteria.
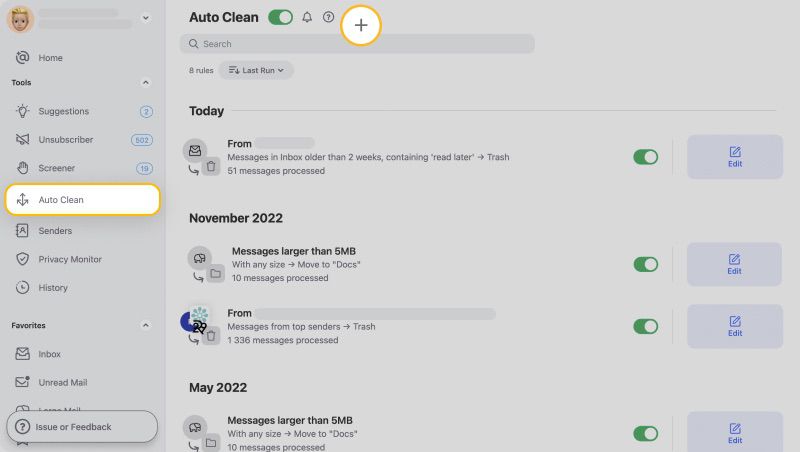
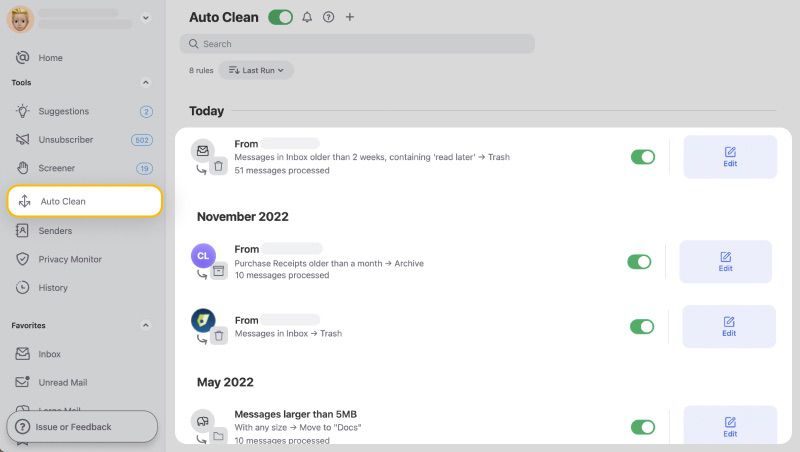
To see messages that have been affected by Auto Clean rules, simply access the Auto Clean tab on the left panel of the app, and a list of your rules will appear. But no worries, if you change your mind, managing Auto Clean rules is a breeze. You can pause any rule by clicking the toggle to the right of it in the list, also you can easily modify a rule or delete it.
This feature rivals some of the best Google hacks and tricks when it comes to email automation and increasing email productivity.
To keep you in the loop, the app can send you summary notifications of Auto Clean actions on an hourly, daily, or weekly basis. You can enable or disable the Action History Summary notifications in the Notifications menu.
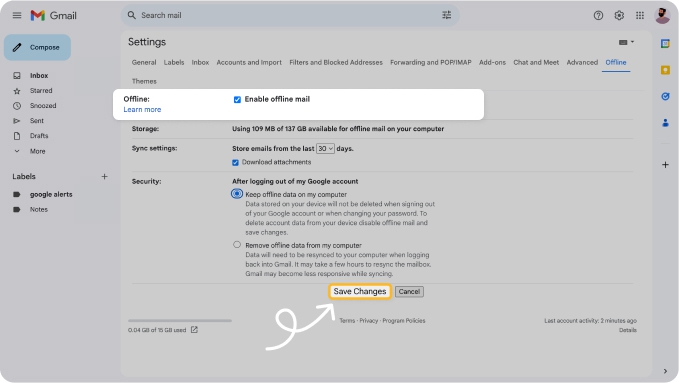
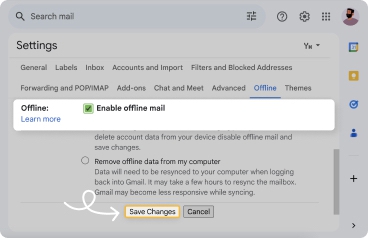
7. Ensure That You Can Use Gmail Offline
We've all been there: needing to access an important email or draft a response while being stuck without an internet connection. But here's a Gmail productivity tip you might not know: it's possible to use Gmail even when offline. By enabling Gmail's offline mode, you can ensure that you'll never be left high and dry without access to your emails.
Go through these steps to enable one of the best Gmail hacks and tricks, offline mode:
- Open your browser and visit Gmail.
- Click the Settings gear icon and choose See all settings.
- Navigate to the Offline tab.
- Click on the box next to Enable offline mail.
- Click Save Changes.
💡 Note: While offline mode allows you to read and draft, you won't be able to send emails until you're connected to the internet again.
8. Unsubscribe from Unwanted Email Subscriptions
Is your inbox often bombarded with unwanted newsletters, promotional offers, and spammy subscriptions? You're not alone! Spam is a huge issue in this day and age, but there's one Gmail hack for subscriptions that'll clear out the clutter and boost your productivity in no time: Clean Email's Unsubscriber feature.
With this feature, you can not only easily get rid of those annoying newsletters but also tackle a more persistent problem: emails that don't provide a clear unsubscribe option, making it difficult to maintain a clean Gmail inbox.
Here’s how it’s done:
- Visit Clean Email and log in using your Gmail address.
- Select the Unsubscriber tool in the left pane.
- Browse through the list and click on the subscription(s) you no longer wish to receive.
- Hit the Unsubscribe button on the blue action bar at the bottom.
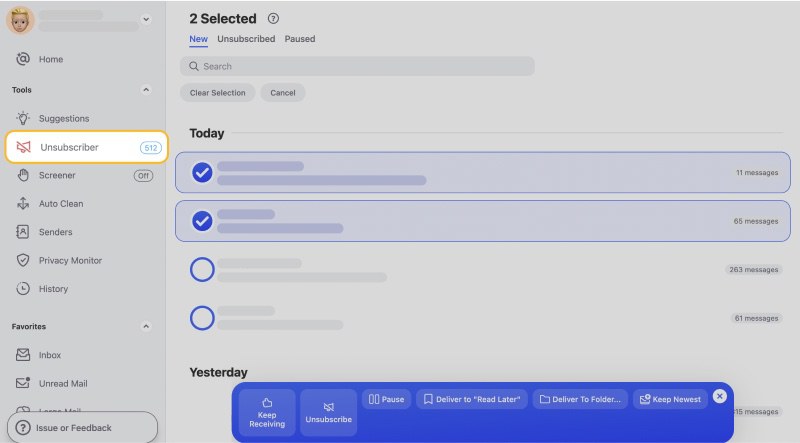
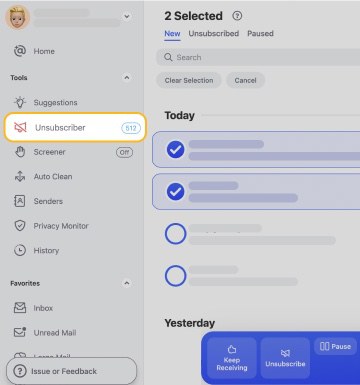
📌 Tip: Clean Email also lets you pause subscriptions by redirecting them to a Read Later folder. Alternatively, you can take advantage of the Keep Newest feature to retain just the latest email from the sender.
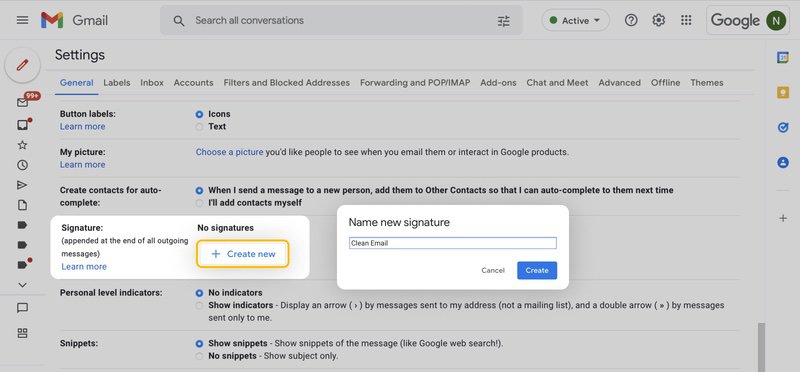
9. Automatically Insert Your Email Signature
Having a professional email signature can do a lot for your reputation, and it can also help others reach out to you more effectively. Think of it as your digital business card, right at the end of every email you send.
However, creating this digital business card from scratch every time you send an email would be tedious and counterproductive. Thankfully, most modern email platforms, including Gmail, let you insert your email signature automatically. This feature is one of the straightforward Gmail hacks that will save you time and enhance your professional appearance.
Complete these steps to set up an automatic email signature in Gmail:
- Open your browser and visit Gmail.
- Click the Settings gear icon and choose See all settings.
- Scroll down until you find the Signature section.
- Type out the content of your signature in the box. You can include your name, designation, and phone number.
- Click Save changes at the bottom once you're satisfied with the way your signature looks.
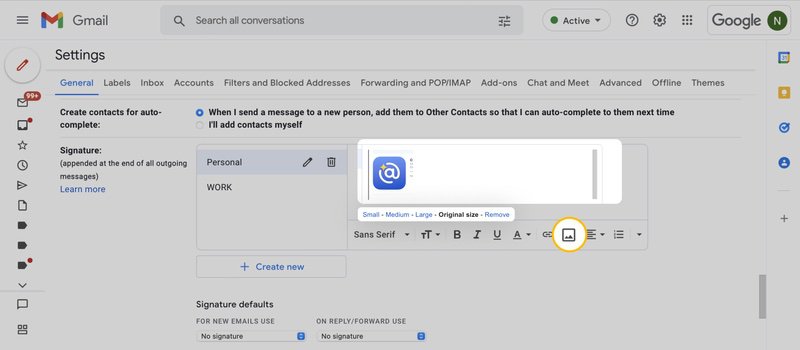
⚠️ Important: While Gmail lets you include up to 10,000 characters in your signature, you should aim for brevity and clarity. Overloading your signature with excessive information can make it look cluttered and may overwhelm the recipient.
10. Consider Using a Third-Party Gmail Client
While not exactly a Gmail workspace hack, venturing into third-party clients can open up a world of enhanced features, streamlined interfaces, and customization options that aren't available in the standard Gmail platform.
To help you pick a great third-party Gmail client, we've curated a list of popular options for all major platforms:
- Thunderbird (Mac, Windows, Linux): This free, open-source email client goes beyond just email with its features for news and instant messaging.
- Spark Mail (Mac, Windows, Android, iOS): Spark Mail is a multi-platform email client with many useful extra features, such as swipes, snooze, and cloud-based attachment support.
- Mimestream (Mac): Mimestream is the choice for Mac users who want to blend Gmail's best attributes with the efficiency of a native macOS app.
- Mailbird (Windows): Catering specifically to Windows users, Mailbird stands out with its support for multiple inboxes, speed reading, attachment search and more.
📌 Tip: If you don't want to use a different Gmail client but still crave more functionality, then you can explore Gmail add-ons.
Bonus: Manage Messages With Gmail Aliases
This Gmail address hack has been covered so much already by various websites, that we're including it only as a bonus for those who might still be unaware of its potential. By simply adding a '+' or tweaking the placement of a dot in your email address, you can create multiple virtual inboxes while everything funnels back to your primary one.
For example, you can use johndoe+news@gmail.com when signing up for newsletters and johndoe+shopping@gmail.com for your online shopping sprees. Similarly, taking advantage of the dot placement, emails sent to j.ohndoe@gmail.com and john.doe@gmail.com both land in your primary inbox, but you can filter and categorize them separately.
Wrap-Up
In the rapidly evolving world of email, mastering the most useful Google life hacks and Gmail productivity tips is crucial. To truly maximize your productivity potential, don't just stop with these Gmail tips. Keep an eye out for emerging features, join Gmail user forums, and consider setting aside time monthly to explore new Gmail updates. After all, productivity is a journey, not a destination.


