


How to Enable Copilot in Outlook (By Platform)
The process to enable Copilot in Outlook varies depending on which version you're using and whether you have a personal or business account. Below you'll find platform-specific instructions for Office 365, Outlook Web, Mac, Classic, New Outlook, and mobile apps. Each section includes the exact steps needed to activate Copilot, along with important notes about licensing requirements, feature availability, and Outlook's various email limits.
📌 Note: New to Copilot? Read our guide on what Microsoft Copilot is used for to understand its full capabilities before enabling it.

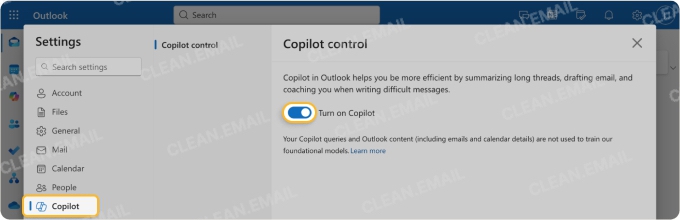
Enable Copilot in Outlook on the Web
Prerequisites:
- Microsoft 365 Personal or Family subscription (includes Copilot)
- Copilot Pro subscription
- Supported email address: @outlook.com, @hotmail.com, @live.com, or @msn.com
The web version of Outlook offers the quickest way to access Copilot features without any software installation.
Here's how to enable Copilot in Outlook web:
- Visit www.outlook.com.
- Sign in with a Microsoft account that has a valid Copilot license.
- Click the Settings gear icon (top right corner).
- Navigate to Copilot → toggle Turn on Copilot to enable it.
Business users with work or school accounts should check with their IT administrator if Copilot options don't appear, as organizational settings may need adjustment.
Enable Copilot in New Outlook for Windows
Prerequisites:
- Windows 10 or Windows 11
- Microsoft 365 subscription or Copilot Pro
- New Outlook app installed (not Classic Outlook)
The New Outlook for Windows is Microsoft's modern email client that comes with built-in Copilot support (сheck out my full New Outlook for Windows review). If you're still using Classic Outlook, you'll need to switch to New Outlook first (see the Outlook Classic section below).
Here's how to enable Copilot in new Outlook:
- Open New Outlook on your Windows PC.
- Click the Settings gear icon in the top right corner.
- Select the Copilot tab from the settings menu.
- Toggle Turn on Copilot to enable.
- Click Save to apply changes.
- Close and restart Outlook for changes to take effect.
If Copilot doesn't appear after restart, click the Update License button in the Account section of Outlook. It sometimes also helps to update to the latest version of New Outlook if you're not using it already.
Enable Copilot in New Outlook for Mac
Prerequisites:
- macOS 12.0 (Monterey) or later
- Microsoft 365 subscription or Copilot Pro
- Latest version of Outlook for Mac
Mac users can access Copilot features in the New Outlook for Mac, which replaced the legacy Outlook client. The setup process is straightforward and takes just a few clicks.
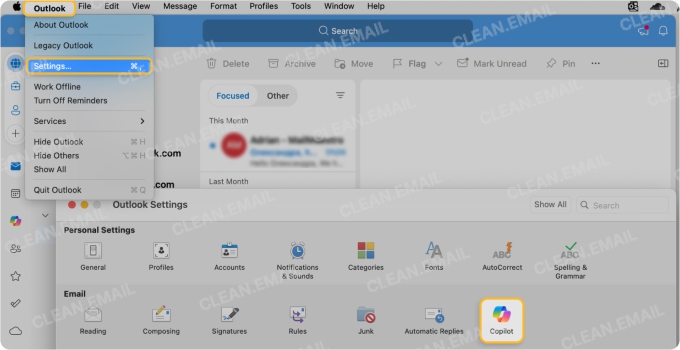
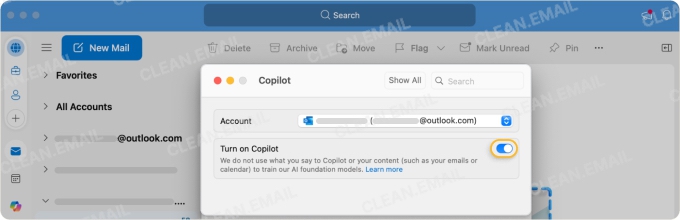
Steps to enable Copilot in Outlook Mac:
- Launch Outlook on your Mac.
- Click Outlook in the top menu bar, then select Settings.
- Choose Copilot.
- Toggle Turn on Copilot to enable AI features.
- Enable Use custom instructions when drafting email in the Draft section if you want personalized suggestions.
- Force quit Outlook (Command + Q) and reopen it to sync changes.
Enable Copilot in Outlook Classic
⚠️ Important: Outlook Classic doesn't support Copilot features. Microsoft requires users to switch to New Outlook to access AI capabilities.
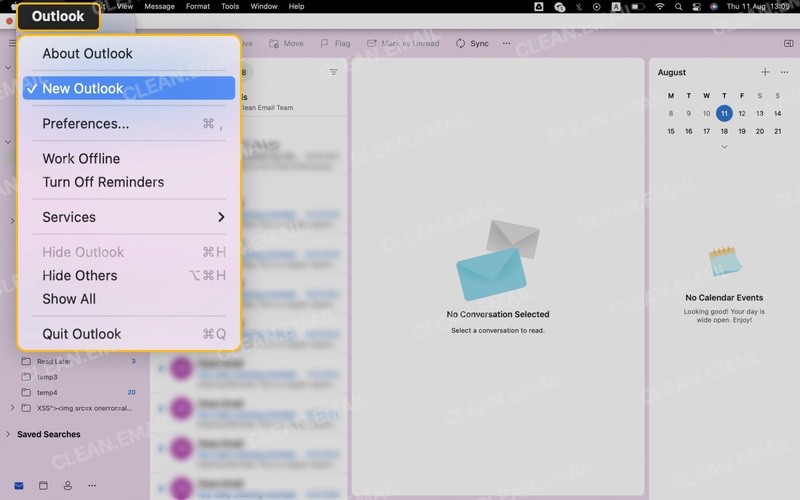
To switch from Classic to New Outlook:
- Open Outlook Classic (or Legacy Outlook).
- Look for the Try the new Outlook toggle in the top-right corner.
- Click the toggle to switch.
- Wait for the migration to complete (your emails and settings will transfer automatically).
- Follow the New Outlook instructions above to enable Copilot.
📌 Note: Some legacy features may not be available in New Outlook. Business users should consult their IT department before switching, which most users, as recent Outlook statistics show, have already done.
Enable Copilot in Outlook Mobile (iOS & Android)
Prerequisites:
- iOS 17.0+ or Android 9.0+
- Microsoft account with supported domain (@outlook.com, @hotmail.com, @live.com, @msn.com)
Copilot in the Outlook app is currently only with Microsoft accounts. Accounts from third-party email providers like Gmail, Yahoo, or iCloud are unable to access Copilot features in the Outlook app.
Steps to enable Copilot in Outlook mobile:
- Open the Microsoft Outlook app on your device.
- Sign in with your Microsoft account (must have an active Copilot subscription).
- Tap your profile icon (usually in top left corner).
- Tap Settings.
- Select Copilot from the settings menu.
- Toggle Turn on Copilot to enable.
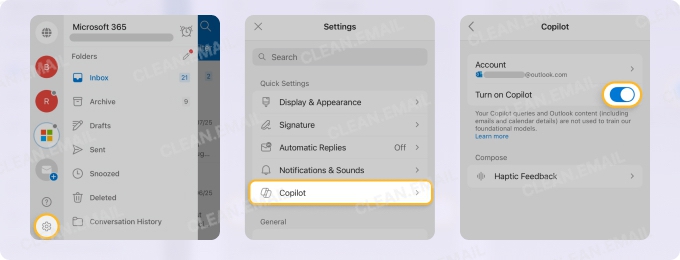
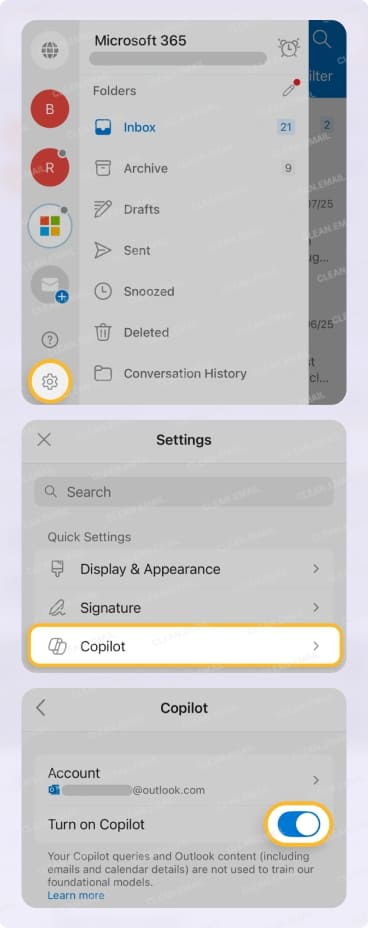
If the Copilot option doesn't appear in settings, verify your subscription is active by visiting account.microsoft.com. Mobile features are currently limited compared to desktop versions.
How to Use Copilot in Outlook
Now that I've explained how to enable Copilot across different platforms, I want to share a few examples of how I've been using Copilot in my daily email routine.
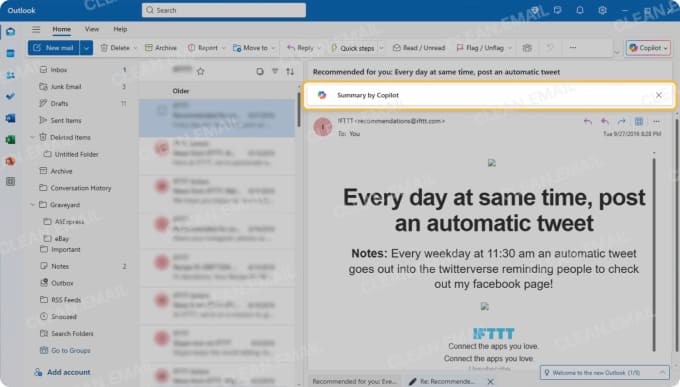
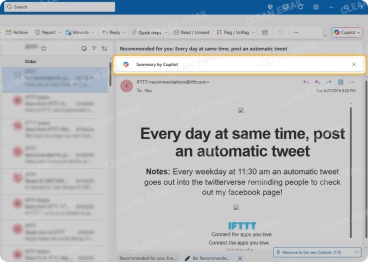
How to use Copilot in Outlook to summarize emails
One of my favorite Copilot features is the email summarization tool, especially when I return from vacation or face a backlog of lengthy email threads. Last week, I opened a 47-message thread about a particularly complicated project update.
Instead of reading through each message, it took Copilot just a few seconds to provide a clear bullet-point summary highlighting the key decisions, action items, and who was responsible for what.
To use the summarization feature:
- Open any email thread.
- Click the Copilot icon in the toolbar.
- Select Summary by Copilot.
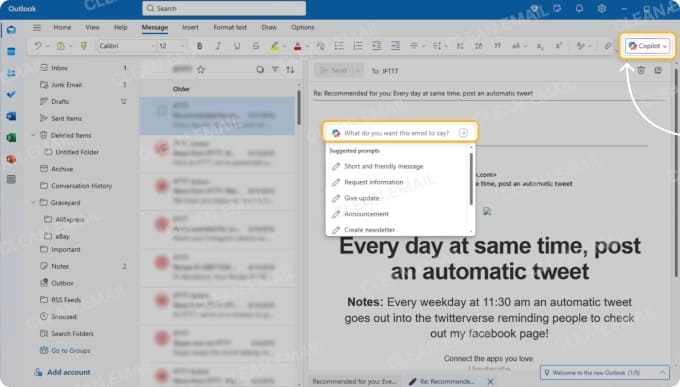
Using Copilot to write and reply to emails
Despite being a professional content writer, I often rely on Copilot for initial email drafts. When I see an AI-generated draft, I often realize there's something additional I should mention, something that wouldn't have occurred to me otherwise.
Here's how to use Copilot in Outlook desktop for composing:
- Open the message you want to reply to.
- Click the Copilot icon in the toolbar.
- Select Reply with Copilot.
- Type a brief description of what you want to say (e.g., "decline meeting but suggest alternative date").
- Review the generated draft and make edits if necessary.
How to use Copilot to organize emails in Outlook
When organizing my inbox, I use Copilot to quickly identify actionable emails. I simply ask: "Does this message require any action from me?" or "What are the key dates mentioned in this email?" This helps me decide whether to flag, file, or delete messages.
📌 Unfortunately, Copilot's organizational features are limited to analyzing individual emails.
Use Clean Email When Copilot Isn’t Enough
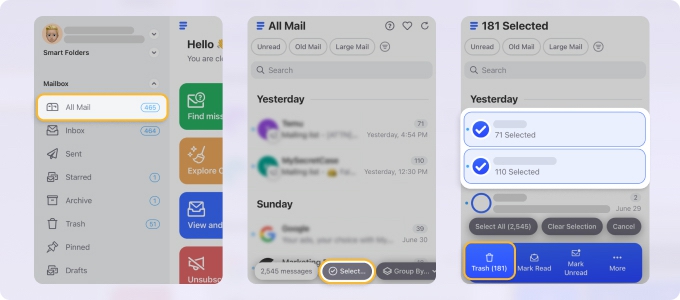
There comes a point when more capability is needed. So to clean my Outlook inbox in bulk, I rely on Clean Email's powerful tools that can:
- Bulk clean emails by sender, size, or age, which is perfect for removing years of accumulated messages in minutes.

- Automatically unsubscribe from unwanted emails even when senders don't include unsubscribe links.
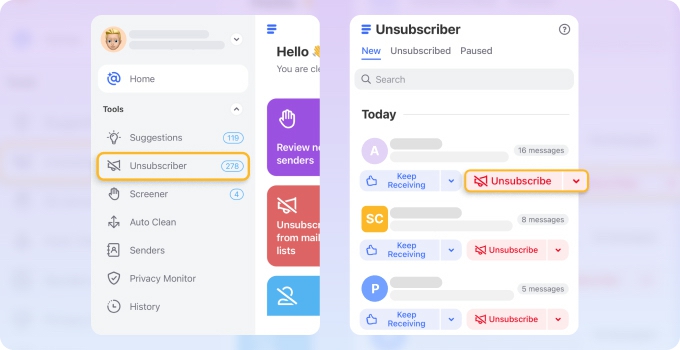
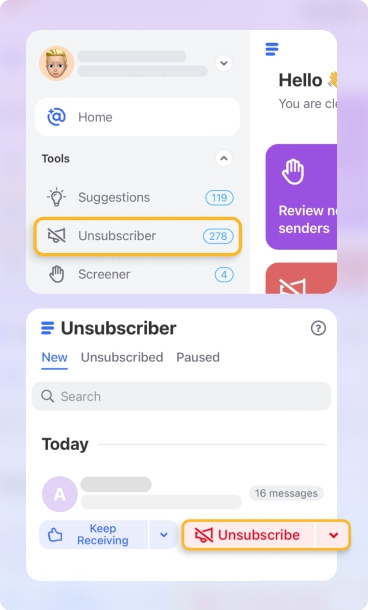
- Pause subscriptions temporarily or send them to a Read Later folder for reviewing at your convenience.
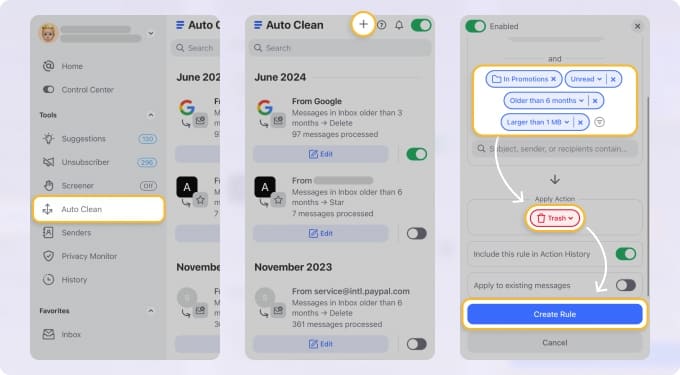
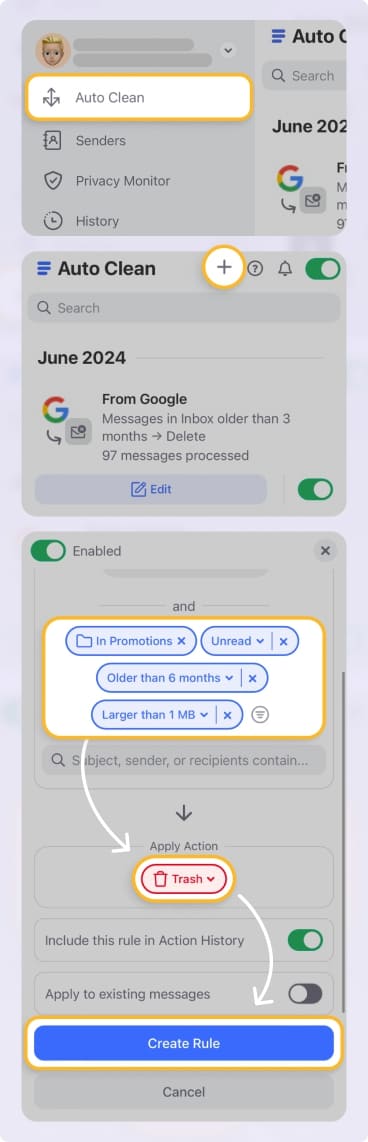
- Create Auto Clean rules to automatically move, delete, or archive future emails based on your preferences.
- Use Smart Folders to instantly group emails by category (shopping, social media, travel, etc.).
📌 Best of all, Clean Email works with all major email providers, so it's not limited to just Outlook inboxes. Whether you're managing Gmail, Yahoo, iCloud, or any IMAP-compatible service, Clean Email can organize all your messages from a single app available across iOS, Android, macOS, and the web.
As someone concerned about email security, I also value that Clean Email is safe (the service is even fully compliant with Gmail's privacy policy and other major providers' security standards) and fully committed to never selling or using its customers' personal data for marketing.
Final Thoughts
Whether you're using Outlook for personal or business purposes, take the time to properly enable Copilot on your preferred platform and explore its features, such as email summarization or drafting. You might be surprised at how much time you can save on email tasks that once felt overwhelming, especially if you combine Copilot with Clean Email for bulk organization and automation.


