AI Assistants
Learn how to connect and use Clean Email with AI Assistants: ChatGPT, Codex, or Claude.
Once connected, your AI assistant can work with all email accounts already added to Clean Email. You do not need to connect or authenticate each mailbox separately.
During setup, you may see terms such as MCP server or custom MCP server.
📌 What is MCP? MCP stands for Model Context Protocol. It is the technology that lets your AI assistant connect to Clean Email. In this guide, an MCP server refers to the Clean Email connection you are adding.
How to Connect Clean Email to Your AI Assistants
ChatGPT
📌 Note: If you use ChatGPT through a managed workspace, an admin may need to add or allow the plugin before workspace members can connect Clean Email.
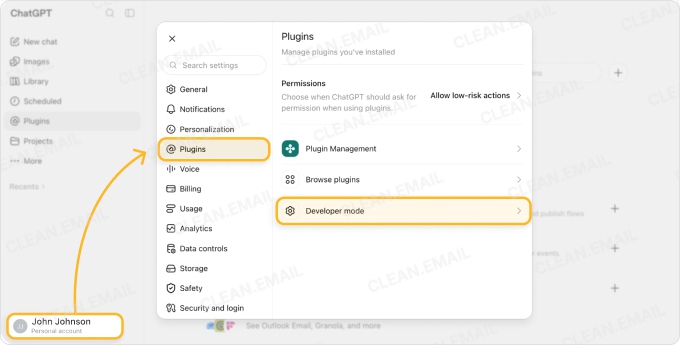
Depending on your ChatGPT version, you may need to enable Developer mode before connecting to Clean Email.
If Developer Mode Is Required
- Select your profile in the bottom-left corner and go to Settings.
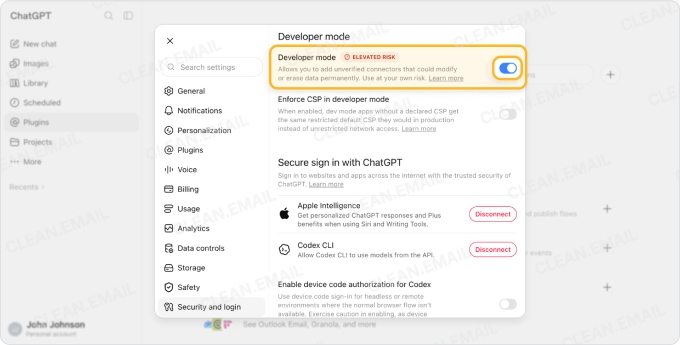
- Open Plugins → Developer mode.
- Make sure Developer mode is turned on. If it is disabled, you will not be able to connect Clean Email.
- Return to the ChatGPT sidebar and continue with the steps below.
Connect Clean Email to ChatGPT on the Web
📌 Note: The exact labels and position of the controls may differ slightly depending on your ChatGPT version.
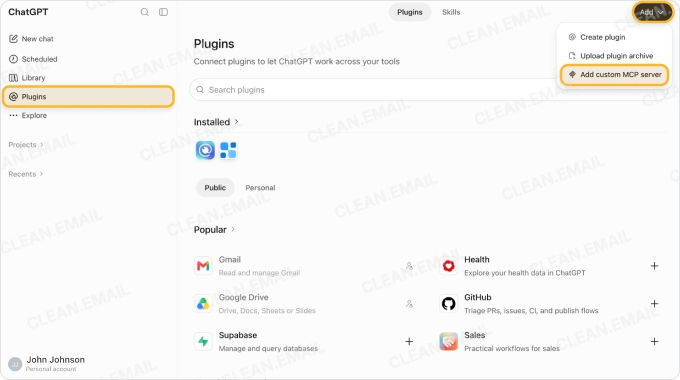
- In the sidebar, select Plugins.
- Select Add or the + button. Depending on your version, the control may appear in the top-right corner or next to the Search plugins field.
- Select Create custom MCP server or Add custom MCP server, depending on the option shown in your version of ChatGPT.
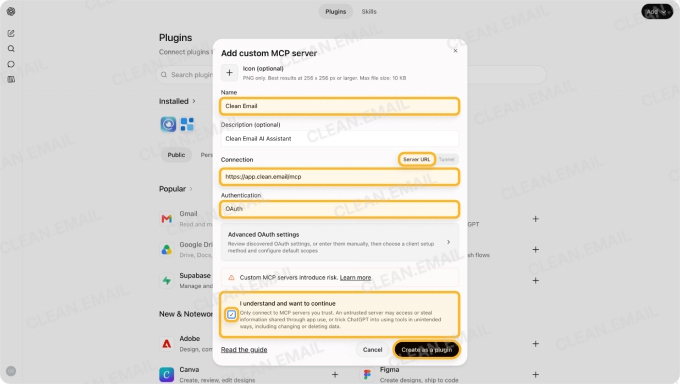
- In the window that opens, enter Clean Email as the name.
- Under Connection, keep Server URL selected and paste the Clean Email connection address: https://app.clean.email/mcp
- Under Authentication, select OAuth.
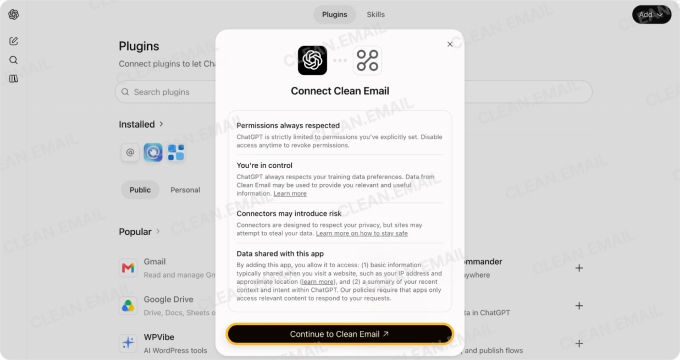
- Read the custom server notice, select I understand and want to continue, then select Create as a plugin.
- Complete Clean Email sign-in and approve the requested access.
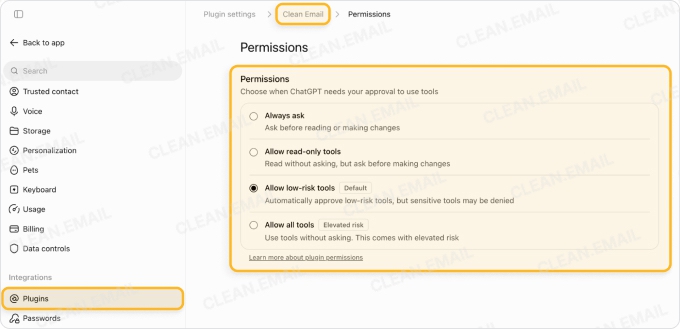
You can choose how ChatGPT handles Clean Email tools under Settings → Plugins → Plugin settings, including when it should ask for permission before accessing mailbox information or making changes.
Start a new chat and ask your AI assistant to use Clean Email to help you manage your inbox.
Codex
Codex App
📌 Note: The exact labels and position of the controls may differ slightly depending on your Codex app version and operating system. The guide below has been tested on macOS.
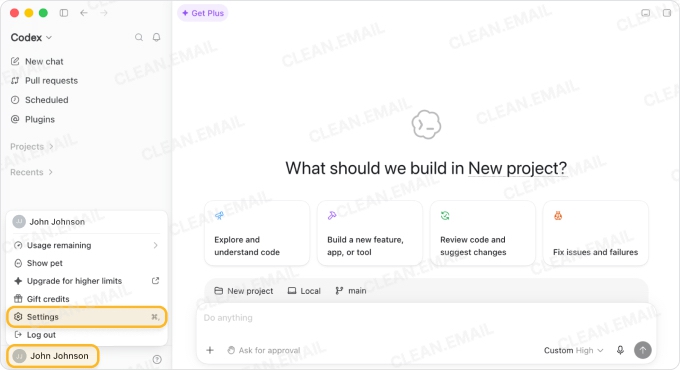
- Open the Codex app, select your profile and go to Settings, or press ⌘ + ,.
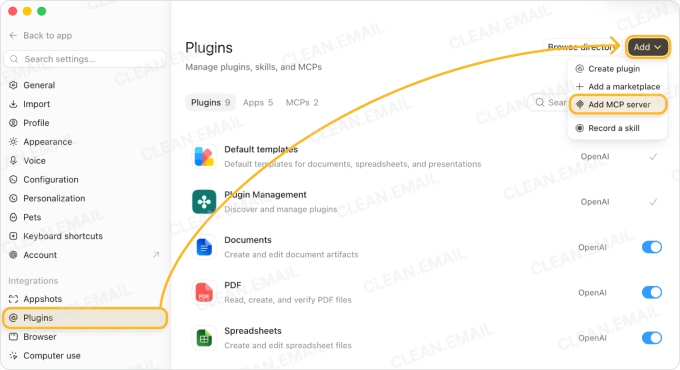
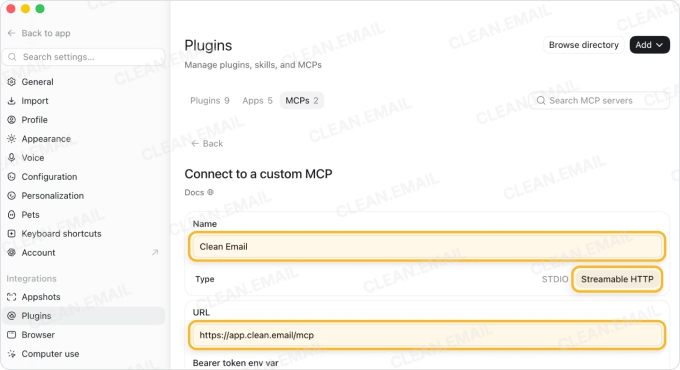
- Under Integrations, open Plugins, then select Add → Add MCP server.
- Enter Clean Email as the server name.
- Select Streamable HTTP and paste the Clean Email connection address: https://app.clean.email/mcp
- Save the server.
- Find Clean Email in the MCP server list and select Authenticate.
- Complete Clean Email sign-in and approve the requested access.
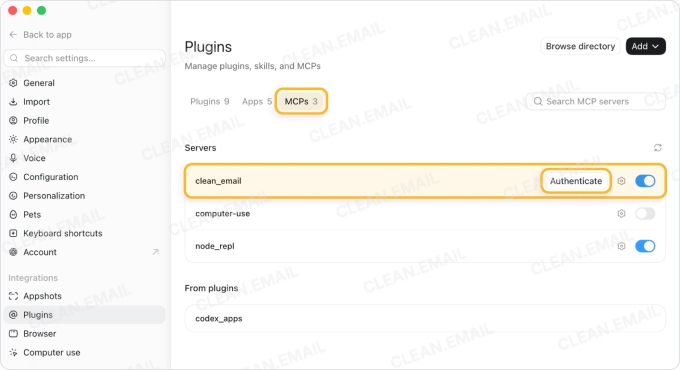
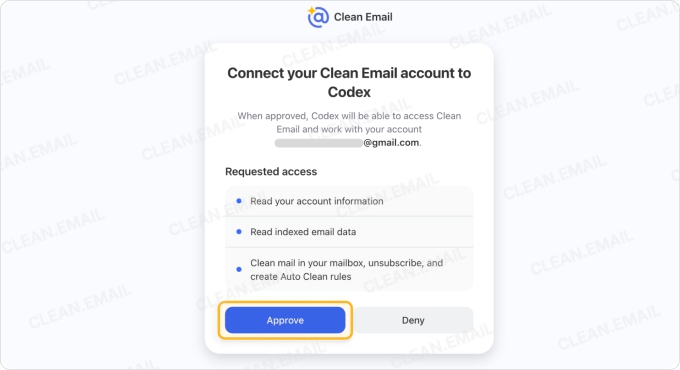
If the server does not appear immediately after saving, restart Codex.
To use Clean Email in Codex, start a new chat, click + (plus), and select Clean Email under Plugins.
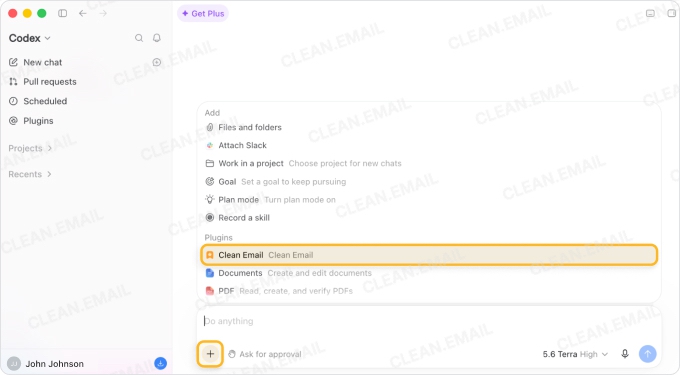
Codex CLI or IDE Extension
- Open a terminal.
- Run: codex mcp add clean_email --url https://app.clean.email/mcp
- Then run: codex mcp login clean_email
- Complete Clean Email sign-in and approve the requested access.
- To check the connection, run codex mcp list in the CLI or use /mcp in the IDE extension.
Claude
📌 Note: If you use Claude Team or Enterprise, an Owner or another authorized admin must add the Clean Email connector to the organization first. After that, members can connect Clean Email to their Claude accounts.
- Open Claude and go to Customize.
- Switch to the Connectors tab.
- Click + Add, then select Add custom connector.
- In the Add custom connector window, enter Clean Email as the name and paste the Clean Email connection address: https://app.clean.email/mcp
- Click Continue.
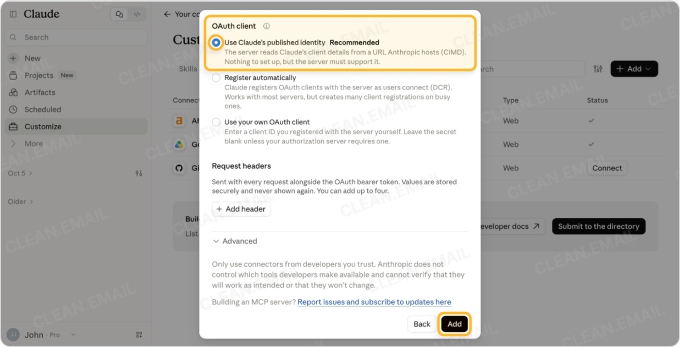
- Under OAuth client, keep Claude’s recommended settings, then scroll down and click Add.
- If you selected Sign in now during the setup process, click Connect.
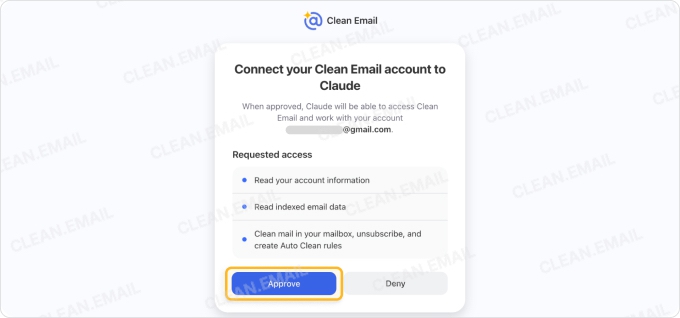
- Complete Clean Email sign-in.
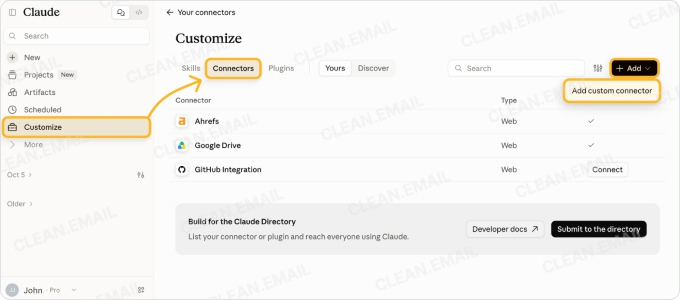
📌 Note: The Claude Free plan allows one custom connector. If you already use a custom connector for another service, you will need to remove it before adding Clean Email or upgrade to a paid plan.
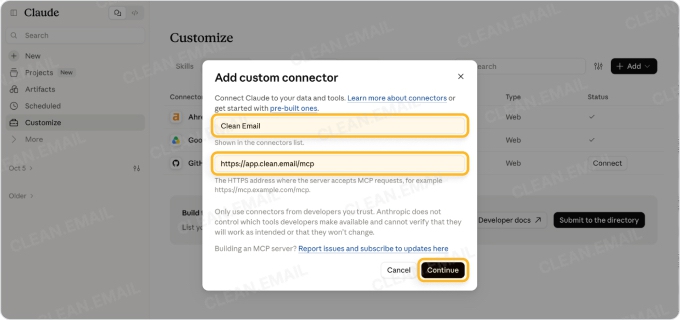
📌 Note: If Claude shows “Couldn’t check the server” or “Connecting to the server — Not found,” you can still continue with the setup. Click Continue anyway to complete the setup.
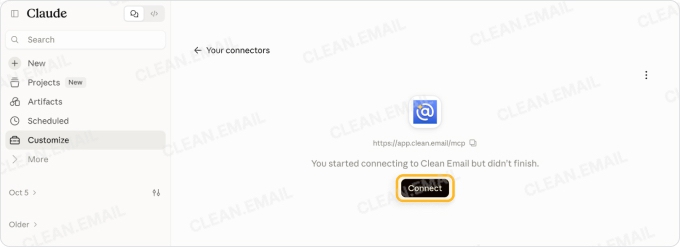
If you selected Sign in when needed, or closed the window before connecting, go to Customize → Connectors → Yours and click Connect next to Clean Email.
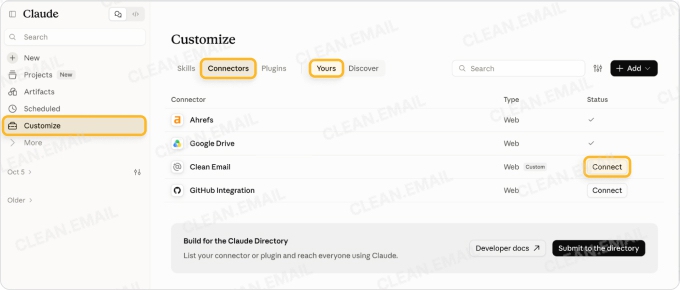
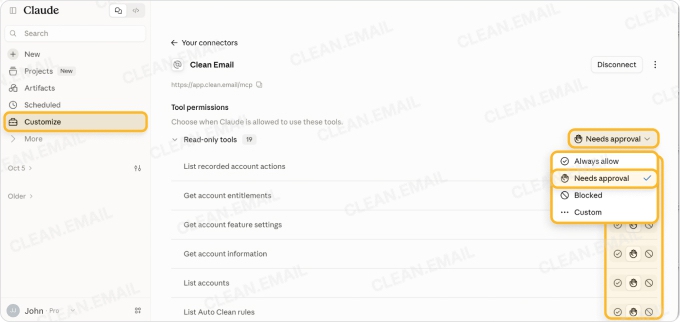
You can configure Clean Email’s tool permissions under Customize → Connectors → Yours, choosing whether Claude can use individual tools automatically, only with your approval, or not at all.
Can I Connect Other AI Apps to Clean Email?
Clean Email currently supports the AI apps listed above, as well as MCP Inspector.
To connect another AI app, contact the Clean Email team and provide the client ID and redirect address shown by the app. After we confirm support, enter the MCP address https://app.clean.email/mcp and follow the app’s sign-in steps.
Sign-in and Troubleshooting
- Sign in with the correct Clean Email account. Use the Clean Email account that already has the mailbox you want your AI assistant to work with. During sign-in, you’ll see the access your AI assistant is requesting. Select Approve to continue.
- If you previously connected Clean Email to an AI assistant but the connection no longer works, reconnect it. Remove the existing Clean Email connection from your AI app, then add it again using the steps above.
- If you keep being asked to sign in, check the connection address. Make sure it is exactly https://app.clean.email/mcp, with nothing added to the end. Then remove the existing connection and connect Clean Email again.
- If your mailbox is still being prepared, wait for the initial sync to finish. Clean Email may need some time to process a newly connected mailbox before your AI assistant can work with the full mailbox.
- Some actions ask for your confirmation. Whether confirmation is required depends on the permissions you set in your AI assistant and the action being requested. If approval is required, review the specific action shown before approving or denying it. If you deny it, that action will not run. If you approve it, the assistant can continue only with the action you reviewed.
Never paste access tokens, authorization codes, client secrets, or mailbox credentials into a chat or support message.
Please contact us and we will be happy to help.