


Key Takeaways
- You can create basic rules in Gmail to act on emails from a particular sender or set up advanced filters for conditions like keyword, size, timeframe, or attachment.
- You can set up rules for work emails, personal messages, and to keep your mailbox free of chaos.
- You can edit or delete rules by going to Settings → See all settings → Filters and Blocked Addresses.
- You cannot currently create rules in the Gmail mobile app, but can consider third-party tools like Clean Email that let you set up rules for Gmail on any device.
Set Up Advanced Rules in Gmail
Currently, you must set up Gmail filters in the web application as the feature is not available in the mobile app.
To create an advanced rule:
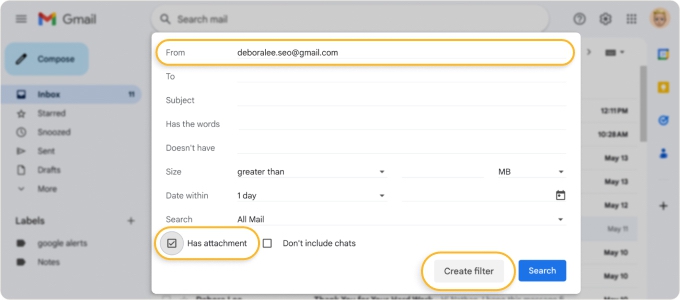
- Click inside the Search box at the top and then select the Show search options button to the right.
- Choose the criteria for your selection.
- Select Create Filter.
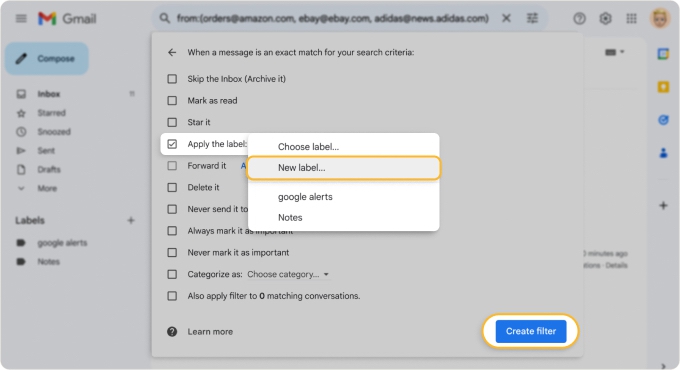
- Pick the action(s) you want to apply to the matching emails such as archive, mark as read, apply a star, label, or category, forward, delete, and flag as important.
- Optionally, choose a location using the Search drop-down box.
- Select Create Filter to finish.


Gmail Search Operators for More Precise Rules
For tighter control, Gmail supports search operators you can type directly into the filter criteria field:
- from:domain.com — all emails from a specific domain
- has:attachment or filename:pdf — emails with attachments, narrowed by file type
- category:promotions or category:social — filter by inbox tab
- OR / AND — combine conditions (e.g., from:amy OR from:david)
- -keyword — exclude emails containing a word (e.g., -unsubscribe)
- before: / after: — filter by a specific date range
Real-Life Uses for Gmail Rules
Using the above basics, you can set up a Gmail automation in just minutes. But you might be wondering what types of rules or filters would work best for your situation. Here are several example uses for Gmail rules to consider.
Manage Work Emails
Make managing emails for your job or business a breeze using filters for delegating, replying, and marking messages as you receive them.
Forward to a Delegate
Automatically forwarding emails to a team member, employee, or coworker expedites the related task. For example, say new requests come into the system and land in your Gmail inbox for you to process. You can automatically forward these to your delegate.
Condition: Enter the keywords in the Subject field such as “Customer Request,” “New Ticket,” or whatever wording your submission form uses.
Action: Check the box for Forward it to and pick the email address to the right. Note that you can add a new forwarding address if needed.
Label and Reply With a Template
Using canned responses is common for acknowledging emails from clients, customers, and vendors. You can compose a template and then automatically reply to specific emails with it. As a bonus, you can apply a label to these messages as a reminder to follow up later.
Condition: Enter a consistent keyword in the Subject or Has the words field.
Actions: Check the box for Send template, pick the template to the right, check the box for Apply the label, and pick the label to the right.
Always Mark as Important
While it’s easy to use the “Mark as Important” action for emails from certain contacts, maybe you want to use this action for other messages. For instance, you might receive attachments for contracts, statements of work, or change requests.
Conditions: Check the box for Has attachment and optionally include email addresses in the From field or keywords in the Has the words field.
Action: Check the box for Always mark it as important.
Organize Personal Emails
Using rules in Gmail can also help you organize personal messages you receive. Whether you mark them, apply a label, or assign a category, you can keep your Inbox neat and clean.
Mark as Read
As a Gmail user, you know that unread emails appear in bold font in your message list. In some cases, this is helpful, but in others, it’s distracting. Maybe you’d like particular emails like promotions or newsletters to be marked as read as soon as they arrive.
Condition: Enter the email address in the From field or a consistent keyword in the Subject like “Newsletter” or “Sale.”
Action: Check the box for Mark as read.
Apply a Label
For organizing messages, Gmail provides labels that appear in the menu. So, you might want to automatically apply labels to incoming messages related to finances, travel, or shopping for quick access. But you can also apply a label to large emails you receive for a quick and easy cleanup of bulky messages later.
Condition: Next to Size, select Greater than (or Less than) and then enter the amount in MB, KB, or Bytes.
Action: Check the box for Apply the label and pick the label to the right. Note that you can create a new label such as “Large Emails” or “Over 10 MB” if necessary.
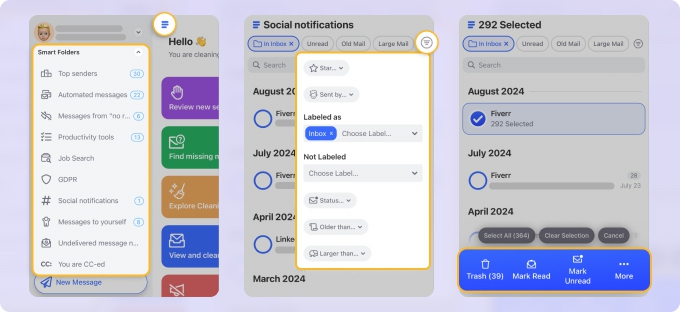
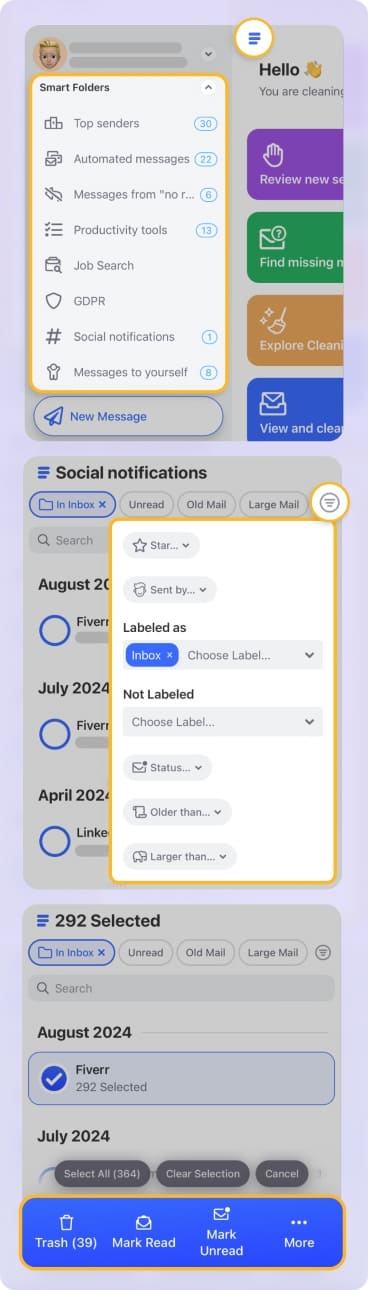
💡 Tip: To eliminate the need to set up rules in Gmail, Clean Email offers Smart Folders that filter related messages for you. You’ll see automatically generated folders for things like Online Shopping, Seasonal Sales, Travel, Entertainment, and others, with more than 30 folders in all.
Assign a Category
While Gmail does a good job of categorizing emails, some messages can fall through the cracks. If you receive messages from social outlets or community forums that land in your Primary inbox, you can automatically recategorize them.
Conditions: Enter the email address in the From field or a consistent keyword in the Subject field and choose Inbox in the Search drop-down box.
Action: Check the box for Categorize as and pick the category (like Social or Forums) to the right.
Control Clutter and Subscriptions
Whether you use Gmail for work emails, personal messages, or both, your mailbox can fill up quickly. Using Gmail’s filters, you can reduce the clutter in your Inbox and manage emails such as subscriptions.
Archive and Never Mark Important
Many subscription or mailing list messages arrive with an “important” marker to make them more noticeable in your Gmail Inbox. But it’s likely that you don’t want all emails like these marked as important and also might want to archive them to read later.
Condition: Enter the email addresses for each sender (separated by commas) in the From field.
Actions: Check the boxes for Skip the Inbox (Archive it) and Never mark it as important.
Delete and Mark as Read
If you regularly delete certain emails right from the get-go, then you’re likely interested in saving time by automating the process. In addition to automatically deleting messages, you may also want to mark them as read so that when you review your Trash, they don’t stand out as unread.
Condition: Enter or select the conditions for the messages you want to delete. Be careful to double-check those conditions to ensure you don’t mistakenly delete the wrong emails, but if you do, you can restore them from the Trash.
Actions: Check the boxes for Delete it and Mark as read.
Include Existing Emails
For any or all of the above usage examples, you can also apply the rule to existing messages. Because Gmail’s filters only work with new emails you receive, this allows you to quickly sweep through current messages to apply the same action during the rule setup.
Condition: Enter or select the conditions for the messages you want to automate.
Action: Check the boxes for the actions you want to apply and mark Also apply filter to matching messages.
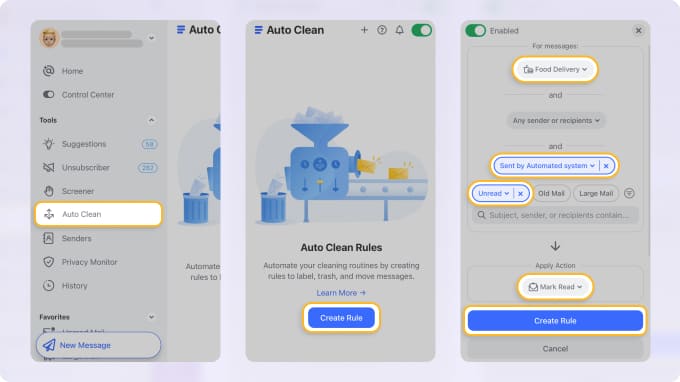
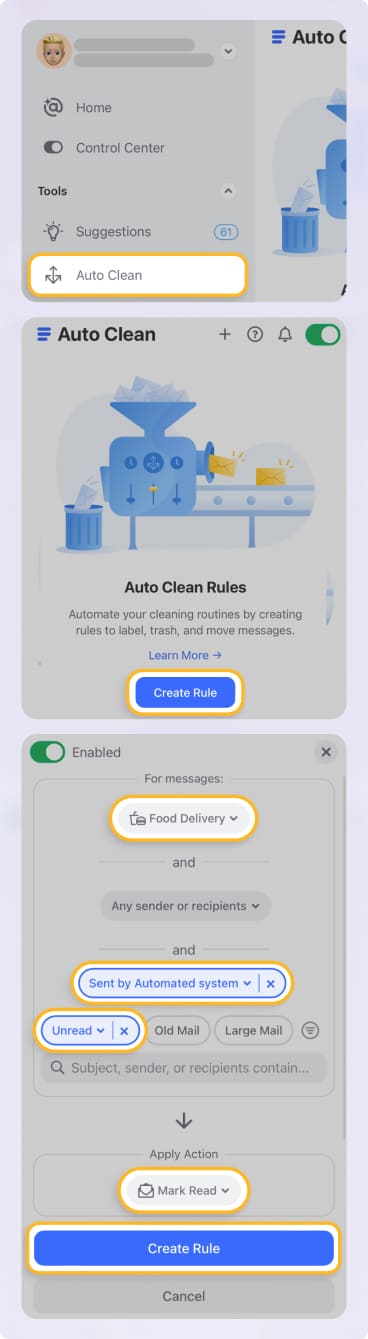
For advanced automation, consider Clean Email and its Auto Clean feature. Not only can you set up rules for new messages you receive, but also automate actions for existing emails and take the guesswork out of organizing them.
Clean Email is fully compliant with Gmail’s privacy policy requirements and is safe to use.
How to Optimize Gmail Rules for a Truly Automated Inbox
Rules become most powerful when you treat them as a system rather than one-off rules. A few principles that make the difference:
- Start with your highest-volume senders
- Layer labels and archiving together
- Use the OR operator to consolidate rules
- Apply filters to existing emails on creation
- Audit quarterly
Tackling your top five senders alone can dramatically reduce inbox noise — you can automatically sort emails in Gmail by sender to identify them quickly before building your rules.
Applying a label without also checking "Skip the Inbox" means filtered emails still land in your inbox. For true automation, use both together.
Instead of creating separate filters for five newsletter senders, combine them into one: from:sender1@mail.com OR from:sender2@mail.com. Fewer rules means less maintenance.
Any time you set up a new filter, check Also apply filter to matching conversations. This instantly cleans up your backlog and confirms whether the rule works as expected.
Set a recurring reminder to visit Settings → Filters and Blocked Addresses and delete rules that no longer apply. A bloated filter list is harder to troubleshoot when something goes wrong.
Conclusion
Now that you know how to create rules in Gmail for emails, give it a try for yourself and see how much time you can save managing your mailbox.
And remember that complementary apps like Clean Email (which you can try for free!) can help you organize and manage messages in bulk. Plus, you can create automated rules with advanced sets of conditions and actions, filter and group emails with ease, and mass unsubscribe to declutter your inbox.


