


What is Hide My Email?
With Apple’s Hide My Email, a unique email address is randomly generated for you to use for things like newsletter signups, app or account registrations, sweepstakes entries, and similar email address-based processes.
If you’ve considered using an alias in Outlook or have even created an alias in Gmail, Hide My Email works similarly. Any communications you receive to the alias (hidden address) are automatically forwarded to your primary email address and you can read and reply to messages using the alias while keeping your main address private.
Hide My Email is available on iPhone, iPad, and Mac. And, if you use Sign In with Apple, you can also take advantage of the Hide My Email feature although it’s not required.

Hide My Email Security
Apple affirms that it does not read content that moves through the Hide My Email process except to perform spam filtering. Additionally, Apple states that “All email messages are deleted from our relay servers after they're delivered to you, usually within seconds.”
So, along with keeping your primary email address private, the content of the communications you receive stays safe and sound when using the feature.
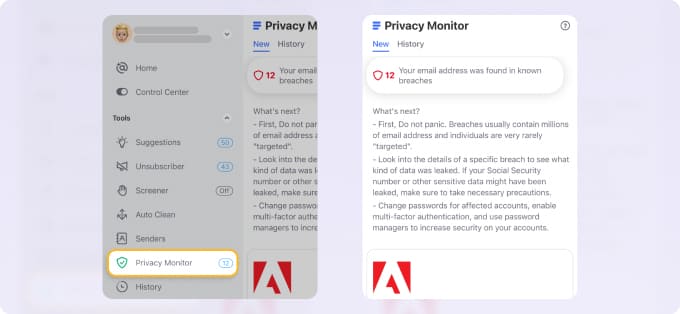
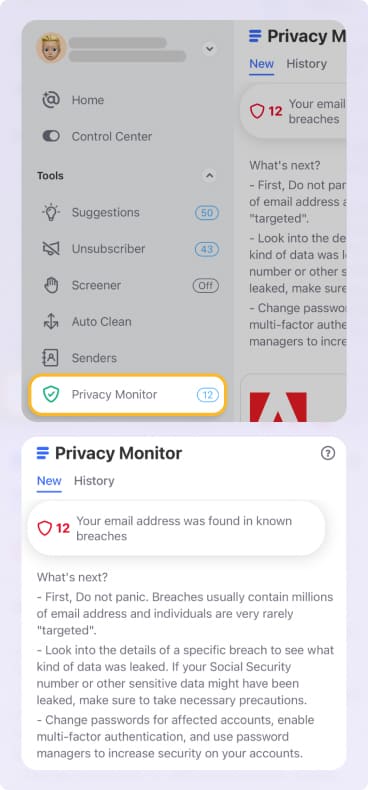
💡 Tip: If you’re concerned about general email security, consider using Clean Email alongside the Mail app and Hide My Email feature. With Clean Email, you can use the Privacy Monitor which alerts you of data breaches involving your email address.
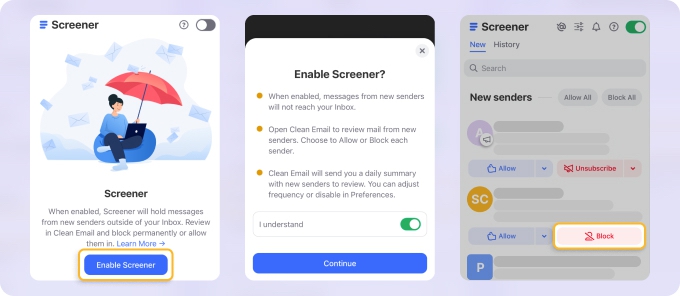
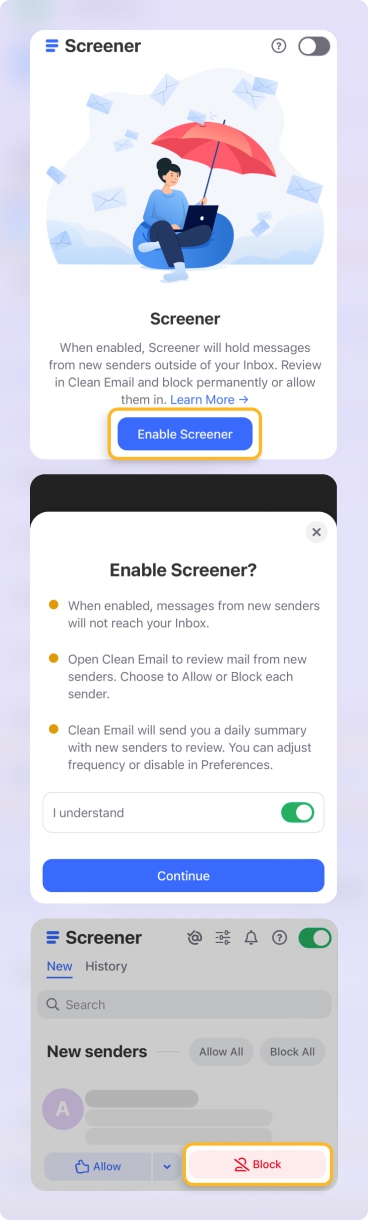
In the meantime, the Screener tool isolates messages from unknown senders until you review and approve or block them.
Clean Email is available on Android, iOS, macOS, and as a web app, so you can keep your inbox secure from any device.
Hide My Email Pros and Cons
Like most any feature, there are advantages and disadvantages to consider. This table sums up the pros and cons of Hide My Email.
- Increased privacy by hiding your primary email address.
- Enhanced control with options to deactivate or reactive an email alias.
- Unlimited email aliases are available.
- Each alias is unique making it difficult to remember multiple email addresses.
- Cannot prevent spam, cyberattacks, or security breaches.
- Not available for every app, website, and service.
How to Use Hide My Email
To use the Hide My Email feature, you’ll need an iCloud+ subscription and must be signed in with your Apple ID. You’ll then see the option when using an application that requests your email address such as websites, emails, Apple Pay, and supported third-party mobile apps.
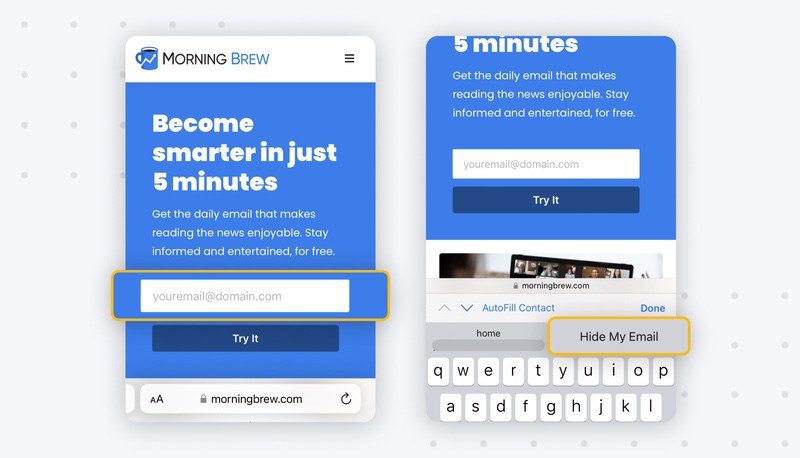
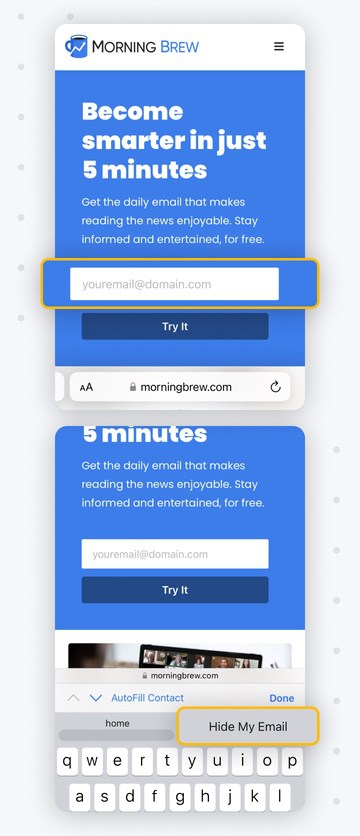
📌 Web: When using Safari to sign up for a new account or subscribe to a newsletter, tap or click inside the email address field and choose the Hide My Email option.
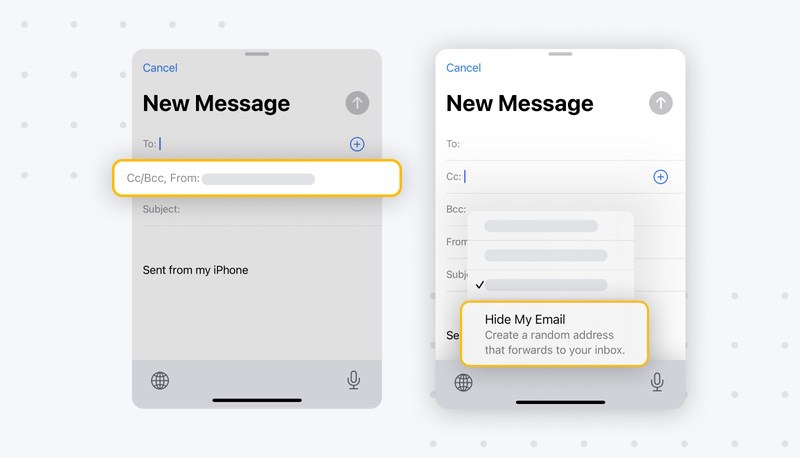
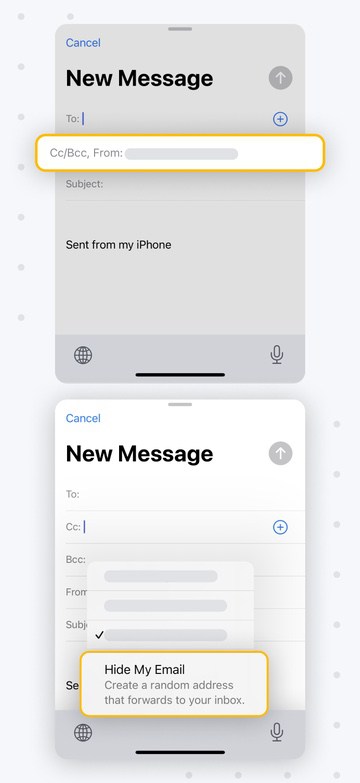
📌 Email: If you’re sending an email in the Mail app, tap or click the From field and choose the Hide My Email option.
📌 Apple Pay: For Apple Pay, you’ll need iOS 17, iPadOS17, macOS 14, or later. When the payment sheet appears, pick Contact (mobile) or the pencil icon (Mac), and choose Hide My Email.
📌 Wallet and Apple Pay: You can also enable the feature in your Wallet and Apple Pay settings:
- On iPhone and iPad, open Settings, select Wallet & Apple Pay, tap Email, and turn on the Hide My Email toggle.
- On Mac, open System Settings, select Wallet & Apple Pay, and turn on the Hide My Email toggle.
📌 Apps: For supported third-party apps, you’ll need iOS 16, iPadOS16, or later. Tap inside the email address field and choose the Hide My Email option.
Depending on the device and location where you’re using Hide My Email, you’ll see options to generate a different alias and add a note. Then, tap Continue or click Use to complete the process.
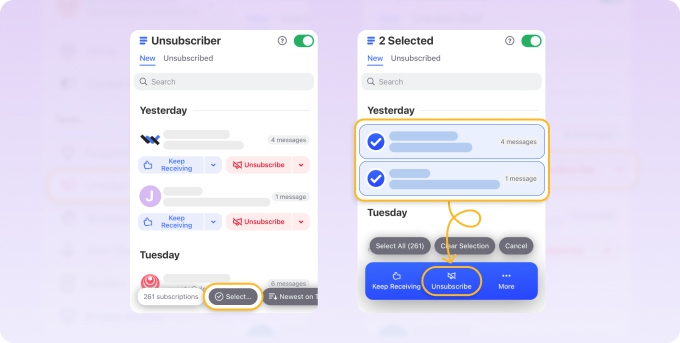
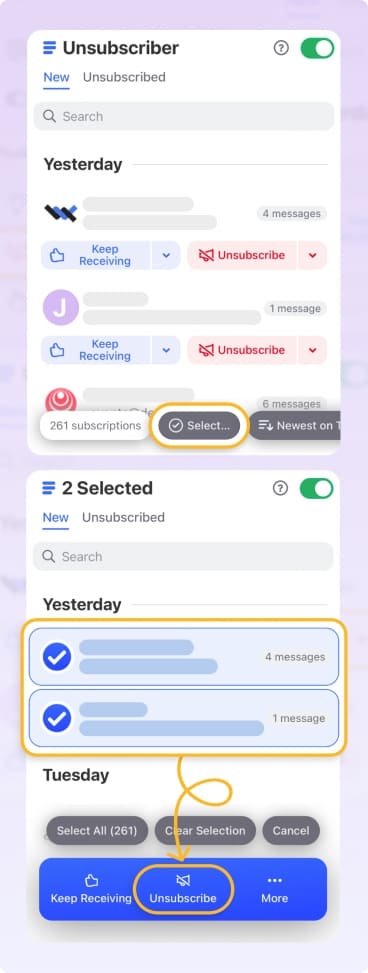
💡 Tip: If you use Hide My Email for newsletter signups, you can more easily and safely unsubscribe later using Clean Email’s Unsubscriber tool. This lets you unsubscribe in bulk as well as temporarily pause subscriptions.
How to Manage Hide My Email Aliases on iPhone and iPad
Once you start using Hide My Email, you’ll accumulate a list of aliases that you can then manage. You can review the addresses, copy one to paste where needed, and change the forwarding address. Here’s how to find hidden emails on iPhone and iPad.
Review ‘Sign In With Apple’ Aliases on Mobile
- Open Settings and tap your Apple ID.
- Select Sign in with Apple.
- Choose an app or website from the list.
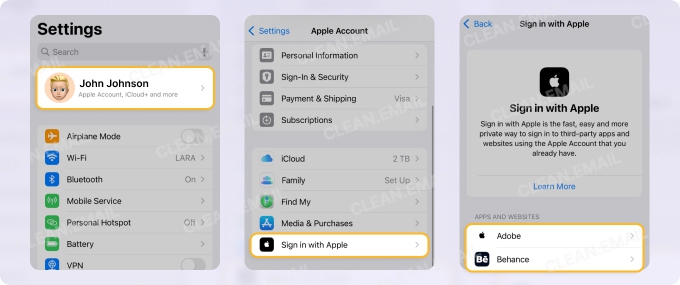
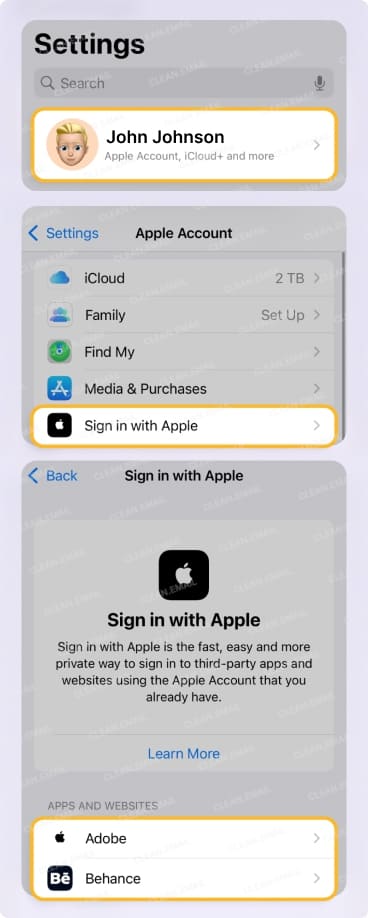
If you see Hide My Email followed by an address ending with @privaterelay.appeid.com then that’s the alias for that app or site.
Edit Aliases on Mobile
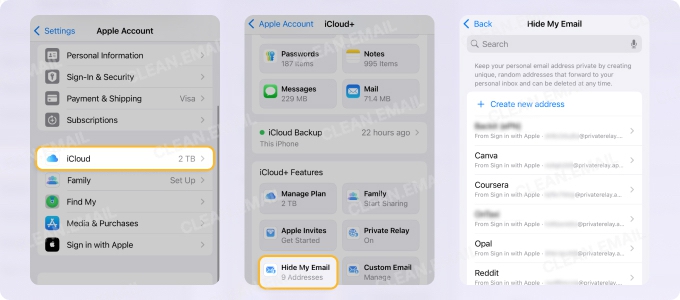
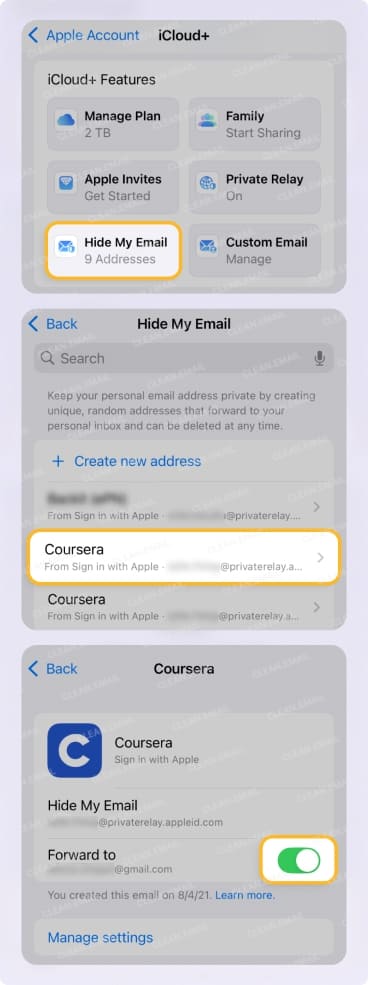
- Open Settings and tap your Apple ID.
- Select iCloud.
- Choose Hide My Email in the iCloud+ Features section.
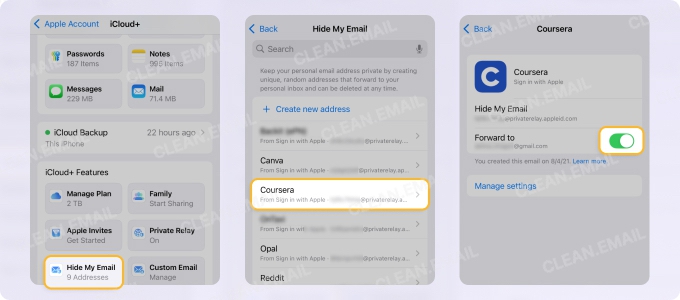
- Pick an option from the list to make one of the following changes:
- For Sign In with Apple aliases, you can turn off the forwarding address.
- For other aliases, you can adjust the label or note.

You’ll see the label directly below the app or website name. For example, you may see “From Sign in with Apple,” “From Safari,” or “From [App Name].”
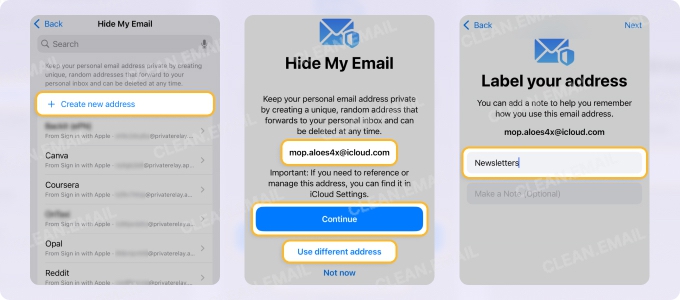
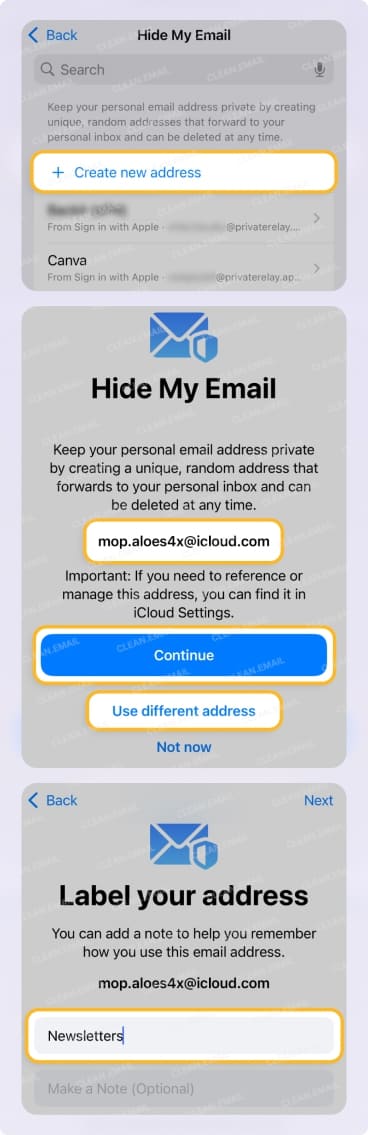
Additionally, you can add a new alias or change the default forwarding address:
- Tap Create New Address, then Continue, or Use different address, if you want to choose another one from the available, then enter a label, optionally include a note, and tap Next. Long-press the address to copy it and tap Done.
- Tap Forwarding Address, choose the new address, and tap the checkmark. Note that the email address must be associated with your Apple ID.
How to Manage Hide My Email Aliases on Mac
Just like on iPhone and iPad, you can manage your Hide My Email aliases on Mac. This allows you to review, copy, or make minor changes on your desktop. Here’s how to find the hidden email addresses on macOS.
Review ‘Sign In With Apple’ Aliases on Mac
- Open System Settings and click your Apple ID.
- Select Sign in with Apple.
- Choose an app or website from the list.
If you see Hide My Email followed by an address ending with @privaterelay.appeid.com then that’s the alias for that app or site.
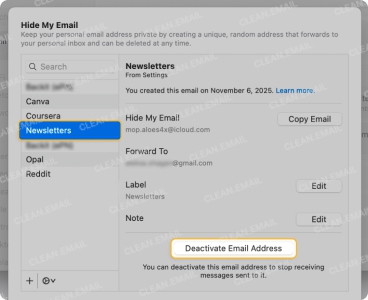
Edit Aliases on Mac
- Open System Settings and click your Apple ID.
- Select iCloud.
- Choose Hide My Email in the iCloud+ Features section.
- Pick an option from the left-hand list to make one of the following changes:
- For Sign In with Apple aliases, you can turn off the forwarding address.
![Edit aliases on Mac]()
![Edit aliases on Mac]()
- For other aliases, you can edit the label or note.
Additionally, you can add a new alias or change the default forwarding address:
- Click the plus sign to add an alias. Then, enter a label, optionally include a note, and click Continue. Select Copy Address and click Done.
- Click the gear icon and choose Change Forwarding Address. Pick the new address and click Done. Remember that the email address must be connected to your Apple ID.
How to Turn Off Hide My Email
You won’t find an option to turn off the feature in the Hide My Email settings. Instead, you can deactivate the alias. This does not delete an account or app, but merely stops forwarding emails from it to your primary account.
💡 Note: You can only deactivate an alias if you’re not using it with Sign In with Apple. To stop using Hide My Email in that case, you can either turn off the forwarding or stop using Sign In with Apple for that app or website.
Deactivate an Alias on iPhone and iPad
- Open Settings and tap your Apple ID.
- Select iCloud.
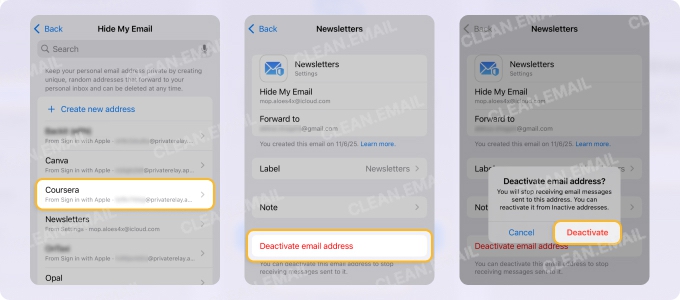
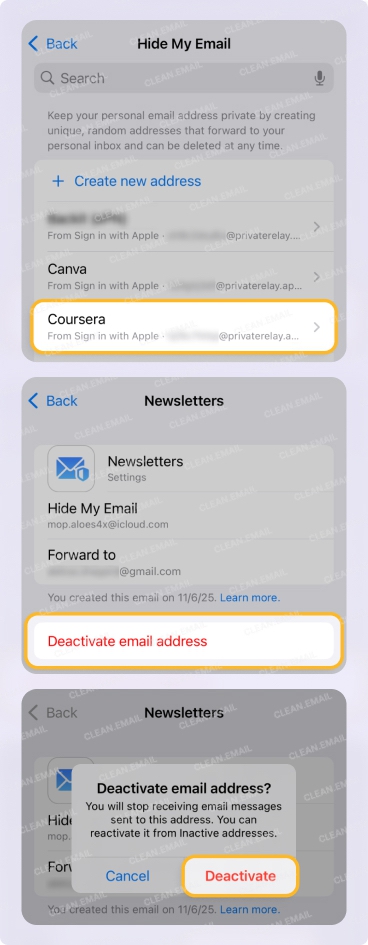
- Choose Hide My Email in the iCloud+ Features section.
- Pick an option from the list and tap Deactivate email address.
- Confirm with Deactivate.
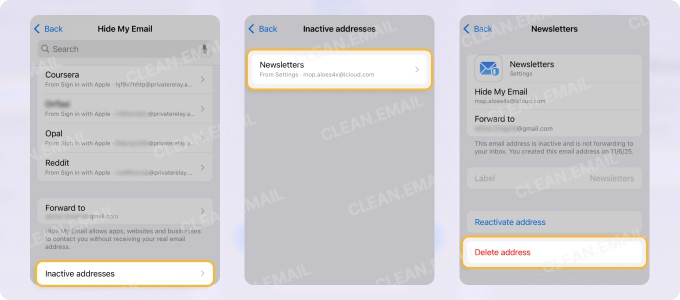
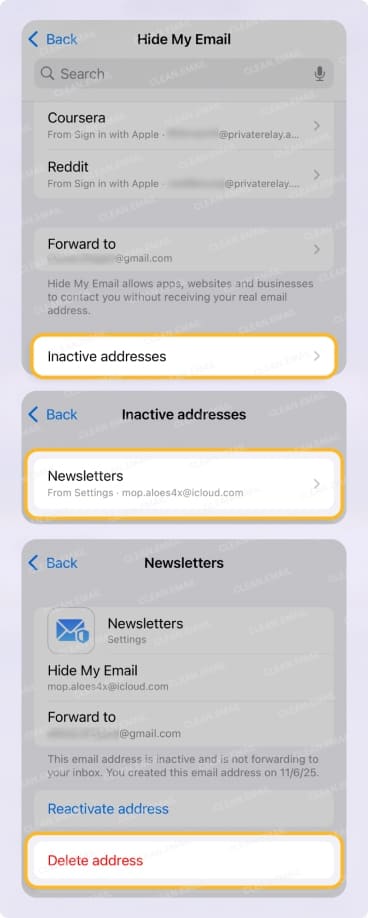
To reactive or delete a deactivated email address, follow these steps:
- Return to Settings → Apple ID → iCloud → Hide My Email.
- Scroll to the bottom and choose Inactive Addresses.
- Pick an address and select Reactivate Address or Delete Address.
- Confirm in the pop-up window.
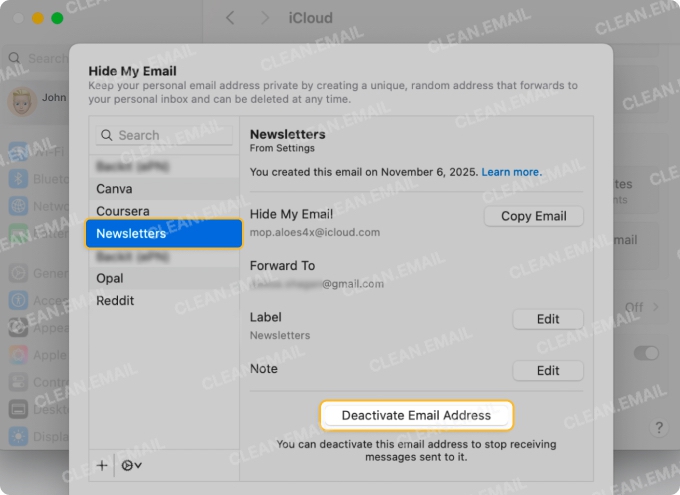
Deactivate an Alias on Mac
- Open System Settings and click your Apple ID.
- Select iCloud.
- Choose Hide My Email in the iCloud+ Features section.
- Pick an option from the left-hand list and click Deactivate Email Address.
- Confirm with Deactivate.
To reactive or delete a deactivated email address, follow these steps:
- Return to System Settings → Apple ID → iCloud → Hide My Email.
- Click the gear icon and choose Show Inactive Addresses.
- Pick an address and select Reactivate Address or Delete Address.
- Confirm in the pop-up window and click Done.
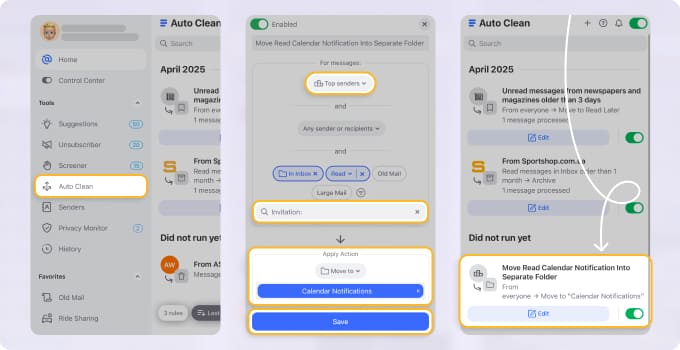
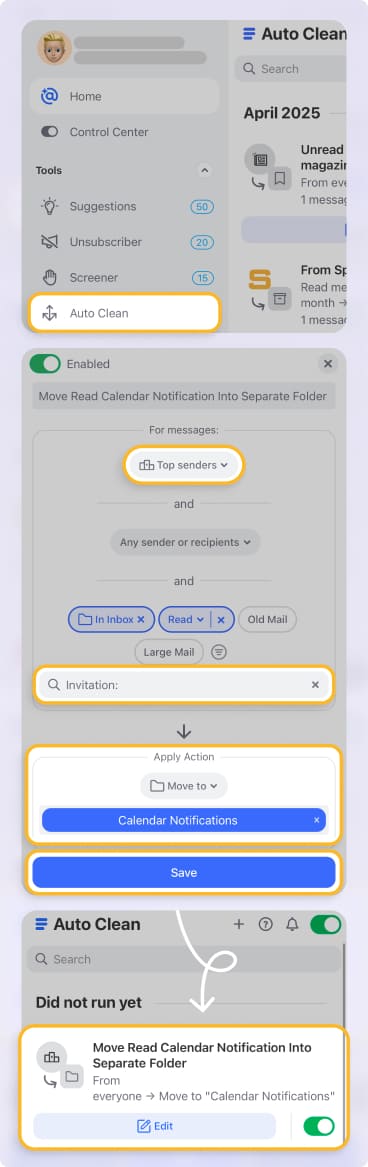
💡 Tip: If you’re considering deactivating a Hide My Email alias to reduce inbox clutter, first check out Clean Email’s Auto Clean feature. With it, you can create rules to manage and organize messages as they arrive which includes emails sent to a particular alias.
Conclusion
The iCloud Hide My Email feature is a terrific option for keeping your primary email address private. This makes it ideal for one-time uses like contest entries or signups for apps and services you’re testing out.
Again, look into using Hide My Email along with Clean Email for superb inbox control. You can automatically organize the forwarded messages you receive, unsubscribe in bulk without revealing your primary address, and screen incoming emails for increased security.
Clean Email is a safe mailbox management tool available on desktop and mobile for all IMAP service providers.


