


Key Takeaways
- Right-click method: right-click a message in your inbox → Block Contact — fastest, no need to open the email
- Settings method: Mail → Settings → Junk Mail → Blocked → set "Move to Trash" — full control over your blocked list and where their mail goes
- Gmail on Mac: open email → ⋮ → Block [sender] → confirm — future messages go to Spam
- Outlook on Mac: open email → ⋯ More options → Block → OK — blocked messages go to Junk
- Yahoo on Mac: Settings → More Settings → Security and Privacy → Blocked addresses → Add → Save
- Blocked senders still getting through? Apple Mail's block is client-side — see the troubleshooting section below; also check if the sender switched to a new address

How to Block Emails in Apple Mail on Mac
Apple Mail gives you three ways to block a sender. The right-click method is fastest for immediate action; the settings method gives you full visibility over your blocked list and control over where their messages land.
Method 1: Block Without Opening the Message
Use this when you're certain a message is spam and don't want to open it — avoiding the email also prevents any tracking pixels from loading.
- Open the Mail app on your Mac.
- In your inbox, locate the message from the sender you want to block.
- Right-click the message.
- Select Block Contact from the context menu.

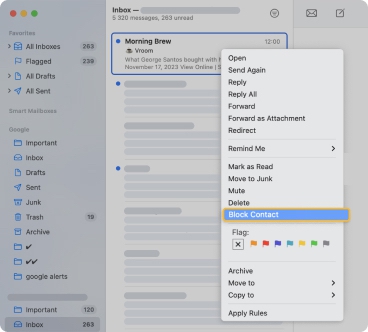
A Blocked icon appears next to the sender's name in the message list, and their messages will be marked with a blocked banner going forward.
Method 2: Block After Reading a Message
Use this when you want to review the email before deciding to block the sender:
- Open the Mail app and select the message.
- Hover your cursor over the sender's name in the message header.
- Click the arrow that appears next to their name.
- Select Block Contact.
The Blocked icon will appear next to their name in your inbox list going forward.
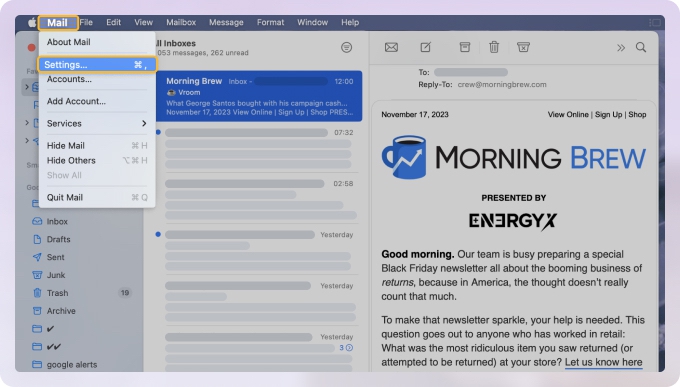
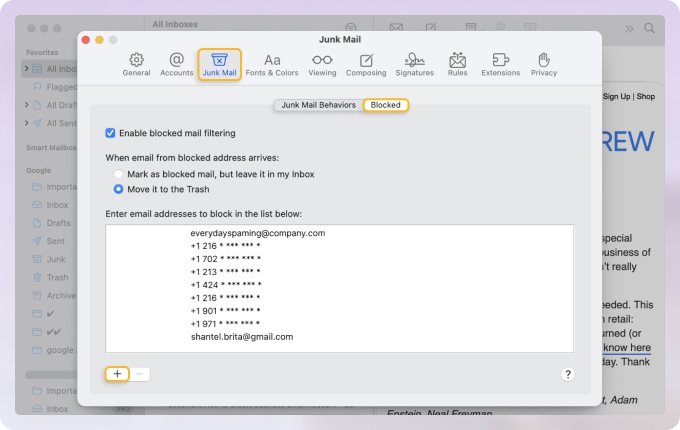
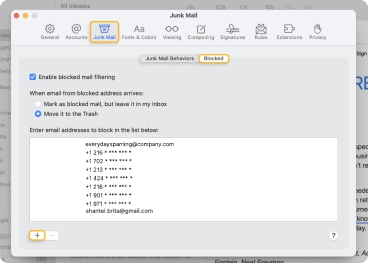
Method 3: Manage Your Blocked Senders List
Use this for full control — add addresses manually, view all blocked senders in one place, and configure exactly where their mail goes:
- Open the Mail app and go to Mail → Settings in the menu bar.
- Click the Junk Mail tab.
- Select Blocked.
- Click ✚ to add an email address to the block list manually.
- Under When email from a blocked address arrives, select Move it to the Trash for the most reliable filtering.
How to Unblock Email Senders in Apple Mail
To unblock from a message: hover over the sender's name in the message header, click the arrow, and select Unblock Contact.
To manage your full blocked list: go to Mail → Settings → Junk Mail → Blocked, find the address, and click the − button to remove it.
📌 Note: If you're using iCloud as your mail account and want a block that works across all your Apple devices — not just this Mac — use iCloud.com rules instead. They run server-side and apply regardless of which device or app you're using. See how to block emails on iCloud for the full walkthrough.
How to Block Emails in Gmail on Mac
- Sign in to Gmail and open an email from the sender you want to block.
- Click the three dots (⋮) next to the Reply button in the top right of the message.
- Select Block "[Sender's name]".
- Click Block in the confirmation pop-up.
![Choose Block [sender’s name]](https://clean.email/user/pages/how-to-block-an-email-address/block-emails-on-mac/choose-block.jpg)
![Choose Block [sender’s name]](https://clean.email/user/pages/how-to-block-an-email-address/block-emails-on-mac/choose-block-mobile.jpg)
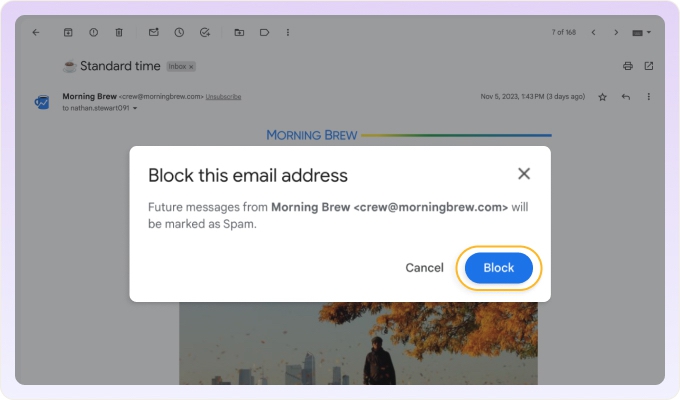
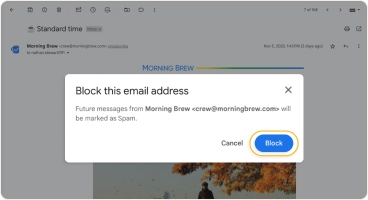
Future emails from that address go automatically to your Spam folder.
To unblock a Gmail sender: open any of their messages → ⋮ → Unblock "[Sender]". If you no longer have any of their messages, go to Settings → See all settings → Filters and Blocked Addresses, find the address, and click Unblock.
How to Block Emails in Outlook on Mac
The steps are the same whether you use Outlook.com in your browser or the Outlook app for Mac.
- Open your inbox and select an email from the sender you want to block.
- Click More options (⋯) in the message toolbar.
- Select Block.
- Click OK to confirm.
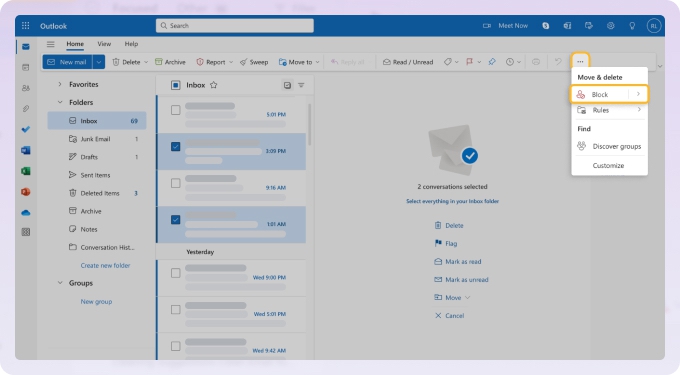
Blocked messages go to your Junk folder. To manage your blocked senders list in Outlook, go to Settings → Mail → Junk email. For more details, see how to block emails on Outlook.
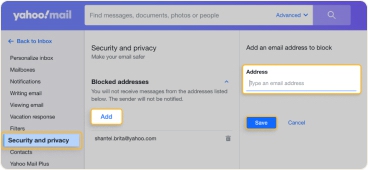
How to Block Emails in Yahoo on Mac
Yahoo Mail allows blocking up to 500 addresses. Blocked messages are automatically moved to your Spam folder.
- Sign in to Yahoo Mail.
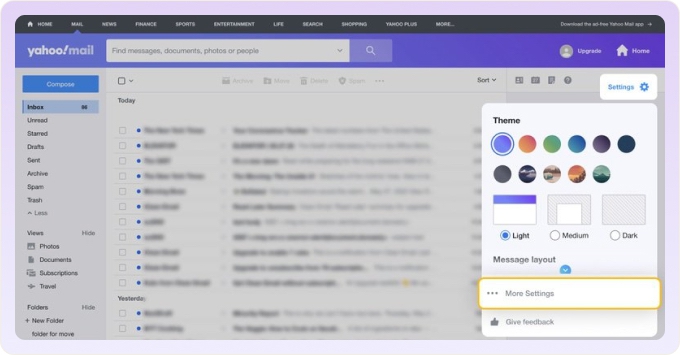
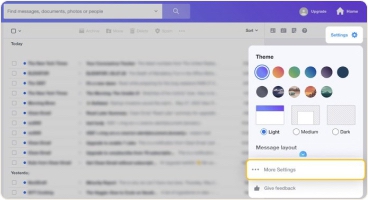
- Click the Settings icon (⚙) in the top right, then select More Settings.
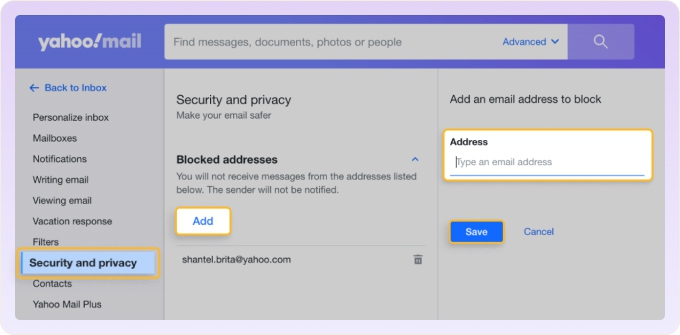
- In the left sidebar, click Security and Privacy.
- Next to Blocked addresses, click Add.
- Enter the email address you want to block.
- Click Save.
To unblock an address, return to Security and Privacy → Blocked addresses and click the X next to the address. For more on Yahoo email blocking and unblocking, see how to block emails on Yahoo.
Why Blocked Emails Still Arrive on Mac
Two causes account for most cases where blocked senders keep reaching your inbox:
Apple Mail's block is client-side. The "Block Contact" feature runs inside the Mail app on your Mac — not at the server level. Your email provider delivers the message to your account first; the app filters it afterward. If Mail isn't running when a message arrives, or if the server delivers messages before the app processes them, blocked emails can still land in your inbox. For iCloud accounts, the more reliable fix is to use iCloud.com rules which run server-side. For Gmail, use a Gmail filter (Settings → See all settings → Filters and Blocked Addresses → Create a new filter).
The sender changed their address. Blocking only stops the exact address you targeted. If a spammer moves to a new address — even a variation within the same domain — your existing block doesn't apply to it. The section below covers options for domain-level filtering.
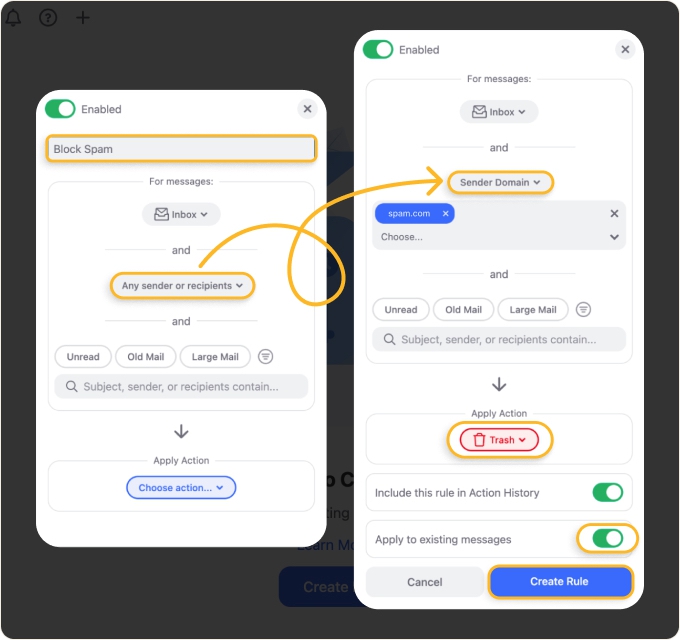
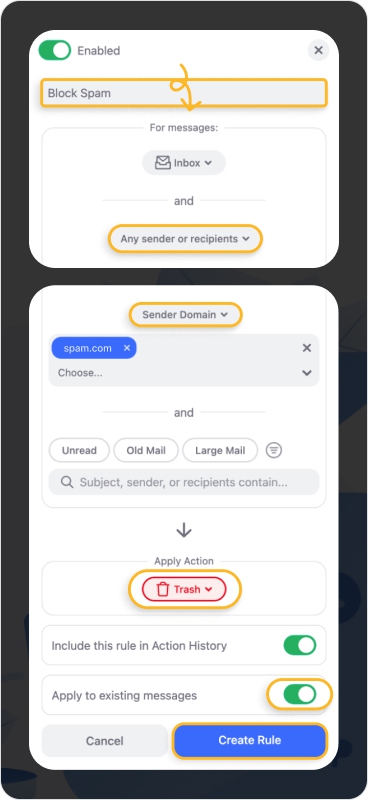
When Blocking One Address Isn't Enough
If a sender keeps reaching you from new addresses within the same domain, address-level blocking won't solve the problem. For domain-level filtering without setting up a new rule for each new address, Clean Email's Auto Clean lets you create rules that route all messages from an entire domain to Trash — across Gmail, Outlook, iCloud, and Yahoo simultaneously.
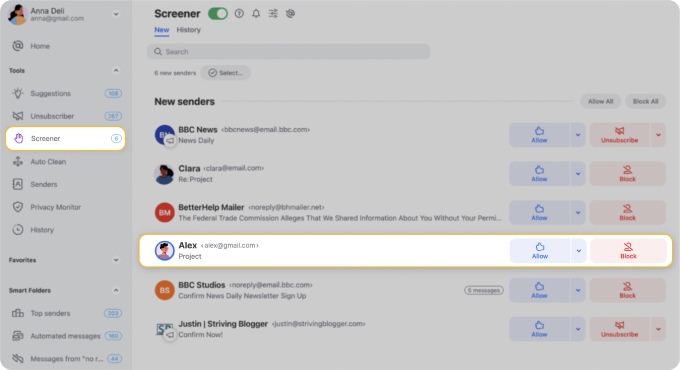
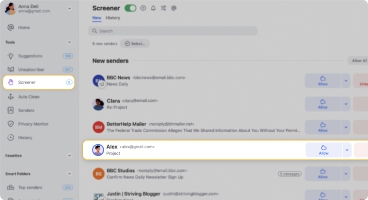
Another effective strategy for blocking junk is to stop it from entering your inbox altogether. With the Screener feature in Clean Email, you can easily prevent annoying senders from infiltrating your inbox.
Frequently Asked Questions
Why am I still getting emails from blocked senders in Mac Mail?
Apple Mail's "Block Contact" is a client-side filter — it runs on your Mac after the email has already been delivered to your account. If Mail isn't open when the message arrives, or your provider delivers messages before the app can filter them, blocked mail can still reach your inbox. Also check whether the sender has changed to a slightly different address — that would bypass your existing block.
How do I permanently block an email address on Mac?
In Apple Mail, go to Mail → Settings → Junk Mail → Blocked, click +, and add the address. Then under "When email from a blocked address arrives," select Move it to the Trash. This is more durable than the right-click method because it persists even if you delete their messages. For the most permanent option in iCloud accounts, use iCloud.com rules — they're server-side and persist indefinitely until you delete them.
How do I block emails on a MacBook or iMac?
The steps are identical on all Mac models — MacBook Air, MacBook Pro, iMac, and Mac mini all run the same macOS Mail app. Follow any of the methods in this article depending on your email provider.
How do I block someone on Mac without opening their email?
In Apple Mail, right-click the message in your inbox list and select Block Contact — this blocks the sender without opening the message. This is the recommended approach if you're concerned about tracking pixels, which load when you open an email and can signal to spammers that your address is active.
How do I block an entire domain in Mac Mail?
Apple Mail doesn't have a native domain-blocking option. The closest workaround is to create a mail rule (Mail → Settings → Rules → Add Rule) that matches the sender domain and moves matching messages to Trash. Alternatively, Clean Email's Auto Clean supports domain-based rules directly and works across all your connected email accounts.


