


Key Takeaways
- No-sender emails appear with a blank, "(No Sender)", or dash in the From field and can result from broken email headers, deliberate spam tactics, bounce messages, or client display bugs.
- Standard "Block Sender" buttons are often not enough for no-sender messages because many don't expose a usable address — filters that detect the absence of "@" in the From field tend to be more reliable long-term.
- On iPhone, a recurring iOS display bug (first seen in iOS 13 and reported again in newer iOS 18 releases) can show valid emails as "No Sender" — removing and re-adding your account usually fixes it.
- The "no sender email won't delete" problem is a separate issue caused by malformed message headers; platform-specific workarounds are in the dedicated section below.
- Microsoft 365 and Exchange admins can combine header-based mail flow rules with anti-spam policies to catch no-sender messages server-side before they reach any user inbox.

What Causes Emails with No Sender?
No-sender emails have four distinct root causes — and they behave very differently from one another.
- Malformed email headers
- Deliberate spam tactic
- Backscatter / bounce messages
- iOS Mail display bug
Some legitimate senders — automated booking systems, CRM tools, older newsletter platforms — send emails with incorrectly structured MIME formatting. The message arrives, but the "From" field is blank because the header was never properly set. These are generally harmless but annoying.
Some spammers intentionally omit the FROM address to evade filters that flag known spam domains. Without an address to match against blocklists, the email slips through.
If a spammer forged your email address as the sender in their campaign, Non-Delivery Reports (NDRs) from failed deliveries bounce back to you. These typically appear as messages from "Mailer-Daemon" or similar system addresses, and in some clients may occasionally show with incomplete or missing sender information. This does not mean your account was compromised — the spammer spoofed your address without ever accessing it.
Apple's Mail app has had a recurring glitch that causes regular emails with valid senders to display as "No Sender / No Subject" in the inbox list. The emails themselves are fine — only the display is broken. This occurred widely in iOS 13 and has been reported again in newer iOS 18 releases. If you're seeing every email labeled "No Sender" on your iPhone, this is almost certainly the cause. See the Apple Mail section below for the fix.
Are No-Sender Emails Dangerous?
Sometimes — but often not. Here's a quick breakdown:
- Potentially dangerous: A no-sender email containing links or attachments could be a phishing attempt. The missing FROM field is sometimes a deliberate tactic to bypass content filters. Over 90% of cyberattacks begin with a phishing email, so treat any unsolicited no-sender message with links as suspicious until proven otherwise.
- Usually harmless: Bounce messages (Mailer-Daemon NDRs) and emails from misconfigured automated senders are generally not malicious. Don't click links in them, but they're not a sign your account is at risk.
- Definitely harmless: If you're on iPhone and seeing "No Sender" on every message, it's the iOS display bug — your inbox and account are fine.
The safest default: don't open no-sender emails you weren't expecting, don't click links inside them, and use the platform steps below to filter or delete them automatically.
Why No-Sender Emails Are Hard to Block
Standard "Block Sender" buttons usually are not enough for no-sender messages because many of these emails don't expose a usable address in the From field. In those cases, simple blocking may fail or only work temporarily, so filters that look for missing sender information — for example, "From does not contain @" where supported — are more reliable long term.
This is why the solutions below use rules and filters that target the absence of a sender address rather than trying to block a specific sender. Once the rule is in place, matching emails are automatically moved to Trash without you having to touch them.
⚠️ Microsoft 365 / Exchange Admins: If your organization is receiving floods of no-sender emails, the most effective approach is a mail flow (transport) rule in the Exchange Admin Center combined with your existing anti-spam and anti-phishing policies — not individual per-user Outlook rules. Exchange Online does not offer a simple "sender address is empty" condition, so admins typically combine header-based conditions with other controls to catch these messages. See the dedicated admin section below for full steps.
Step-by-Step Guides for Blocking No Sender Emails by Platform
Here's how to block or filter no-sender emails across the most common email clients and platforms.
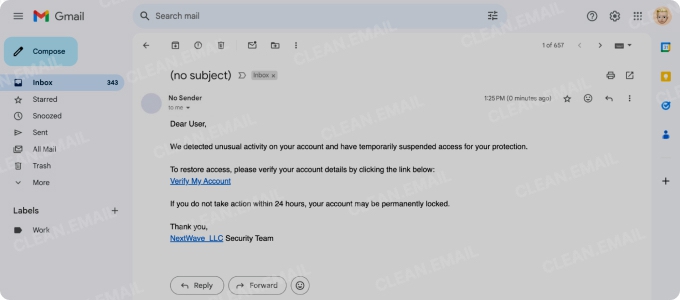
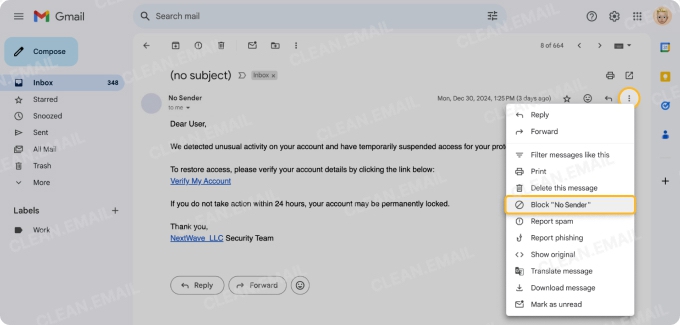
1. How to Block No Sender Emails in Gmail
To stop no sender messages in Gmail using your web browser:
- Go to your Gmail inbox and open one of the suspicious messages.
- Click the Options (three vertical dots next to "Reply").
- If Gmail shows a real address in the From line, select Block "[sender]" to send future messages from that address to Spam.
- If there is no usable address — or the same problem returns from different senders — skip blocking and use a filter as described below instead.
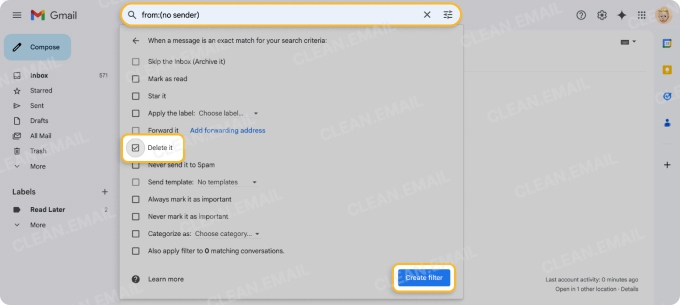
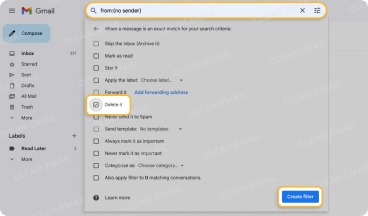
For a more reliable long-term fix, create a filter that targets messages with an empty or malformed sender address:
- Click the Show search options icon on the right side of the search bar.
- In the Has the words field, enter From: <> (including the angle brackets) to target messages where the sender address is empty or malformed.
- Click Create filter.
- In the next window, check Delete it to move matching emails to Trash automatically — or check Skip the Inbox (Archive it) and apply a label if you'd prefer to review them first.
- Click Create filter again to save and apply the rule.
📌 Tip: Check out our guide on how to stop unwanted emails in Gmail for additional tips.
How to block no sender emails on iPhone / iPad (Gmail app)
- Open the Gmail app.
- Open the suspicious email.
- Tap the three-dot menu and choose Block "[sender]" if Gmail shows a real address.
- If the sender looks blank or keeps changing across different messages, blocking won't help much. Instead, open Gmail in a browser and create a From: <> filter as described in the desktop section above.
📌 Related Read: How to Block Email on iPhone and iPad to Stop Spam.
2. How to Block No Sender Emails on Android (Gmail App)
- Open the Gmail app on your Android device.
- Open the suspicious email.
- Tap the three-dot menu ⋮ in the top-right corner of the message.
- Tap Block "[sender]" if Gmail shows a real address, so future messages from that address go to Spam.
- For truly malformed "no sender" messages, or if the problem persists from many different senders, open Gmail in a browser and create a From: <> filter, then bulk-delete the results as described in the "Why Won't It Delete?" section below.
3. How to Block No Sender Emails in Outlook
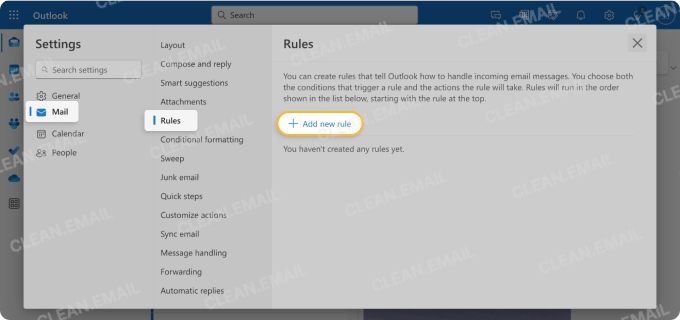
Follow these steps to block emails with missing or hidden From addresses in Outlook by creating a message rule:
- Click Settings (gear icon) in the top-right corner.
- Select Mail from the dropdown menu.
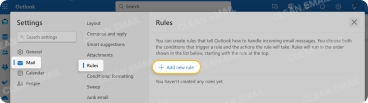
- Go to Rules and click Add new rule.
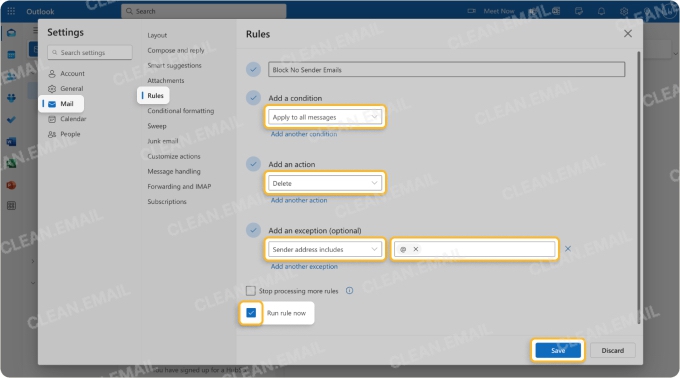
- Give it a name, such as "No Sender Filter."
- Under Add a condition, choose Apply to all messages.
- Under Add an action, select Delete (or Move to → Deleted Items).
- Under Add an exception (optional): because Outlook on the web does not offer a simple "sender address does not contain @" condition in all versions, this rule works best when you add extra conditions that match the specific no-sender messages you're seeing — for example, a unique subject pattern or header value — rather than trying to target an empty From field directly.
- Check the Run rule now box to apply the rule to existing messages.
- Click Save to activate the rule.
💡 Outlook desktop note: Some users experiment with adding a single dash (-) to Outlook's Blocked senders and domains list (Settings → Mail → Blocked senders and domains), but this is not officially documented and may not have any effect on true no-sender messages — treat it as experimental rather than a guaranteed fix.
For more details, see our guide on how to block emails on Outlook.
4. Outlook / Microsoft 365 — Admin Mail Flow Rules
For Microsoft 365 or Exchange administrators managing multiple accounts, per-user Outlook rules are inefficient.
A mail flow (transport) rule at the server level is more effective, though Exchange Online does not provide a simple "sender address is empty" condition — admins typically combine header-based conditions with anti-spam and anti-phishing policies to cover these messages:
- Sign in to the Exchange Admin Center (admin.exchange.microsoft.com).
- Go to Mail flow → Rules and click + Add a rule.
- Name the rule (e.g., "Block No Sender Messages").
- Add a condition such as "A message header" → "includes any of these words", choose the From header, and use patterns that match the broken messages you're seeing — for example, a specific malformed domain or header fragment.
- Where supported in your environment, you can experiment with regex patterns on the From header to match empty or whitespace-only values, but this is not guaranteed to work uniformly across all Exchange configurations.
- Set the action to Reject the message with the explanation… or Deliver the message to the hosted quarantine.
- Click Save and confirm. For comprehensive coverage, pair this rule with your organization's anti-phishing and anti-spam policies in the Microsoft Defender portal.
5. How to Block Emails With No Sender Address in Yahoo
Blocking emails with no sender address on Yahoo isn't as straightforward as directly blocking the "no sender" itself, but you can set up filters to catch these emails by focusing on patterns in the From field:
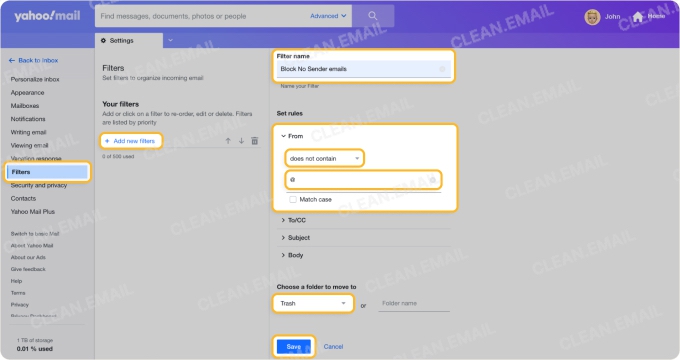
- Sign in to your Yahoo Mail account.
- Go to Settings → More Settings → Filters.
- Click + Add new filters.
- Under From, choose does not contain and type @ to try to catch messages that appear without a normal email address.
- Under Choose a folder to move to, select Trash — or choose a review folder first to confirm the filter behaves as expected before sending matches straight to Trash.
Yahoo's own help recommends avoiding negative criteria like "does not contain" when possible, because they can be too broad and interact with other filters. Use this rule cautiously, monitor it for a while, and adjust it if it catches legitimate mail.
📌 Explore additional tips in our guide on how to stop spam emails on Yahoo.
6. How to Block No Sender Emails in Apple Mail on iPhone / iPad
Before setting up any block, it's important to distinguish between a genuine no-sender spam email and a display bug — because the fix is completely different.
Apple Mail display bug (iOS 13 and iOS 18.x)
Apple's Mail app has had a recurring issue across multiple iOS versions where emails with valid senders display as "No Sender / No Subject" in the inbox list:
- iOS 13 (2019): Many users saw this issue due to IMAP cache problems. Removing and re-adding the email account usually fixed it.
- iOS 18.x: Similar Mail glitches have been reported in newer iOS 18 releases, where messages display incorrectly or Mail fails to sync properly. Removing and re-adding the account, or updating to the latest iOS build, often resolves it for affected users.
Newer iOS 18 updates appear to reduce how often this happens, but some users still need to remove and re-add their Mail accounts or contact Apple Support to clear lingering Mail bugs.
If you're seeing "No Sender" on many or all of your emails after a recent iOS update, this is almost certainly the display bug — not real no-sender spam. To fix it:
- Go to Settings → Apps → Mail → Accounts and tap your email account.
- Tap Delete Account (your emails are not deleted — they live on the server).
- Restart your iPhone or iPad.
- Go back to Settings → Apps → Mail → Accounts → Add Account and re-add the same email account.
The Mail app will re-sync from the server and display correct sender names again.
Blocking actual no-sender spam in Apple Mail
If you've confirmed the emails are genuine no-sender spam (not the display bug), Apple's native Mail app doesn't support blocking by an empty FROM field — there's no address to enter in the blocked senders list. Your best options are:
- Open the suspicious email, tap the sender area, and choose Move to Junk to train Apple's spam filter over time.
- Use Settings → Apps → Mail → Blocked to add any partial sender information if it's available.
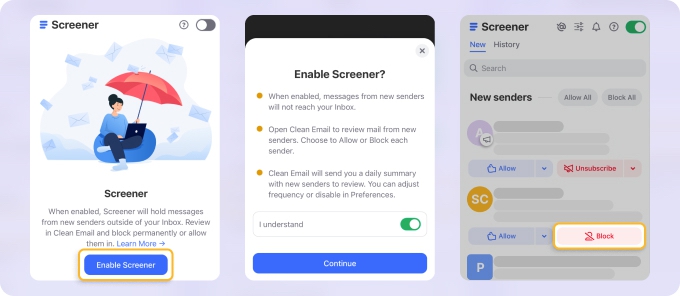
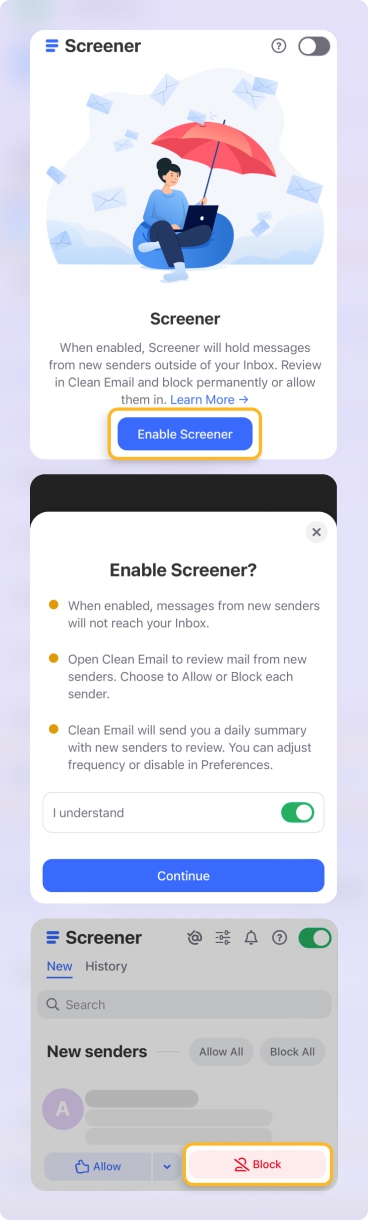
For systematic filtering, Clean Email's Screener holds all incoming mail from unknown senders for your review before it reaches your inbox.
7. How to Block No Sender Emails on Mac
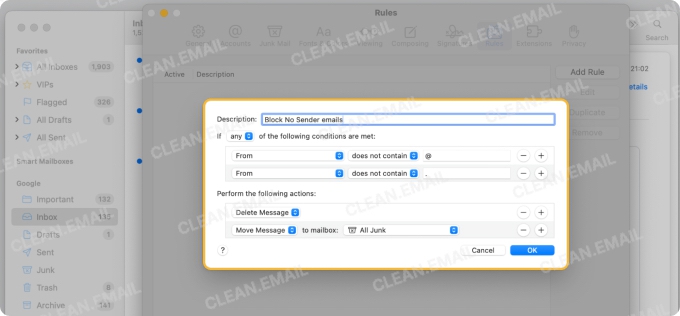
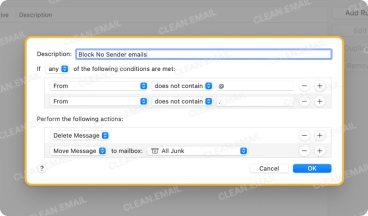
Legitimate senders typically have addresses in the format xxx@yyy.zzz. Emails identified only as "no sender" would get flagged for missing a period (.) or the "@" symbol.
Set up a rule in Mail that checks if the From field does not contain an "@" or "." symbol, and move matching messages to a review folder first. Once you're sure it isn't catching anything legitimate, you can change the rule action to send those messages straight to Trash.
For more tips, explore our guide on how to block emails on Mac.
8. How to Block No Sender Emails in Spectrum
Unfortunately, Spectrum's webmail interface doesn't provide a dedicated condition to target truly senderless messages in its built-in filters, because there is no address or domain to match.
Moving these emails to Spam can help train Spectrum's filtering over time, but there's no guaranteed native block rule for missing From headers.
You can also check our detailed guide on addressing phishing and Spectrum email management.
Block No-Sender Emails Automatically with Clean Email
If running filters manually on multiple platforms feels like too much work, Clean Email can take over.
The Screener feature holds incoming messages from unknown or new senders for your review before they ever reach your main inbox — so ‘no-sender’ emails don't land in your inbox to begin with.
You can also set up an Auto Clean rule that permanently deletes any message where the sender field matches "no sender", applying it to existing messages instantly and to all future ones automatically.
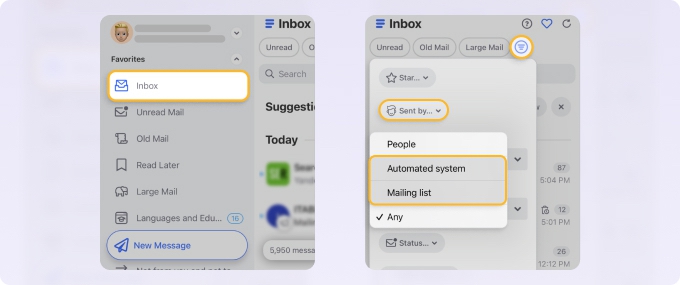
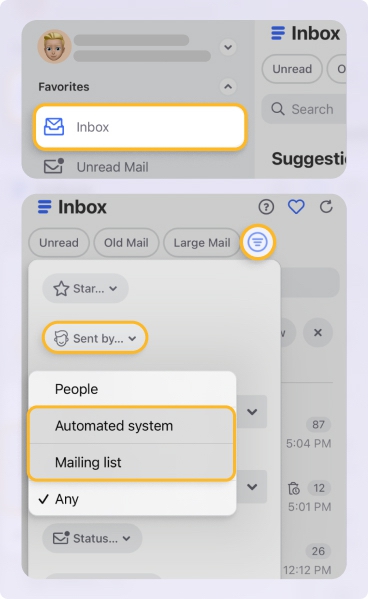
With Clean Email, you can filter out emails sent by unusual senders, automated systems, or mailing lists and set specific rules to ensure these messages never reach your inbox.
💡 Opening potentially spam emails in Clean Email is safer because the app doesn’t load external images or run scripts embedded in emails, which prevents tracking pixels from notifying the sender of your activity.
Why Won't My No-Sender Email Delete?
This is one of the most common frustrations: the email just sits there, and the normal Delete button either does nothing or the message reappears. Here's what's happening by platform and how to fix it.
Outlook / Outlook.com
Malformed emails with no valid FROM header can cause the Outlook client to fail on standard deletion. Try these workarounds:
- Select the stuck email and press Ctrl + Shift + Delete to permanently delete it, bypassing the Deleted Items folder.
- Switch to Outlook Web App (OWA) at outlook.com and delete from there — the web version handles malformed messages more reliably than the desktop client.
- If no-sender messages keep reappearing, they may be re-syncing from a server-side Junk or Spam folder. Log in via webmail and empty that folder directly on the server.
Apple Mail on iPhone — iOS display bug
If your iPhone Mail app shows "No Sender / No Subject" on all or many emails and normal swipe-to-delete doesn't work properly, you're likely hitting the iOS IMAP cache bug reported across iOS 13 and newer iOS 18 releases. Fix:
- Go to Settings → Apps → Mail → Accounts and tap your email account.
- Tap Delete Account (your emails are not deleted — they live on the server).
- Restart your iPhone.
- Go back to Settings → Apps → Mail → Accounts → Add Account and re-add the same email account.
The Mail app will re-sync from the server and display correct sender names again.
Gmail
If individual no-sender messages won't respond to the Delete button, use a bulk approach:
- In the Gmail search bar, enter From: <> (including the angle brackets) to find messages whose sender address is empty or malformed, or use the filter you created earlier.
- Once Gmail shows the matching conversations, click Select all, then choose Select all conversations that match this search.
- Click the Delete (trash) icon to remove all of them at once.


