


Key Takeaways
- Three-tap method to block a sender in Mail app on iPhone: open the email, tap the sender's name at the top, tap it again and choose View Contact Card, and select Block this Contact — future messages go to your Junk folder.
- Swipe-left shortcut: swipe left on the email in your inbox → tap More → Block Sender — blocks the sender without opening the message (recommended for suspected spam).
- Blocked senders can still reach you — spammers rotate addresses; blocking one address won't stop the next one they use.
- Blocked Sender Options in Settings → Mail let you choose whether blocked emails stay in Inbox (marked), go to Junk, or go straight to Trash.
- Block entire domains: Apple Mail has no native domain blocking — Clean Email's Auto Clean routes all mail from @example.com directly to Trash regardless of which specific address it comes from.

How to Block Emails in Apple Mail on iPhone
Apple Mail gives you two methods to block a sender and a separate setting that controls where blocked messages land.
Block After Opening
- Open Mail and open an email from the sender.
- Tap the sender's name/email at the top.
- Tap again to open the contact card - View Contact Card.
- Scroll and tap Block this Contact.
- Confirm.
Blocked messages are moved to the Junk folder. The block syncs automatically across all your Apple devices signed into the same Apple ID. The same steps apply on iPad.
Block Without Opening the Message
Swiping left on an email lets you block the sender without opening it — which also prevents tracking pixels from loading and signaling to spammers that your address is active.
- In your inbox, swipe left on the email from the sender you want to block.
- Tap More (the three-dot icon) from the options that appear.
- Select Block Sender (or Block Contact) from the menu.
- Tap OK to confirm.
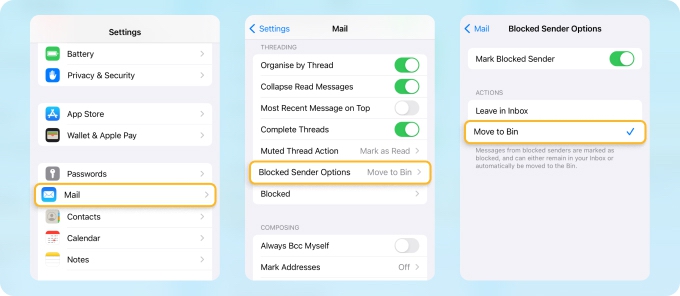
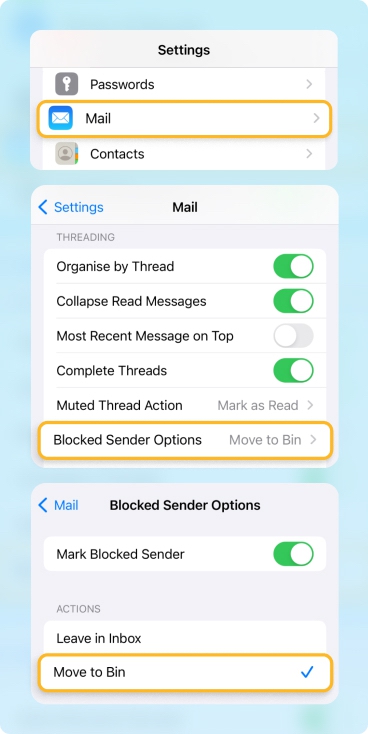
Change Where Blocked Messages Go
By default, blocked messages are marked and moved to Junk. To route them straight to Trash instead:
- Open Settings on your iPhone.
- Scroll down and tap Mail.
- Scroll to the Threading section and tap Blocked Sender Options.
- Select Move to Bin (or Trash).
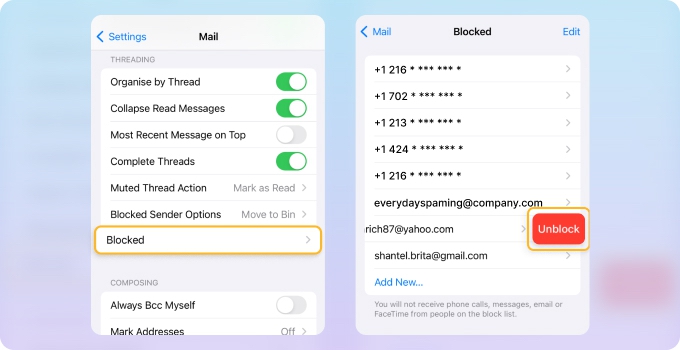
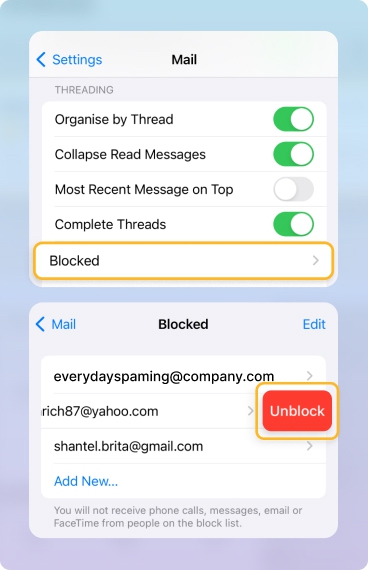
How to Unblock a Sender
- Open Settings, scroll down and tap Mail.
- Tap Blocked.
- Find the address you want to unblock.
- Swipe left and tap Unblock.
Manage Unknown and Junk Senders in Mail
Apple Mail does not use a separate "Unknown Senders" tab, but it does give you controls for how it treats suspicious messages and blocked senders. Instead of hiding all emails from people who aren't in your contacts, Mail relies on its junk filter plus a few settings that determine what happens when you mark a message as junk or block a sender.
- Open Settings and scroll down and tap Mail.
- Scroll down to Threading / Blocking & Privacy (varies slightly by iOS version) and tap Blocked Sender Options.
- Choose what should happen to messages from blocked senders:
- None (stay in Inbox but marked as blocked)
- Mark as Blocked, Leave in Inbox
- Move to Trash
When you mark a message as junk from the Mail app, future messages from that sender are more likely to go straight to the Junk mailbox instead of cluttering your inbox. Combined with blocking, this lets you push unwanted mail out of sight without deleting it automatically, so you can still review junk mail occasionally if needed.
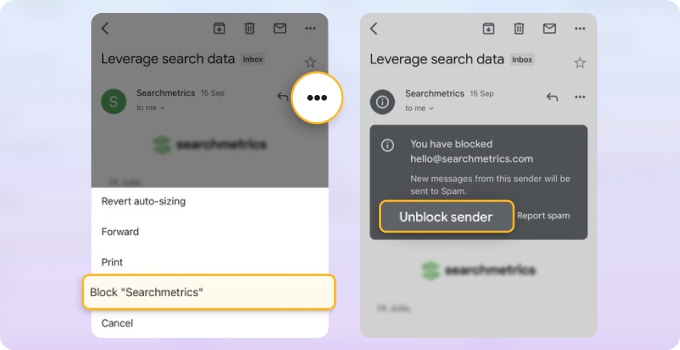
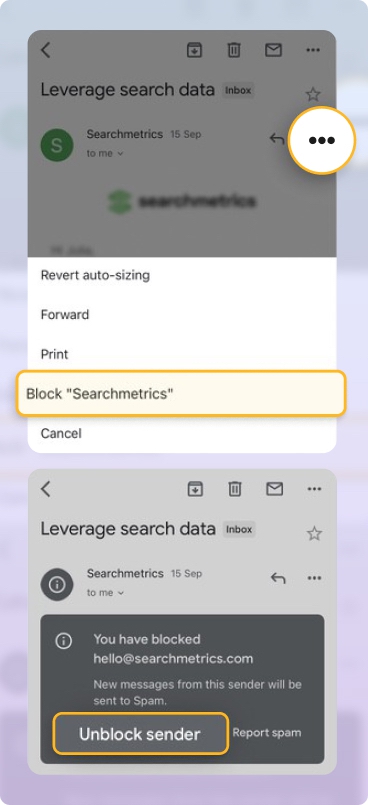
How to Block Emails on iPhone in Gmail App
- Open the Gmail app and open an email.
- Tap the three-dot menu ⋯ next to the sender’s name.
- Select Block "[Sender's name]" from the dropdown menu.
- Confirm the block in the popup.
Future emails from that address go automatically to your Spam folder.
To unblock a Gmail sender on iPhone: open any of their messages → tap ⋯ → Unblock "[Sender]".
Blocking in Other Email Apps on iPhone
Outlook:
Open the email → tap the three dots → Report Junk → Block Sender → confirm. (Some Outlook builds only show Move to Junk or Report Junk without a separate Block Sender option — using either will route future messages from that sender to Junk.) Blocked messages go to Junk. For the full steps and how to manage your blocked list, see how to block emails on Outlook.
Yahoo:
The Yahoo iOS app doesn't have a dedicated block option — tap the sender's profile picture, tap More, then Mark as spam. For account-level blocking, log into yahoo.com and use Security and Privacy settings. See the full Yahoo blocking guide.
iCloud Mail:
If you use iCloud as your email account, you can block directly from the iPhone Mail app using the Apple Mail steps above. For server-side rules that persist across all devices and support domain filtering, log into icloud.com and create a rule via Mail → Settings → Rules. See how to block emails on iCloud for the full walkthrough.
AOL:
The AOL iOS app doesn't have a block button — mark messages as spam instead. For full blocking, open AOL Mail in your mobile browser with Desktop Site enabled. See the full AOL blocking guide.
Proton Mail:
Open the email in the Proton Mail iOS app, tap the sender's email address, tap it again, then select Block messages from this sender. Blocked senders' future messages are permanently deleted before delivery and the sender is added to your Block list in settings.
Zoho Mail and Mail.com:
In both iOS apps, select the email and use the options menu to mark it as Spam — the sender is added to your blocklist and future messages route to the Spam folder. You can manage the full blocklist by logging in on the web.
Why Am I Still Getting Emails from a Blocked Sender?
This is the most common complaint from iPhone Mail users — and the reason is straightforward. Blocking an address stops that specific address from reaching you. But most persistent spammers don't send from a single address.
They rotate through dozens or hundreds of addresses from the same domain: info@example.com, then noreply@mail.example.com, then offers@example.com. Each time you block one, the next email arrives from a slightly different address — and your existing block doesn't apply to it.
What actually help in this situation:
Block by Domain, not by Address
Apple Mail has no native domain-blocking option. Clean Email's Auto Clean lets you create a rule targeting an entire sender domain — every email from @example.com goes straight to Trash regardless of which specific address it comes from.
Block Emails More Effectively with Clean Email
Clean Email adds two capabilities that Apple Mail doesn't have natively: domain-level blocking and a gatekeeper for new senders.
Block an Entire Domain on iPhone
When a spammer reaches you from multiple addresses under the same domain, blocking individual senders won't stop them. Use Auto Clean to block the whole domain:
- In Clean Email, select Auto Clean from the left panel, then tap the ✚ icon or Create Rule.
- Name your rule and tap Any sender or recipients.
- Choose Sender Domain from the dropdown, type the domain, and select it from the results.
- Set the action to Trash.
- Tap Create Rule.
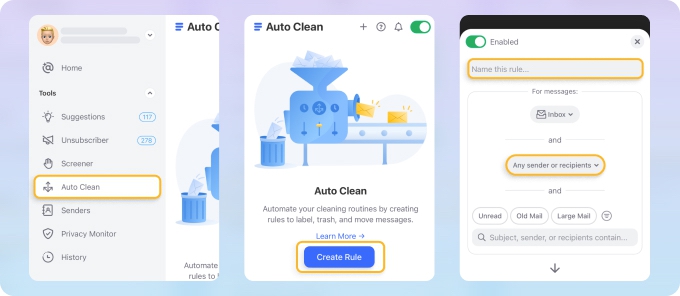
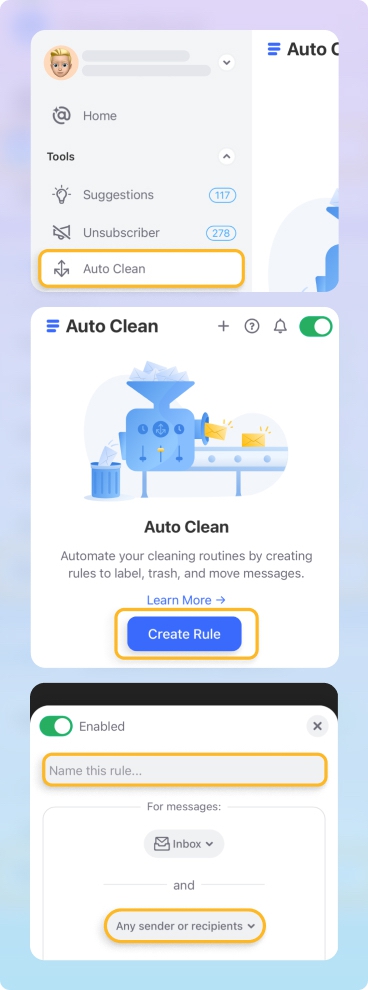
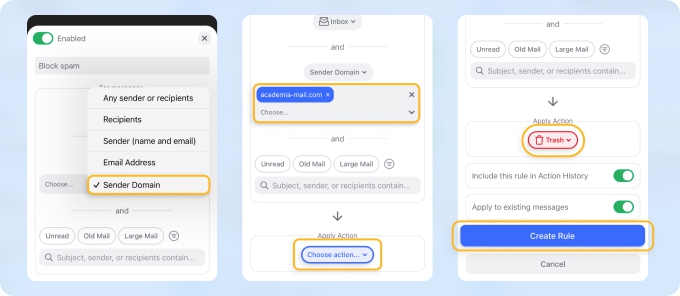
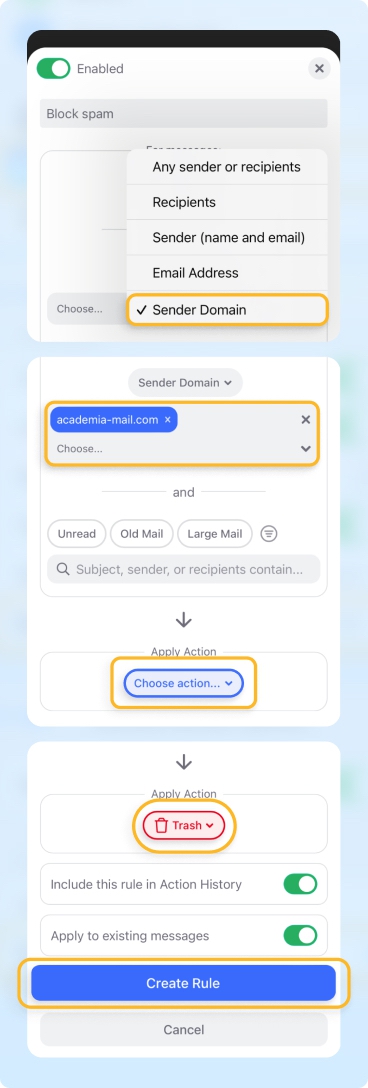
The rule applies automatically to all future emails from that domain. Enable Apply to existing messages to also clean up what's already in your inbox.
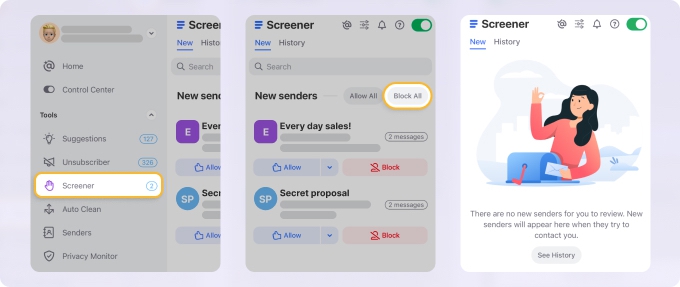
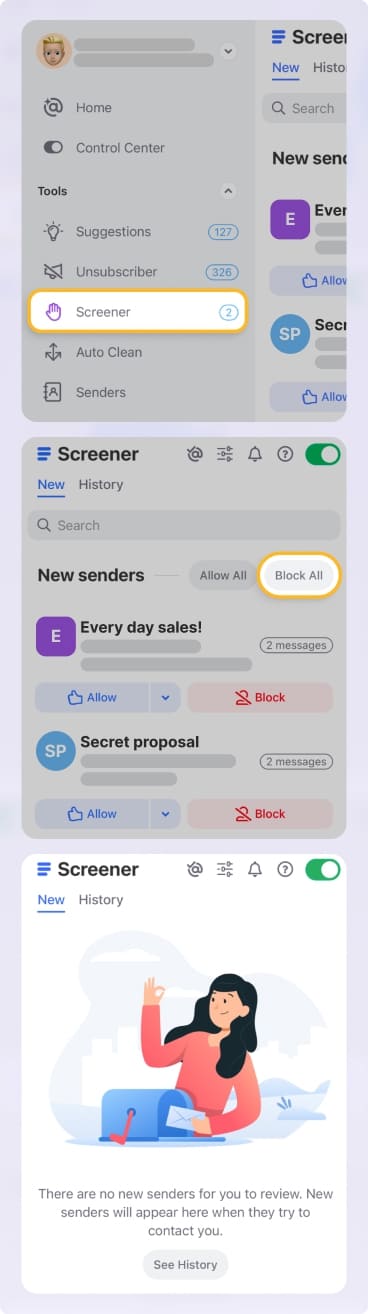
Stop New Senders Before They Reach Your Inbox: Screener
When spam volume is too high to manage sender by sender, the Screener feature works as a gatekeeper: emails from new senders are held in a review queue before reaching your inbox.
You decide who gets through — approve the contacts you want, and the rest stay quarantined automatically.
How to Block Multiple Senders at Once
Apple Mail has no built-in option for bulk blocking — you can only block senders one at a time from individual messages.
Clean Email lets you block multiple senders in bulk directly from the iOS app using the Auto Clean feature.


