


Quick Steps: Delete All Emails on iPhone at Once
You can delete all emails in the Mail app on iPhone in just a handful of steps. However, it’s a good idea to review the messages ahead of time to avoid deleting something important.
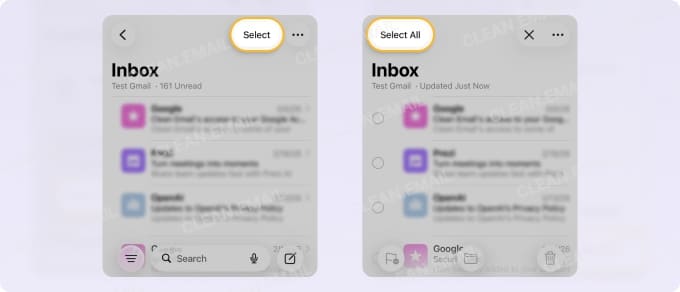
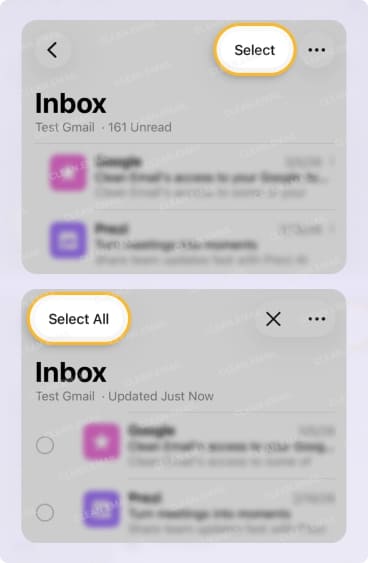
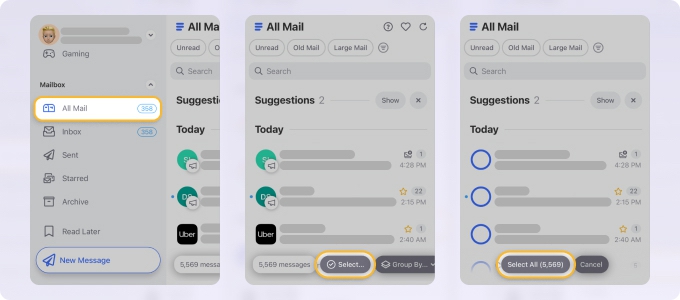
- Open Mail and select a mailbox.
- Tap Select on the top right.
- Mark Select All on the top left.
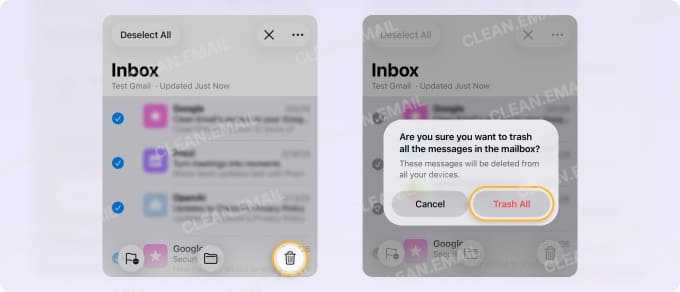
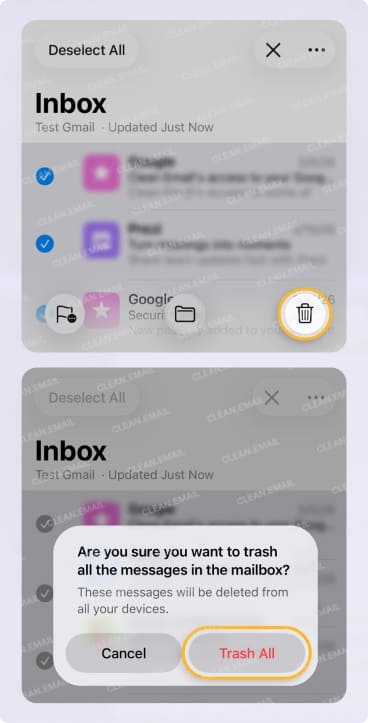
- Choose Delete (trash can icon) on the bottom right.
- Confirm with Trash All.
How to Delete Multiple Emails on iPhone
If you prefer to remove a chunk of emails rather than all of them, you can do so a couple of different ways in Mail on iPhone.

Delete Emails Using Gestures
For selecting and deleting consecutive emails, you can use swipe gestures on iPhone for a quick method.
With your mailbox in view, tap Select at the top and do one of the following:
- Drag your finger down the left side where the circles appear.
- Stop when you’ve chosen the emails you want to remove.
- Tap Delete at the bottom and Confirm.
OR
- Drag your finger up the left side from the last email you want to delete.
- Using your other hand, tap the Status Bar at the top. This chooses all messages in between the last selected and first email.
- Tap Delete at the bottom and Confirm.
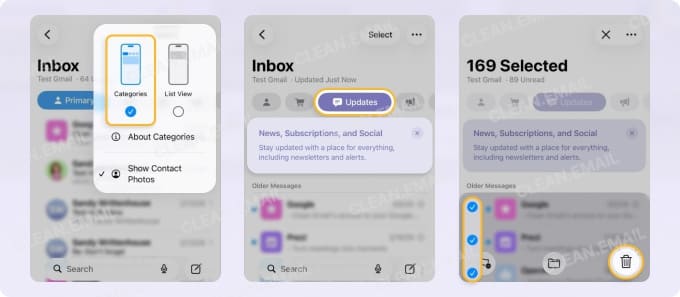
Delete Emails Using Categories
In iOS 18.2, Apple introduced Categories for Mail. Similar to Gmail’s categories, you can automatically filter your inbox by Primary, Transactions, Updates, and Promotions. This allows you to easily delete emails based on the sender’s category.
To view your inbox using categories, tap the three dots on the top right and select Categories. When the buttons display at the top, choose one to see and delete emails in that category.
Why Deleting Emails on iPhone Feels So Slow
Based on real user discussions, the main issue is simple: the Mail app isn’t designed for large-scale deletion. There’s no true “select all” for entire inboxes, and most actions rely on manual gestures.
Here are the most common methods people use:
- Swipe to delete – fast, but only works one email at a time.
- Tap Select + drag down – a lesser-known trick that lets you select multiple emails quickly by dragging your finger through the checkboxes.
- Batch “Select All” (visible emails only) – works in chunks, but requires repeating the process over and over.
- Two-hand method – one finger scrolls while the other taps emails to speed things up.
While these tricks help, they don’t scale well. Deleting hundreds or thousands of emails still becomes repetitive and time-consuming — which is why many users eventually switch to desktop tools or third-party apps for bulk cleanup.
Delete With Ease Using Clean Email on iPhone
Deleting emails is a standard practice. But features that let you easily mass delete emails on iPhone, avoid removing the wrong messages, and review emails before deletion, make the process more effective and efficient.
Using Clean Email, you can do all of the above, and then some, to quickly remove unwanted messages and free up storage space. The app works with Gmail, iCloud, Outlook, Yahoo Mail, and any IMAP provider on iPhone for managing any account.
Clean Email gives you:
A true Delete action which removes emails directly from the server, bypassing the Trash. All selected messages are completely removed from your mailbox and cannot be recovered. Note that you can also choose to send emails to the Trash first if you prefer.
The ability to select and delete thousands of emails at once which can be difficult with many providers. For example, you don’t have to select emails page-by-page or scroll to load and choose more messages.
Smart Folders that help prevent accidentally deleting important messages. For instance, you can delete all emails in the Online Shopping folder without risking removing messages related to work.
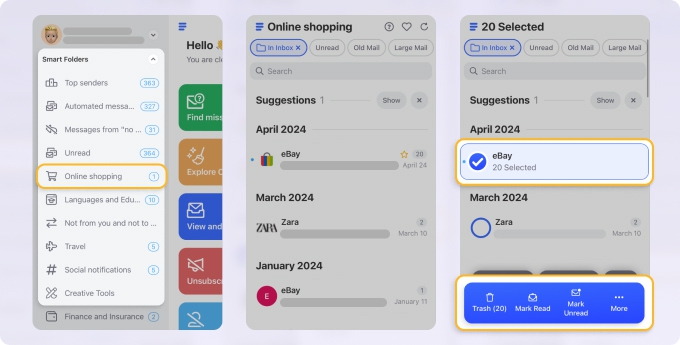
The option to preview emails before deleting them. This helps eliminate important emails that you want to keep from your deletion selection.
Sign up for Clean Email and see for yourself how these features and the other smart tools can help you better manage your emails.
How to Manage the Trash in Mail
When deleting emails on your iPhone, it’s important to know where they go and how the permanent deletion process works in the Mail app.
Trash vs Archive
When you delete emails in Mail on your iPhone, these messages go to the Trash folder. By default, emails remain in the Trash for 30 days before they’re automatically and permanently deleted – unless you remove them manually first.
When you archive emails, these messages go to the Archive folder. Emails remain in the archive indefinitely or until you manually move or delete them. Read more: How to archive emails on iPhone.
Trash: For emails you no longer want and will not need in the future.
Archive: For emails you want to keep and may need in the future.
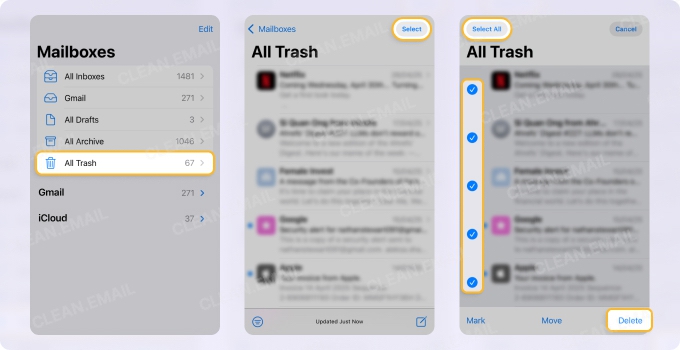
Empty the Trash on iPhone Mail
If you’re wondering how to permanently delete emails on iPhone to free up storage space quickly, you can empty the Trash to remove all emails in it. Because there’s currently no “empty trash” option in Mail on iPhone, you’ll use the same steps as above for deleting messages.
- Choose either All Trash or the Trash folder for a particular mailbox.
- Tap Select on the top right.
- Mark Select All on the top left.
- Choose Delete on the bottom right.
- Confirm with Delete All.
💡 Tip: Learn about the difference between deleting emails immediately versus emptying the trash.
Troubleshoot Email Deletion in Mail
If you run into trouble deleting messages in Mail on iPhone, there are some common causes and solutions.
First, if you’re receiving an error message such as “Unable to move message. The message could not be moved to the trash,” there are few possible reasons:
- The mailbox behavior settings are incorrect.
- The Trash folder is not properly assigned.
- The email account has sync issues.
Troubleshooting
Aside from the above error message, you may have other issues that don’t provide a clue. If so, walk through the following:
Check to see if the Trash is full. While you can’t see the size of your Trash folder, you can skim through it to see how many emails it contains. If you see thousands of messages, consider emptying the Trash.
Close and reopen Mail. Many times, simply closing and reopening an app can fix temporary glitches with it.
To close Mail, swipe up from the bottom and stop mid-way on your screen to display the open apps. Flick the Mail app up and off the screen to close it and then tap the Home screen icon to reopen it.
Verify the account settings. To correct problems like seeing the Archive icon rather than Delete or sync issues, follow the below steps to review and adjust the account settings.
- Open the Settings.
- Go to Apps → Mail.
- Tap Mail Accounts.
- Select the email account and do the following:
- For iCloud, tap Mailbox Behaviors.
- For Gmail, tap Account Settings → Advanced.
- For Outlook, tap Account Settings → Advanced Settings.
- Below Move Discarded Messages Into, choose Deleted Mailbox.
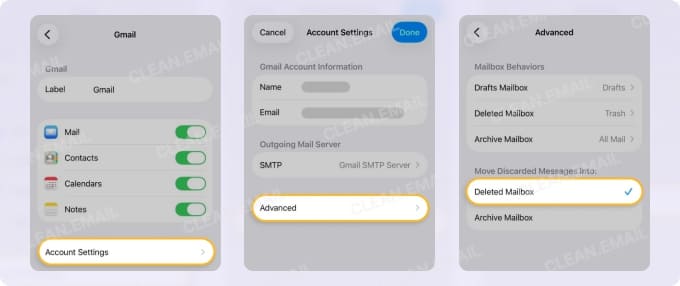
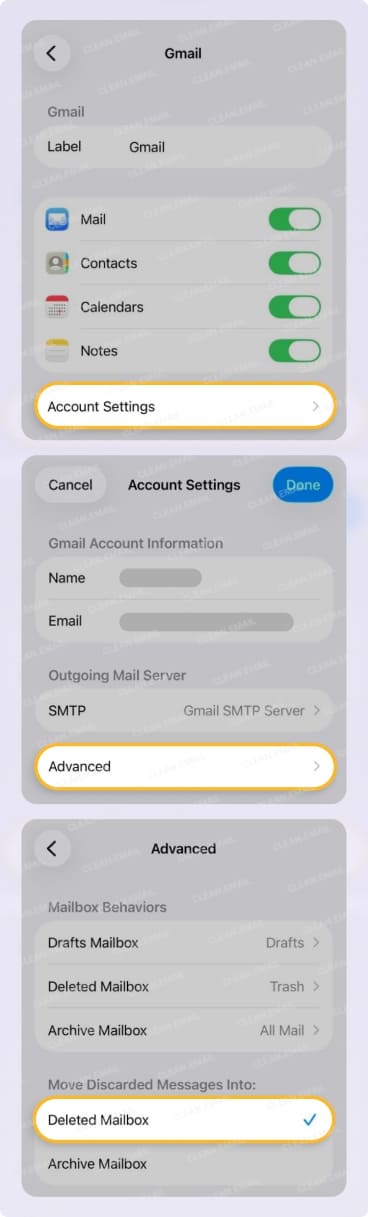
Once you maneuver to the above settings, you may see an additional option for Mailbox Behavior. If so, make sure that the Deleted Mailbox is set to either Deleted Messages (iCloud) or Trash (Gmail).
Summary (What Actually Works Best)
Whether for an iPhone email storage cleanup, better organization, or finding messages faster, knowing how to bulk delete emails on iPhone is key to quickly eliminating unneeded messages.
Here’s a quick comparison of the most common methods:
| Method | Speed | Effort | Scale |
|---|---|---|---|
| Swipe delete | Fast | Low | ❌ Small only |
| Drag multi-select | Medium-fast | Medium | ⚠️ Limited |
| Tap spam | Slow | High | ❌ |
| Select All batches | Medium | High repetition | ⚠️ |
| Two-hand tapping | Medium | High | ❌ |
And remember that you can try Clean Email for free. As a robust complement to the Mail app, it can not only help you mass delete messages but manage your entire mailbox with smart features and advanced tools.


