


Quickest way to delete multiple emails in Outlook:
- Desktop: Press Ctrl + A (Windows) or Command + A (Mac) → Delete
- Web: Click Select → Check top box → Empty folder
- Mobile: Long-press an email → Select All → Delete
- Clean Email (any device): Sign up with your Outlook account → Use a filter or Smart Folder → Select All → Delete or Trash
Jump to your device:
- Outlook desktop
- Outlook on the web
- Outlook mobile

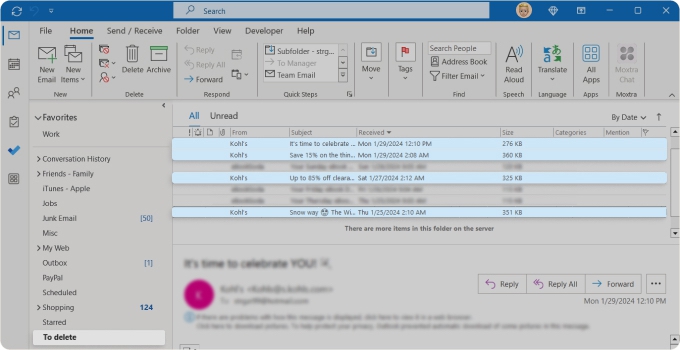
How to Delete Multiple Emails in the Outlook Desktop Client
There are several ways to select and remove groups of emails in the Outlook desktop app, from cleaning up conversation threads to wiping all messages in a folder.
Delete emails using the Outlook Clean Up tool
Outlook provides a built-in email cleaner that lets you automatically delete emails in Outlook when you find redundant messages in a conversation or folder.
📌 This tool is only available in the desktop version of Outlook: Outlook for Microsoft 365, Classic Outlook for Windows, Outlook 2021, Outlook 2019, Outlook 2016, Office for business, Office 365 Small Business, and Microsoft 365 admin.
Here’s how to bulk delete emails in Outlook with the Clean Up tool:
- Select the conversation thread or folder that you’d like to clean up.
- Go to the Home tab and select the Clean Up drop-down arrow.
- Choose to either Clean Up Conversation, Clean Up Folder, or Clean Up Folders & Subfolders.
- If prompted, select Clean Up or Clean Up Folder to confirm.
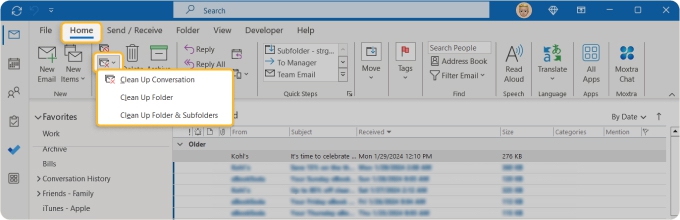
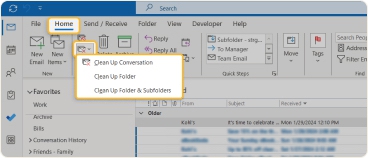
The messages are then moved to the Deleted Items folder where you can permanently remove them if you like.
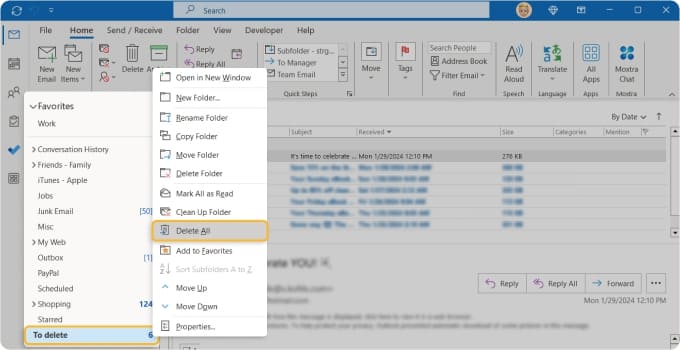
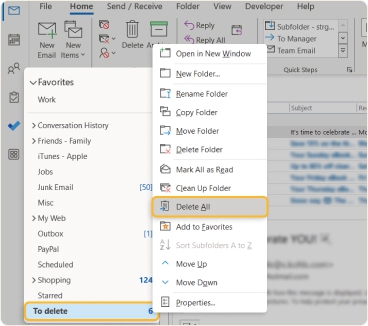
Bulk delete emails in a single folder
📌 Supported on all desktop versions of Outlook
Follow these steps to remove all email messages in a folder:
- Open the Folder Pane on the left to select the folder.
- Right-click the folder and choose Delete All.
- Pick Yes to confirm and move the messages to the Deleted Items folder.
If you prefer to use keyboard shortcuts to clean up all messages in a folder, press Ctrl + A (Windows) or Command + A (Mac) to select the emails. Then, press the Delete key.
💡 Hint: If you are a Mac user, follow our guide on how to delete multiple emails on Mac.
Clean up consecutive and nonconsecutive emails
📌 Supported on all desktop versions of Outlook
Here’s how to bulk delete emails in Outlook when you want to remove just a few messages, but not all.
- For consecutive messages: Select the first email in the list, press and hold Shift, select the last message in the group you want to remove, and press Delete.
- For nonconsecutive messages: Select the first email, press and hold Ctrl (Windows) or Command (Mac), select the other messages you want to remove, and press Delete.
How to Mass Delete Emails in the Outlook Web App
If you manage your messages on the web instead of your desktop, you can bulk delete Outlook emails there as well. However, the options for choosing the messages you want to remove are a bit more limited. Let’s look at a few common methods.
💡 Note: All messages you delete on Outlook.com also go to the Deleted Items folder. To free up space immediately, you need to empty this folder.
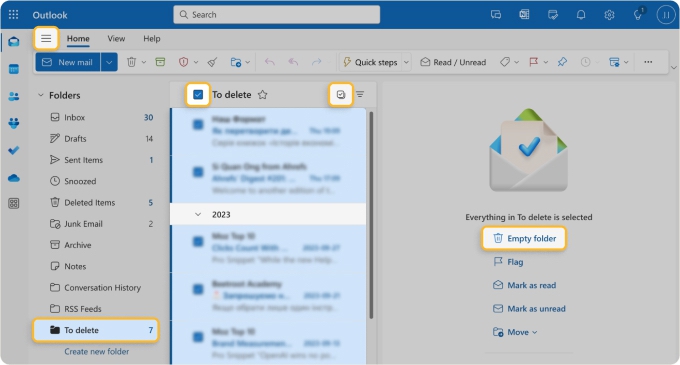
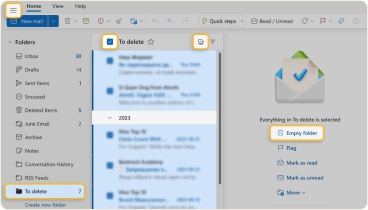
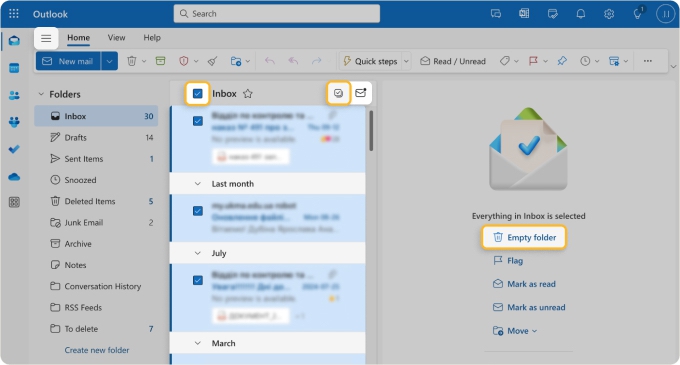
Delete all messages in a single folder on the web
Maybe you have a folder of emails you only need for a short time. When time’s up, you can remove them in one fell swoop.
- Display the Navigation Pane on the left using the menu icon (three lines) on the top left.
- Select the folder containing the emails you want to delete.
- On the top right of the message list, click Select. This then places a checkbox on the left side allowing you to select all emails in the list.
- Check that box and choose Empty Folder in the top toolbar or bottom of the list.
- Click OK to confirm.
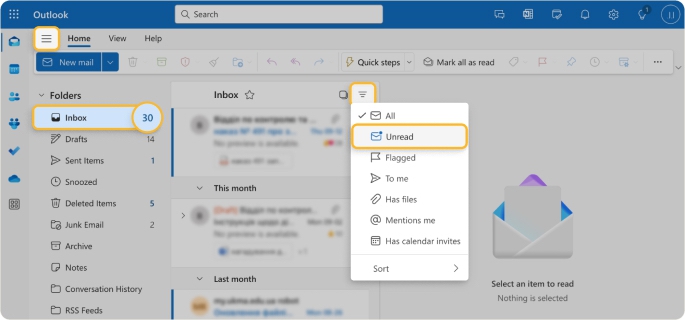
Delete unread emails in Outlook.com in bulk
This is especially handy if you have many unread messages in a folder that you have no intention to read or need.
- Display the Navigation Pane and select your Inbox or a different folder. Notice that you’ll see the number of unread conversations to the right of the Inbox or folder.
- On the top right of the message list, select Filter and choose Unread. This then displays only the unread emails.
- Also on the top right, click Select to display the checkbox on the left and then mark the box to select all emails.
- Choose Empty Folder in the top toolbar or bottom of the list.
- Click OK to confirm.
How to Delete Multiple Emails in the Outlook Mobile App
The Outlook mobile app supports bulk deletion, but it’s more limited than both the desktop and web versions. You can remove all messages in a folder or select consecutive and non-consecutive emails, but advanced filtering and large-scale cleanup are easier on a computer.
Delete all messages in a single folder on your phone
To get rid of all emails in a folder using the Outlook mobile app:
- Open the menu using your profile icon on the top left and then choose a folder.
- Long-press (tap and hold) a message in the list to display the Select All option on the top left.
- Mark Select All and tap the Delete icon (trash can) at the bottom.
- Choose Delete to confirm.
Delete consecutive and nonconsecutive emails on your phone
You can remove consecutive or nonconsecutive emails in the Outlook mobile app similar to removing all messages as described directly above.
Start by long-pressing a message in the list, then do one of the following:
- For consecutive messages: Slide your finger down the left side of the message list to mark adjacent emails and choose Delete at the bottom.
- For nonconsecutive messages: Tap to mark each email and choose Delete at the bottom.
💡 Hint: Follow our guides on how to delete all emails at once on Android and how to delete all emails on iPhone.
Quick Comparison: Bulk Delete Options by Platform
| Platform | Fastest Way | Best For | Limitation |
|---|---|---|---|
| Desktop | Ctrl + A / Command + A → Delete | Large cleanups and advanced filtering | No built-in automation for recurring cleanup |
| Web | Select → Check top box → Empty Folder | Quick folder-based cleanup | Fewer bulk tools than desktop |
| Mobile | Long-press → Select All → Delete | Small to medium cleanups on the go | Limited selection (loads in batches) |
| Clean Email | Filter → Select All → Delete or Trash | Cross-device bulk cleanup, rules, automation | No dedicated Windows app |
Quickly Delete Multiple Outlook Emails with Clean Email
Because of the limitations of deleting multiple emails in Outlook using the web and mobile apps, an effective alternative is to use the Clean Email app. By connecting your Outlook.com account, you can easily find and delete emails across all platforms, including the web app, Mac app, and mobile (Android and iOS).
For example, the Cleaning Suggestions feature automatically groups messages for you based on factors like sender, subject line, or attachment size. You can then take action on an entire group at once.
- Select Suggestions in the left-hand menu pane.
- Check out the recommendations such as sending emails to the Trash or Archive and then use a suggestion by clicking the button to the right.
- You can also use the drop-down menu for the Trash or Archive button to pick another action. You can choose Delete to permanently remove the emails or Keep Newest to only retain the latest message from a sender.
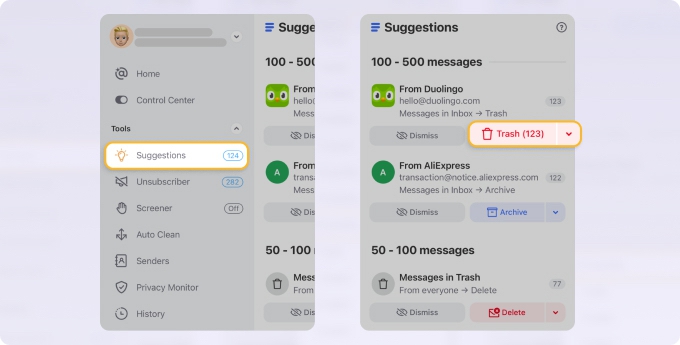

📌 Note: The Delete action permanently removes emails, while Trash moves them to the Trash folder, allowing for recovery for 30 days if needed.
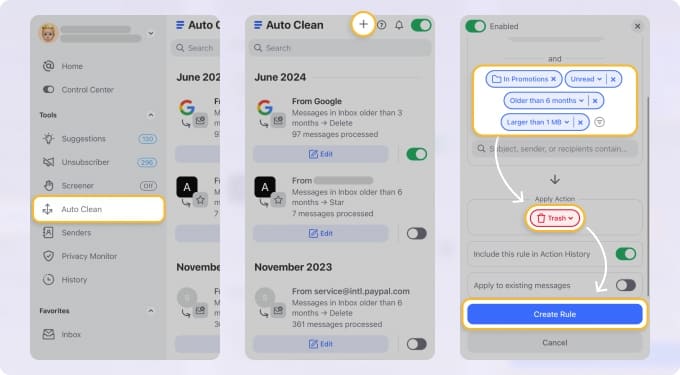
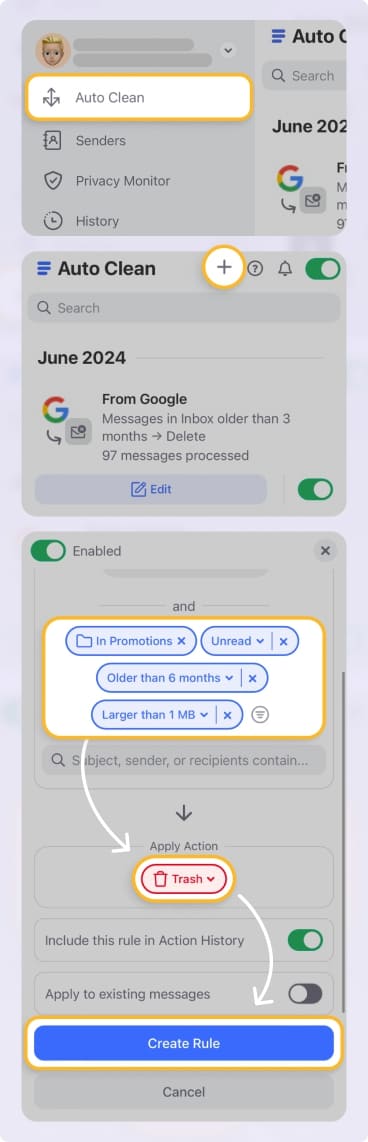
Auto Clean Multiple Emails
If you regularly delete the same types of emails — newsletters, automated alerts, messages from specific senders — Auto Clean from Clean Email lets you set a rule once and never repeat the process.
What sets it apart from Outlook's built-in rules:
- Filter by domain, not just individual addresses. Outlook requires you to add each sender manually; Clean Email lets you target an entire domain in one rule.
- Works on mobile. Outlook doesn't support rule creation in its mobile app at all. Clean Email does.
- Distinguishes real emails from automated ones. You can target mailing lists and automated systems specifically, without touching real correspondence.
Once a rule is active, matching emails are handled the moment they arrive — no manual cleanup needed.
Conclusion
Knowing how to mass delete emails in Outlook helps you do more than just tidy up your inbox. Removing large batches of messages can improve mailbox search speed, reduce clutter, and free up storage space – especially if you regularly receive newsletters, notifications, or automated alerts.
FAQs
Why can I only delete 75 emails at a time in Outlook?
Outlook on the web limits how many emails you can select or remove at once to prevent performance issues, so you may need to scroll and repeat the Select All action in batches. If you need to remove a larger number at once, you can use a tool like Clean Email to filter and delete emails across your mailbox in a single action.
Can I bulk delete emails in Outlook without using Ctrl?
Yes. You can right-click any folder and choose Delete All to remove every message in it at once, or use Ctrl + A / Command + A to select all and then press Delete. On Outlook.com, click Select in the top right of the message list to enable the checkbox, then check the top box to select all emails in the view.
How do I delete all unread emails in Outlook?
Use the Filter option to show only Unread messages, then select all and delete them; you may need to repeat the process in batches if your mailbox is large.
How do I delete multiple emails in Outlook on Android?
Open a folder, long-press an email to enter selection mode, tap additional messages, then tap the Delete icon; large mailboxes may require deleting in batches.
How do I delete all archived emails in Outlook?
Open the Archive folder, press Ctrl + A (or Command + A on Mac) to select all messages, then delete them; on the web, use Select All and empty the folder.
How do I delete emails with large attachments in Outlook?
Use the search bar and filter by size (for example, “larger than 10 MB”), then select and delete the matching emails; you can also filter by size in Clean Email to remove large messages across folders.
How do I delete all emails in the Other folder in Outlook?
Switch to the Other tab, select all visible emails, and delete them; if there are many, scroll to load more and repeat the process.
What is the keyboard shortcut to delete emails in Outlook?
Select the email and press Delete to move it to Deleted Items, or press Shift + Delete to permanently remove it in the desktop app.
How do I delete sent emails in Outlook?
Open the Sent Items folder, select the messages you want to remove (or press Ctrl + A / Command + A to select all), then click Delete.
Why can't I delete emails in Outlook?
You may lack account permissions, have a sync issue, or be viewing a shared or read-only folder; try refreshing the mailbox or checking your account settings.
How do I bulk delete emails in Outlook by sender?
Search for the sender’s address, select all matching results, and delete them.
How do you select multiple emails in Outlook?
To select a range of emails, click the first message, hold Shift, and click the last. For individual non-adjacent messages, hold Ctrl (Windows) or Command (Mac) and click each one. To select all emails in a folder, press Ctrl + A (Windows) or Command + A (Mac).


