


Mac Rules vs. iCloud Rules
With two options for creating automated inbox rules on Mac, it’s important to understand the differences between them before selecting one. Here’s a brief rundown of Apple Mail rules versus iCloud Mail rules.
| Mac Mail Rules | iCloud Mail Rules (iCloud Mail only) | |
|---|---|---|
| Where they run | On your Mac (Mail app, client‑side) | On Apple’s iCloud Mail servers (server‑side) |
| Runs when Mac is off | ❌ Only when Mac is on and Mail is running discussions. | ✅ Always, on the server |
| Affects iPhone/iPad | ❌ Rules do not run on iOS; effects sync after Mac runs them support. | ✅ Applied before delivery to all devices |
| Works for Gmail/Outlook in Mail | ✅ Any account in Mail (Gmail, Outlook, etc.) | ❌ iCloud Mail accounts only |
| Available conditions | Rich: from, to, subject, body, size, date, headers | Limited: from, to/Cc, subject contains, list‑id |
| Available actions | Move, copy, delete, mark read, flag, color, sound, run script | Move to folder, Mark as Read, Forward, Move to Trash (plus combos) |
| Where to set up | Mail → Settings → Rules | iCloud.com → Mail → gear icon → Settings → Rules; or iOS Settings → iCloud Mail Rules (iOS 17+) |
After reviewing the above table, you’re likely deciding which option is right for you. If you want cross-device behavior for handling emails, go with iCloud rules. But if you want complex conditions or rules for non-iCloud accounts, choose Apple Mail rules on Mac.
Now, maybe you have a specific scenario and aren’t sure which rule system fits it best. Here are several common situations with which method is a better choice and why.
| Scenario / goal | Better choice | Why |
|---|---|---|
| Keep newsletters out of Inbox on all devices | iCloud Mail rule | Server-side rules file mail before it hits any device – iPhone, iPad, and Mac all see it already filed |
| Auto-sort shopping or promo mail into folders | iCloud Mail rule | Works 24/7 without your Mac being on |
| Highlight VIP senders consistently across all devices | iCloud Mail rule + VIP | Server-side ensures consistency; VIP handles per-device notifications |
| Auto-forward invoices or work mail to another inbox | iCloud Mail rule | Server-side forwarding is more reliable than client-side |
| Heavy Gmail/Outlook use in Apple Mail on Mac | Mac Mail rule | Only Mac rules act on non-iCloud accounts in the Mail app |
| Complex multi-condition logic (body text, size, headers) | Mac Mail rule | Mac rules support body text, size, custom headers, color-coding |
| Run AppleScript or custom automation workflows | Mac Mail rule | Only Mac rules can trigger AppleScript |
| One-off cleanup of existing mailboxes | Mac Mail rule | Apply manually to selected mailboxes, then turn off |
| iPhone/iPad only – no Mac | iCloud Mail rule | Create and manage from iOS Settings; no Mac needed |
| Max reliability across all providers and devices | Mix: server + client | Server-side for broad filtering; Mac rules for advanced or provider-specific workflows |
With all of this in mind, let’s walk through how to create rules in both Apple Mail on Mac and iCloud Mail.

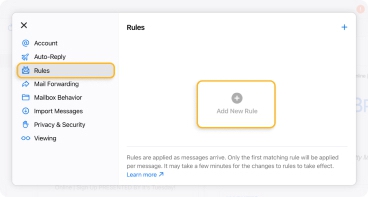
How to Create Rules in Apple Mail on Mac
To automatically act on emails as they arrive and save time managing messages on Mac, you can set up Apple Mail filters in the form of rules. This allows you to do things like move emails from a particular sender to a folder or flag messages containing PDF attachments.
Open Mail on your Mac and follow these steps:
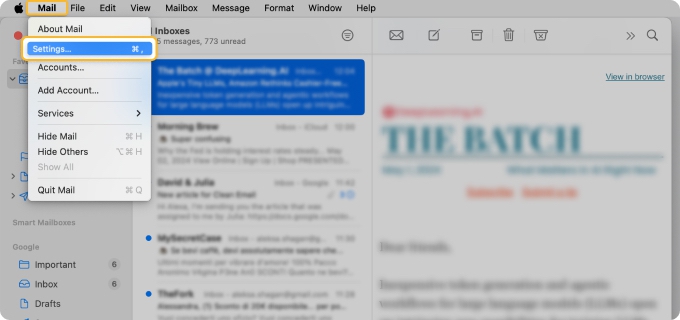
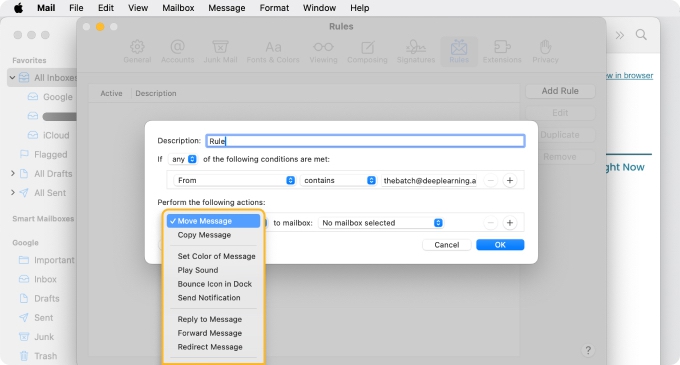
- Select Mail → Settings in the menu bar.
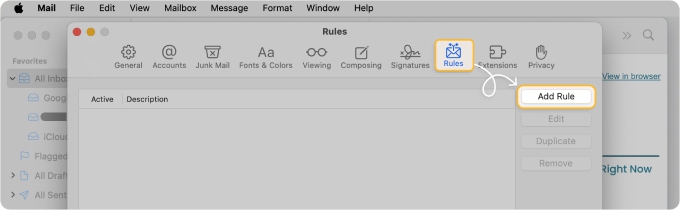
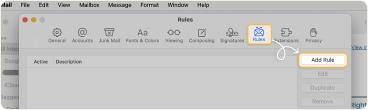
- Go to the Rules tab in the pop-up box.
- Choose Add Rule.
- Enter a Description (aka Name).
- Pick any or all for the matching conditions. This is important if you add multiple conditions.
- Add the first condition and select or enter the corresponding detail.
- Add the first action and select or enter the corresponding detail.
- Use the plus sign to add another condition or action.
- Click OK to save the rule.
Keep in mind that rules run from top to bottom. If necessary, you can select and drag a rule to a different position in the list.
How to Create Rules in iCloud Mail
Now you may be wondering how to set up rules in Apple Mail on iPhone. For this, you have two options: The Mail app in your Settings and iCloud Mail in your web browser.
If you’re creating iCloud Mail rules on Mac, you’ll use the same steps. Just note that the available conditions are more limited than with Apple Mail rules.
iPhone Settings App
- Open the Settings app and select Apps → Mail.
- Choose Mail Accounts and pick iCloud.
- Tap iCloud Mail Rules under Organize Your Inbox.
- Select Add Rule and enter a Rule Name.
- Beside Message, pick the condition and add the corresponding detail directly beneath.
- Beside Action, pick the action and add the corresponding detail directly beneath.
- Tap the checkmark in blue to save the rule.
When you finish, you’ll see all of your rules where you can select one to view or change it. You can also tap Edit to remove a rule or rearrange the order.
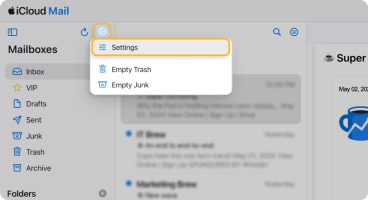
iCloud.com
- Visit iCloud.com, sign in, and pick Mail.
- Click Settings (gear icon) on the left and select Settings.
- Choose Rules and use the plus sign to add a rule.
- Enter a rule name.
- Follow Steps 5 and 6 above to add the condition and action.
- Click Add to save the rule.

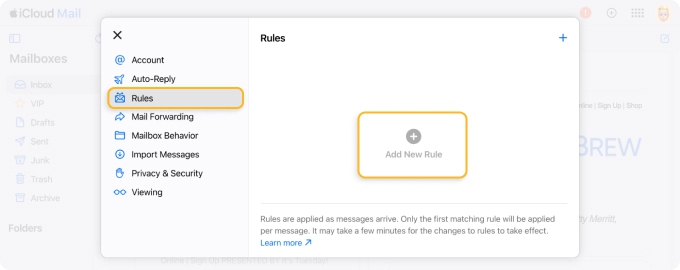
You’ll then see a list of your rules. You can pick one to view, change, or delete it or rearrange the order.
📌 Note: Allow up to 15 minutes for your new rule to take effect.
When Apple Mail Rules Aren’t Enough: Clean Email
While Apple Mail rules can handle many situations, there are limitations that you may not be able to look past. This includes iCloud’s limited criteria for rules, keeping the Mac Mail app open, and rules only applying to incoming emails.
Here’s how Clean Email compares to Apple Mail and iCloud Mail when it comes to mailbox rules.
| Use case / requirement | Apple Mail rules (macOS) | iCloud Mail rules | Clean Email |
|---|---|---|---|
| Runs when your Mac is closed | ❌ No | ✅ Yes | ✅ Yes |
| Applies across all devices automatically | ⚠️ Mac-dependent | ✅ Yes | ✅ Yes |
| Works with non-iCloud providers (Gmail, Outlook, Yahoo) | ❌ No | ❌ No | ✅ Yes |
| Supports AppleScript / advanced local actions | ✅ Yes | ❌ No | ❌ No |
| Age-based cleanup (e.g. delete after 30 days) | ❌ No | ❌ No | ✅ Yes |
| Bulk cleanup of existing messages | ⚠️ Limited | ⚠️ Limited | ✅ Yes |
| Best use case | Power-user, local logic | Core, always-on sorting | Long-term automation and cleanup |
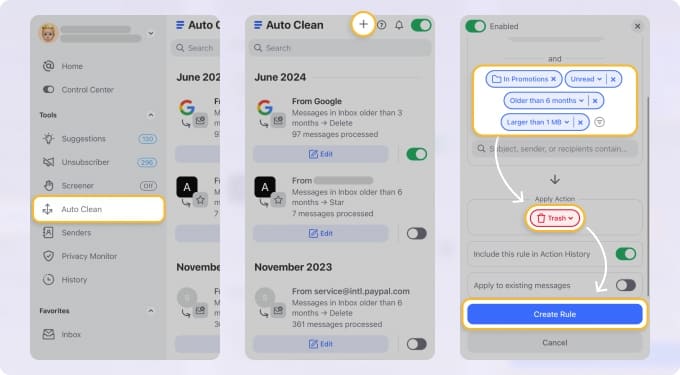
Now, let’s look at how Clean Email’s features fill the gaps with Apple Mail and iCloud Mail rules.
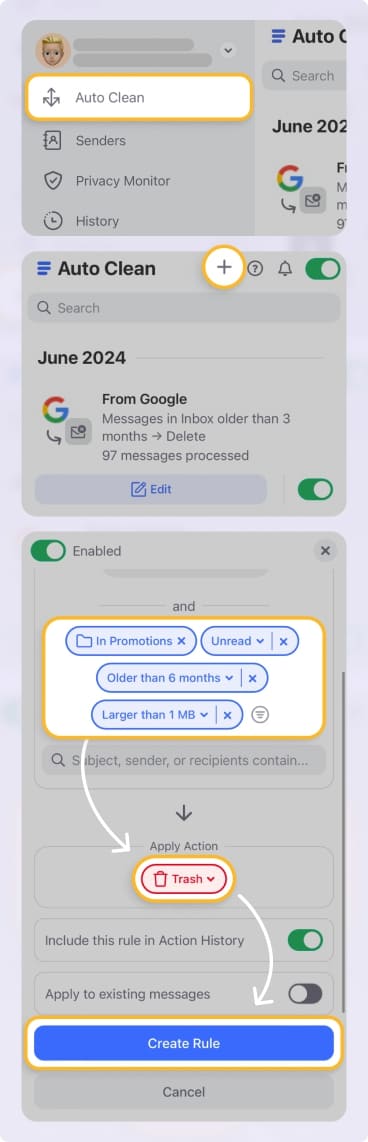
Gap: Neither Mac nor iCloud rules support true age‑based auto‑deletion or auto‑archiving.
Auto Clean rules let you automatically delete or archive emails based on a certain number of days. You can set up rules for any email account using a wide range of conditions – and they work on both new and existing messages.
Gap: iCloud rules are iCloud‑only, and Mac rules only run while the Mail app on your Mac is open.
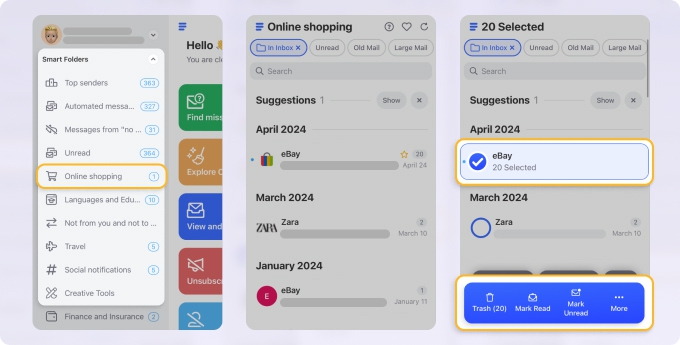
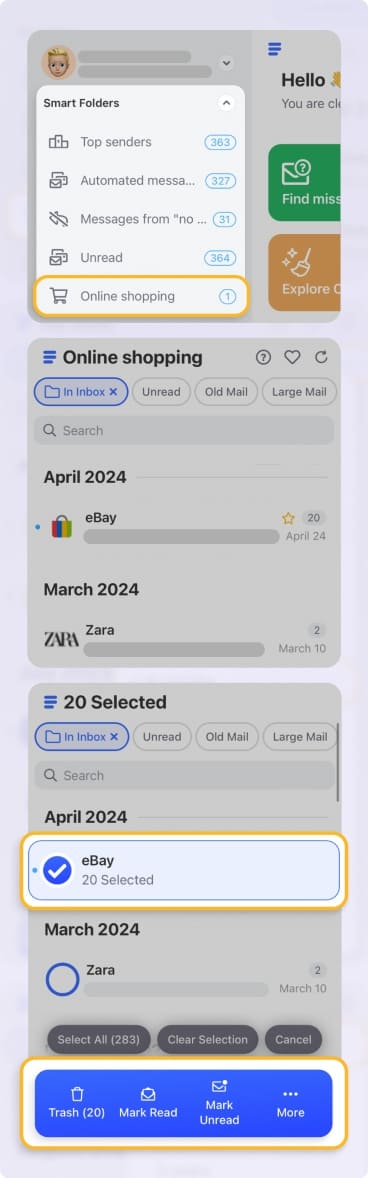
Smart Folders group emails into pre-made category folders. You’ll see folders for newsletters, shopping, notifications, finance, and more. These folders work automatically with all email accounts, on any device, and without any setup.
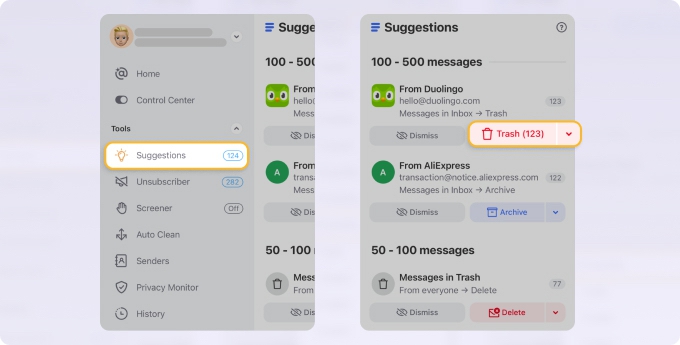
Gap: Apple’s native rules focus on incoming messages and don’t automatically analyze and group your existing inbox for bulk cleanup.
Cleaning Suggestions scans your inbox and groups emails for deleting, archiving, or marking. You can then clear entire groups of messages at once without manually selecting every email or setting up rules.

Apple Mail Spam Filter: Junk Mail on Mac vs. iPhone
Apple Mail provides a built-in spam filter on both Mac and iPhone. However, there are some differences between how the feature works on each device.
The junk filter on Mac can be enabled or disabled, is configurable, and uses advanced training. However, on iPhone, the filter is enabled by default, not configurable, and allows for only basic training.
On Mac, you can choose from Training Mode or Automatic Mode for the junk filter:
- Training Mode: You decide which emails are junk and mark them as such.
- Automatic Mode: The filter works on its own and decides which emails are junk.
To configure the junk mail filter on Mac:
- Open Mail and select Mail → Settings.
- Go to the Junk Mail tab.
- Mark the checkbox for Enable junk mail filtering.
- Under When junk mail arrives, choose one of the following:
- Mark as junk mail, but leave it in my inbox for Training Mode.
- Move it to the Junk mailbox for Automatic Mode.
- Mark any other options per your preference and then close the window.
With Training Mode, you can manually mark a message as Junk or Not Junk in a variety of ways. If you use Automatic Mode and notice the filter not correctly marking some messages, you can use these actions for better training as well.
To mark a message as Junk, do one of the following:
- Click the Junk button in the toolbar.
- Drag the email to the Junk folder.
- Right-click and pick Move to Junk.
- Select Message → Move to Junk in the menu bar.
To mark a message as Not Junk, do one of the following:
- Click the Not Junk button in the toolbar.
- Drag the email to your Inbox.
- Right-click and pick Move to Inbox.
- Select Message → Move to Inbox in the menu bar.
For additional options, learn how to block emails on Mac along with how to block iCloud emails.
Why Apple Mail Rules Stop Working
Have you encountered your Apple Mail rules not working correctly? Maybe the rules weren’t triggered as expected or disappeared after a system update.
Here are the top three failures users experience along with how to fix them.
Mail was closed when the email arrived: Because Mail rules run locally on your Mac, the Mail app must be open for the rules to process.
- Keep your Mac powered on and the Mail app running or switch to iCloud rules.
Rules disappear every time Mail quits: When Mail is enabled under iCloud Drive app syncing, it overwrites local rule changes on every launch with the stored iCloud version.
- Go to System Settings → Apple ID → iCloud → iCloud Drive → Apps syncing to iCloud Drive and turn off the Mail toggle.
Rules stopped auto-running after a macOS update: A common user problem where your rules exist but don’t trigger on incoming emails after a system update.
- Before walking through the fix below, ensure that:
The rule order is correct. Remember, rules run from top to bottom in the list. Upon the first match, Mail stops processing rules for that email. Try moving more specific rules above general rules.
There is a sender address mismatch. When using the From condition, it shows a display name, not the actual email address. Edit the rule using the exact address by going to View → Message → Raw Source and look for the From: email address.
If both of the above are configured correctly, perform these troubleshooting steps in order:
- Confirm that rules are active in Mail → Settings → Rules. Be sure the checkboxes are marked.
- Rebuild the affected mailbox by selecting it in Mail and choosing Mailbox → Rebuild.
- Remove and recreate the rule(s).
- Reset the Mail settings. Quit Mail, go to ~/Library/Containers/com.apple.mail/Data/Library/Preferences/, move the file com.apple.mail.plist to the Desktop, and relaunch Mail. This resets settings like signatures, preferences, and smart mailboxes, but does not affect your email accounts.
Rules Are Running But You’re Not Getting Notified
When you create a rule to move an email to a folder, the Mail app can suppress the alert. So, although the rule works correctly, you are not notified when it happens.
To receive notifications:
On Mac, you can add the Play Sound action to the rule. This provides you with an audio clue if your system notifications aren’t being triggered.
To add this action:
- Go to Mail → Settings → Rules.
- Select the rule and click Edit.
- Use the plus sign to add an action.
- Choose Play Sound and select the sound.
- Click OK to save your change.
On iPhone, you can mark the rule’s destination folder as a Favorite and then enable alerts for Favorite Mailboxes.
This works for email accounts that support Push notifications such as iCloud and Exchange. For standard IMAP accounts like Gmail and Yahoo Mail, you may not receive an alert until you manually open the folder.
You can set this up in just two steps:
- Open Mail and go to Mailboxes → Edit and choose the Folder.
- Open the Settings and select Apps → Mail → Notifications → Customize Notifications → Favorite Mailboxes and enable Alerts.
Why Rules on Mac Don’t Apply to iPhone
The reason that rules work differently on Mac versus iPhone is the local versus server-side architecture. On Mac, rules run locally which means they process on your actual Mac. But on iPhone, rules run on the email server and not your iPhone.
With this in mind, the way in which your rules are processed depends on which platform receives the email first. For example, if you’re using Mail on your iPhone and your Mac is asleep, then the rule you set up on Mac won’t be triggered.
The solution for situations like this is to use iCloud Mail rules. But there’s a trade-off. The rules apply to both Mac and iPhone devices; however, the setup criteria are limited, and the rules only work with iCloud emails.
Conclusion
Whether you create Apple Mail rules on your Mac or set up an iCloud Mail filter on the web, be sure to keep the differences between the two systems in mind. Consider the depth of conditions you need, whether it’s for iCloud Mail or another service, and where you need the rules to run.
And remember, tools like Clean Email that complement the Mail app can help you bypass its limitations. You can use smart features and perform effective mailbox management on any device by adding Clean Email to your toolbox.


