Key Takeaways
- The iPhone email filter button adjusts your mailbox view for Unread, Flagged, or Mail Sent Today.
- Email Categories filter your inbox by topic such as Transactions, Updates, and Promotions.
- Designating VIP senders lets you filter emails from important people to a specific mailbox.
- Junk filters automatically move spam to the Junk folder and cannot be disabled.
- Mail rules can apply actions to incoming messages like moving, marking, or deleting.
- Supplementary tools like Clean Email can bypass Apple Mail’s limitations and provide advanced filtering features.
Use the Apple Mail Filter Button
💡 Note: All iOS mail filters described in this article also work the same way on iPad.
For a quick view of unread messages or emails with attachments, you can use Apple Mail’s filter. This filter narrows down the messages you see, but it does not reroute or move emails. It’s simply a handy filtered view.
- To enable the filter, tap the Filter button (funnel) at the bottom (iPhone) or top (iPad).
- When the icon turns blue, tap it again to choose the filters you want to use:
- Include Mail From (Available for All Inboxes): Pick the email accounts you want to include.
- Include: Select Unread and/or Flagged.
- Addressed: Choose To: Me and/or Cc: Me.
- Additional options: Enable the toggles for Mail with Attachments, from VIP, and/or Mail Sent Today.
- Tap the checkmark in blue at the top to see the filtered emails.
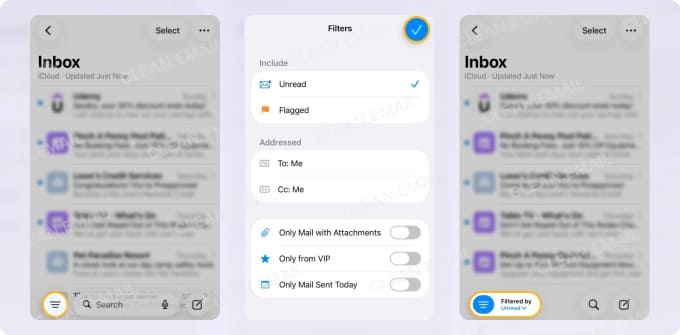
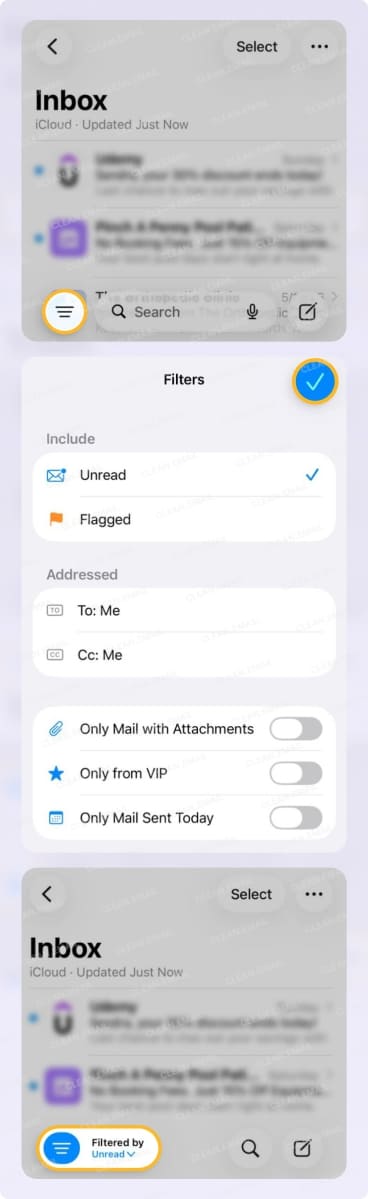
You can combine filters to create a custom view. For example, you can see emails from your iCloud and Gmail accounts that are Unread and addressed to you. Or you can include messages from all accounts that are Flagged and contain attachments.
After you finish using the filter, tap the Filter button to turn it off and return to your initial view.
Enable Apple Mail Categories
Introduced with iOS 18, you can use Categories for automatic inbox sorting, similar to Gmail’s Category tabs. These make it easy to spot the emails you want like delivery alerts and social notifications.
Like the iPhone and iPad email filter described above, this only affects the visual display of your messages; it does not move emails to folders. Additionally, you can enable the category view per account. For instance, you turn on Categories for iCloud, but use the List View for Outlook.
To enable the categories, tap the three dots at the top and mark Categories.
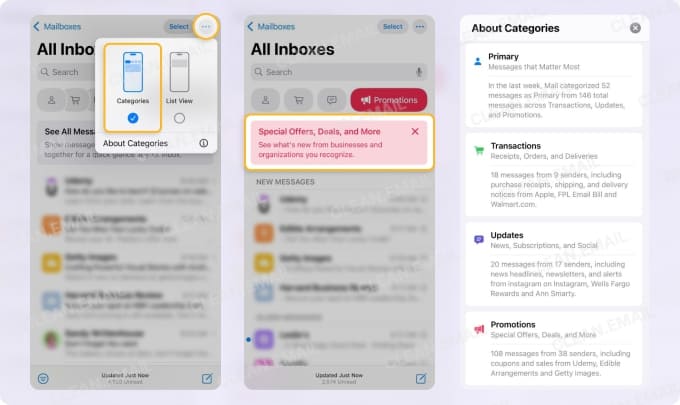
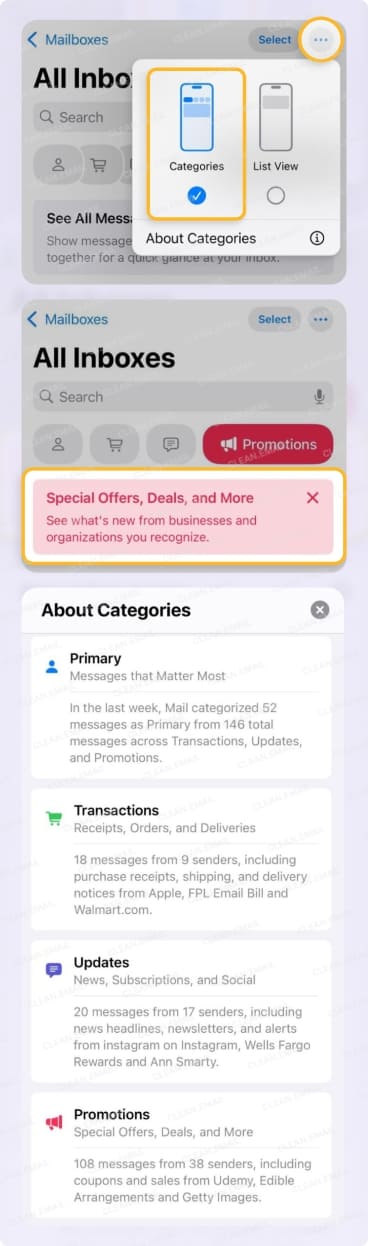
You can then tap to see one of the following:
Primary: Personal emails, direct messages, and time-sensitive communications
Transactions: Receipts, orders, and deliveries grouped by sender
Updates: News, subscriptions, and social alerts
Promotions: Offers, deals, and discounts
All Mail: Messages from every category listed together
To remove the category view, tap the three dots at the top and mark List View.
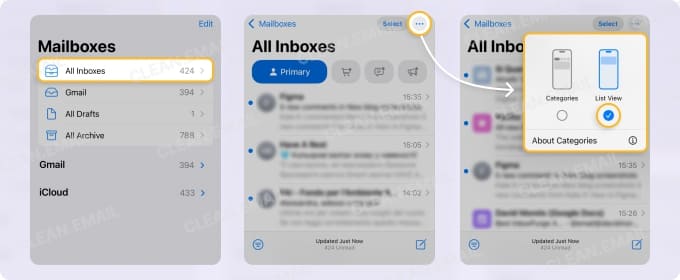
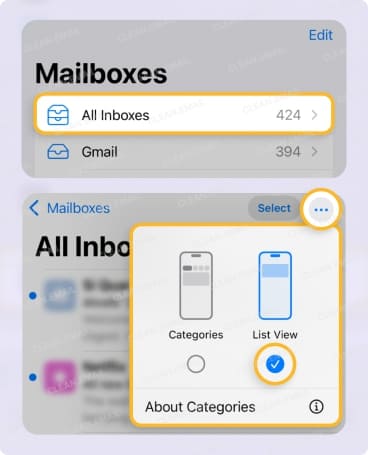
If you see an email that you want to recategorize, this is an option. Once you do so, all current and future emails from that sender will appear in your newly chosen category.
- Swipe the email in your message list from right to left.
- Select More.
- Choose Categorize Sender.
- Pick the Category from the list.
- Tap Continue.
Designate VIP Senders in Mail
Everyone gets emails from at least one “very important person,” right? To ensure messages from your most significant senders don’t get lost in the shuffle, you can designate them as VIPs.
When you add a VIP:
- A star icon appears next to each of their messages and in the email header.
- Their emails appear in the VIP mailbox along with their default mailbox.
- You can receive custom notifications for new messages.
What’s nice about this Apple Mail feature is that there’s minimal setup required and you don’t have to worry about creating inbox rules.
To designate a VIP:
- Open an email from the sender.
- Tap the sender’s name or email address in the message header.
- Select View Contact Card.
- Choose Add to VIP.
To view or edit your VIP list:
- Go to the Mailbox selection screen.
- Tap the Info icon (letter “i”) next to VIP.
- Then, do one of the following:
- Select a VIP to view their contact card.
- Pick Edit to add or remove a VIP.
- Choose VIP Alerts to customize the notifications.
- Tap Done when you finish.
Be Aware of Junk Email Filters on iPhone
While you may find the ability to manage junk mail settings with some providers, Apple Mail doesn’t offer this functionality. Junk mail filters are built into the system, identifying spam and moving it to the Junk folder automatically. There are no iPhone junk mail settings to configure.
These filters do a decent job; however, there are times when they may not catch all junk messages. In these cases, you can manually mark an email as spam on iPhone, and the system learns from this over time.
Unfortunately, it does not learn the opposite and can mark emails as Junk when they’re not. So, you may find yourself moving messages from the Junk folder back to your Inbox. And there is no allow list available, nor can you disable the iPhone or iPad email spam filter.
When iPhone Filtering Isn't Enough: Clean Email
To overcome Apple Mail’s mobile limitations, consider Clean Email. This supplementary tool helps you filter and manage email on any device with its advanced feature set.
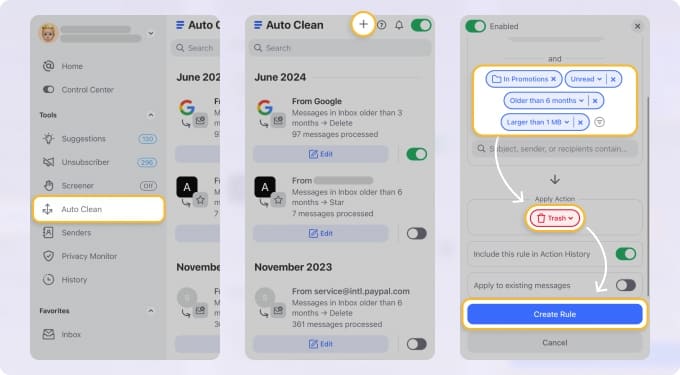
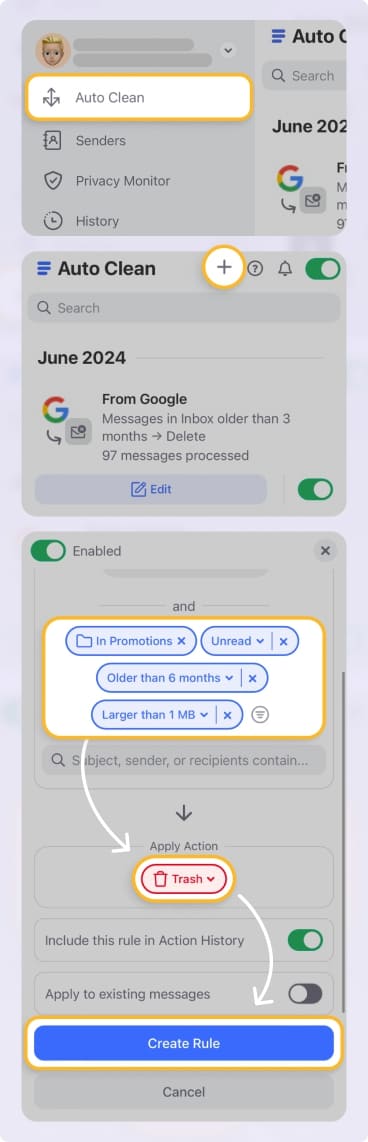
Auto Clean
Set up automated mailbox filters with Auto Clean. Not only can you create and manage rules on both desktop and mobile, but you can set up rules for all of your email accounts (Gmail, Outlook, Yahoo Mail, iCloud Mail.)
The Auto Clean feature also provides a wide range of conditions and actions, more so than Apple Mail. For instance, you can filter by keyword, size, age, domain, sender, and/or status and then move, mark, flag, archive, delete, or trash the messages.
Smart Folders
Use built-in Smart Folders as filters. Clean Email provides over 30 smart folders that automatically filter related emails for you without any setup.
You have folders for things like Travel, Seasonal Sales, Entertainment, and Online Shopping as well as others for your Top Senders, Automated Messages, Messages to Yourself, and those where You are CC-ed.
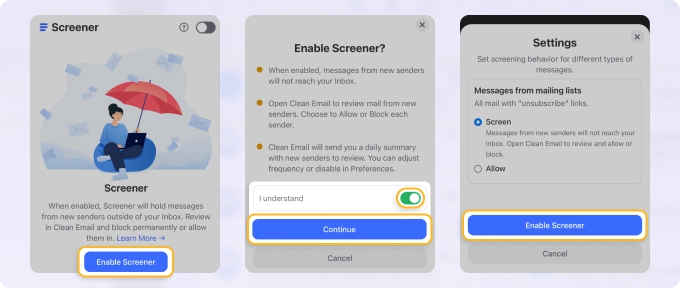
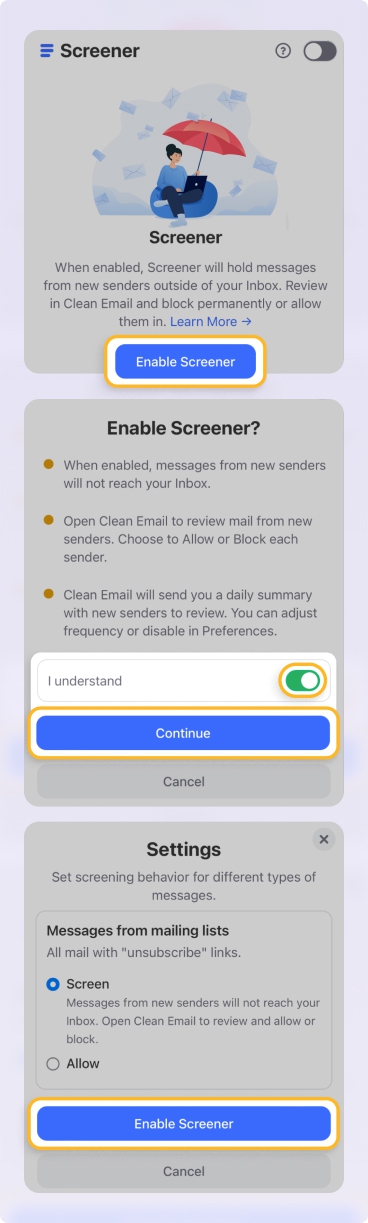
Screener
One final automated filter you’ll appreciate is Screener which isolates emails from new senders in one spot. You can then Allow, Block, or Unsubscribe before the messages even reach your inbox.
The Screener feature is ideal for keeping junk out of your mailbox and reducing the risk of malicious emails compromising your inbox.
Manual Filters
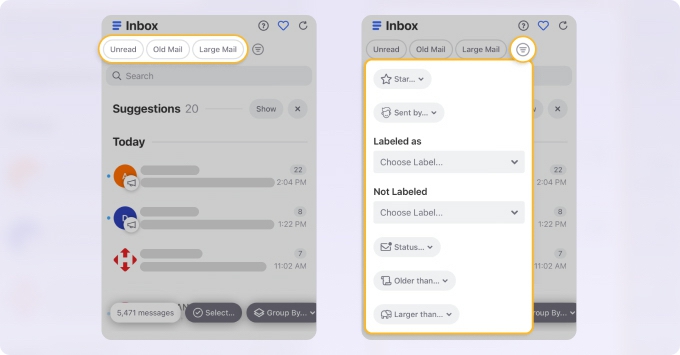
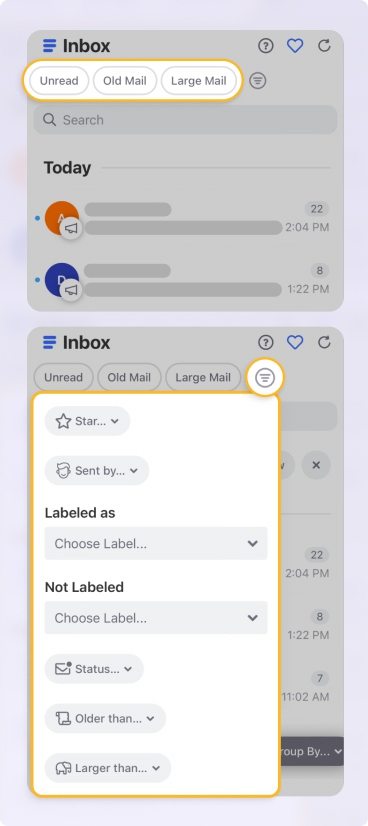
If you want to apply quick filters while viewing your messages, Clean Email provides buttons right at the top for Unread, Old Mail, and Large Mail. Plus, you have a Filter button to choose from Starred, Sent by, Labeled as, or Status.
Create Filter Rules on iPhone and iPad: iCloud Mail Rules
If you’re looking to automate iPhone email filters, you can use iCloud Mail rules. The advantage is that these rules run on Apple’s servers, so they apply to iCloud Mail on all your devices. The disadvantage is that you can only create rules for iCloud.com accounts, not Gmail or Outlook.
You can set up email rules on iPhone using the Settings app or iCloud.com in your web browser.
💡 Note: It can take up to 15 minutes for a new rule to take effect.
In the Settings App
- Open the Settings and select Apps → Mail.
- Pick Mail Accounts and choose iCloud.
- Tap iCloud Mail Rules below Organize Your Inbox.
- Select Add Rule.
- Enter a Rule Name.
- Next to Message, choose the condition such as “is from” or “has subject containing” and add the name, address, or keywords directly beneath.
- Next to Action, choose the action such as “Move to Folder” or “Mark as Read” and add the corresponding detail directly beneath.
- Tap the checkmark in blue to save the rule.
When you finish, you’ll see all of your rules where you can select one to view or change it or tap Edit to remove a rule or rearrange the order.
On iCloud.com
- Visit iCloud.com, sign in, and select Mail.
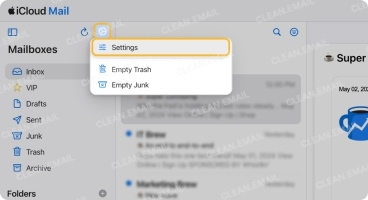
- Click Settings (gear icon) on the left and pick Settings.
- Select Rules and use the plus sign to add a rule.
- Follow Steps 5 through 7 above to add the name, condition, and action.
- Click Add to save the rule.
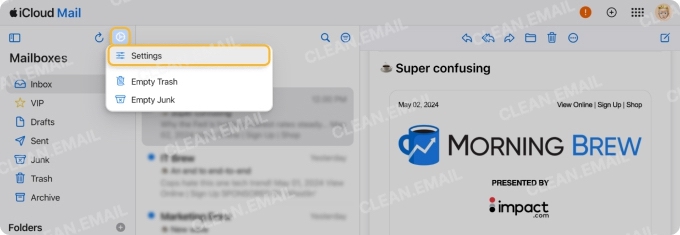
Like in the Settings app, you’ll see a list of all rules you’ve set up where you can pick one to view, change, or delete it or rearrange the order.
For additional details including Mail rules on Mac, a comparison of rules per system, and troubleshooting, look at our guide to Apple Mail rules.
Filtering Gmail, Outlook, and Other Accounts on iPhone
Because the rules you can set up for Mail on iPhone are only available for iCloud accounts, you’re probably wondering how to create automated filters for your other connected email accounts.
If you want to set up rules for Gmail, Outlook, Yahoo Mail, or another service, you’ll need to create those rules directly with the provider. These rules are saved on the server side, not locally, so they will apply to emails you receive in Apple Mail on iPhone and iPad.
Check out our how-to’s for Gmail rules, Outlook rules, and Yahoo Mail rules for further assistance.
Conclusion
Knowing how to filter emails on iPhone and iPad gives you a good way to find those that are unread or flagged, from important senders, or for shopping alerts and bank statements. But if you want to take filtering on your device further and overcome Apple Mail’s limitations, consider a tool like Clean Email.