


Key Takeaways
- Unsubscribe in Apple Mail by opening an email and tapping Unsubscribe.
- Apple Mail doesn’t support bulk unsubscribe and only shows the option for some senders.
- Requests may take a few days to process, and some emails may still arrive.
- For suspicious emails, mark them as Junk instead of unsubscribing.
- Gmail app on iPhone offers a Manage subscriptions view to see all newsletters in one place.
- Tools like Clean Email provide advanced options such as bulk unsubscribe and better subscription control.
How to Unsubscribe from Emails on iPhone and iPad
You can get started quickly in the Apple Mail app on your mobile device. Here we will break down how to stop getting emails on iPhone and iPad.

Unsubscribe from Emails on iPhone in Apple Mail
To use the Apple Mail unsubscribe feature, open the app on your iPhone or iPad and follow these steps:
- Choose a specific mailbox or All Inboxes from the Mailboxes menu.
- Choose a message from a mailing list.
- Click Unsubscribe at the top of the email.
- Click Unsubscribe in the pop-up window to confirm.
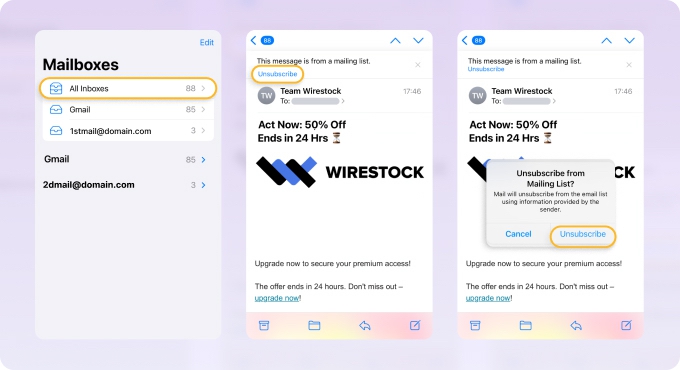
⚠️ Limitations: The Unsubscribe banner only shows up for messages that Apple thinks are mailing lists. Even if they have an unsubscribe link, some real newsletters won't show the banner.
After you unsubscribe, it can take a few days for the sender to process your request. During this time, you may still receive messages.
If emails continue to arrive after several days, it may be because:
- The sender hasn’t processed the request yet.
- You’re subscribed through multiple email lists.
- The sender doesn’t fully honor unsubscribe requests.
In such cases, marking messages as Junk or blocking the sender may be more effective. This is especially important if an email looks suspicious or like spam—in that case, it’s safer to skip unsubscribing and mark it as junk instead.
💡 Tip: But what if you clicked Unsubscribe on a legitimate subscription you still want to receive? Learn how to resubscribe to emails after clicking Unsubscribe in our guide.
How to Use iCloud Mail Cleanup Recommendations to Unsubscribe
- Open the Settings app on your iPhone or iPad.
- Tap your Apple ID name.
- Select iCloud.
- Under Saved to iCloud, tap Mail.
- Choose iCloud Mail Cleanup.
- Tap the Get Recommendations button.
- Tap Get Recommendation under Unsubscribe Recommendations.
- Select the senders and tap Unsubscribe.
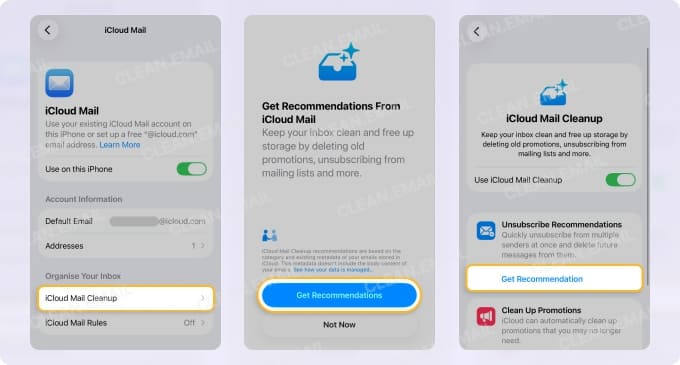
📌 Note: If no suggestions are displayed, there are currently no unsubscribe recommendations available.
Can You Unsubscribe in Bulk in Apple Mail?
Apple Mail does not support bulk unsubscribe. You need to open each email individually and tap Unsubscribe when the option appears.
There’s also no way to unsubscribe from all emails at once. The unsubscribe option only appears for some mailing lists, so managing multiple subscriptions can take time.
This limitation makes inbox cleanup inefficient, which is where tools like Clean Email offer a much faster alternative.
How to Unsubscribe on iPhone with Clean Email
To unsubscribe on iPhone and iPad using Clean Email’s Unsubscriber feature, download the app, sign up for free, and follow these steps:
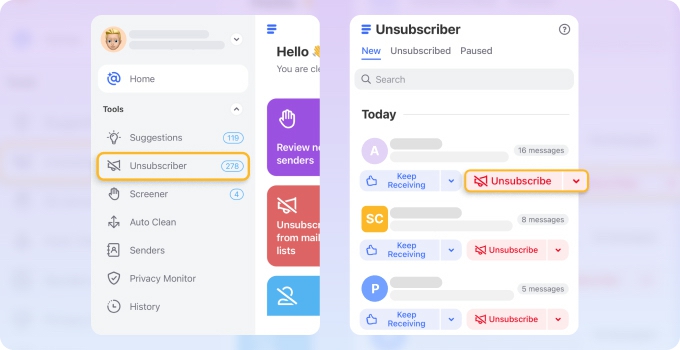
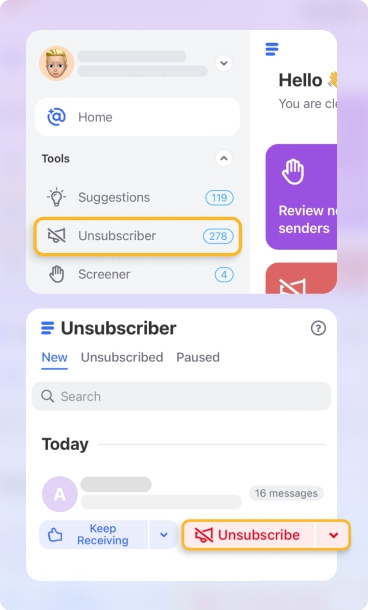
- Tap the hamburger icon on the top left → select Unsubscriber.
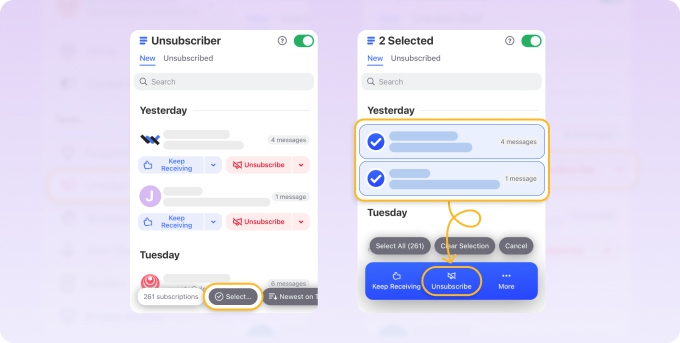
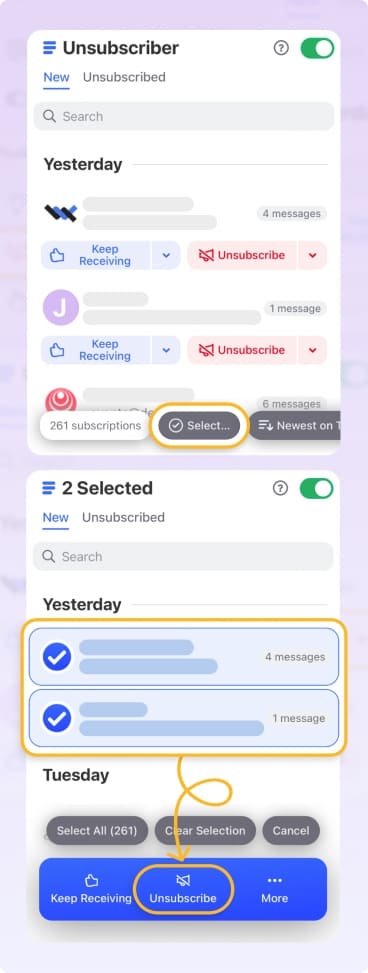
- Unsubscribe from individual or multiple messages:
- Tap Unsubscribe for an individual email.
- Tap Select at the bottom, choose the messages, or pick Select All → Unsubscribe for multiple emails.
![Unsubscriber feature in Clean Email]()
![Unsubscriber feature in Clean Email]()
![Mass unsubscribe from Gmail messages in Clean Email]()
![Mass unsubscribe from Gmail messages in Clean Email]()
- Confirm the action.
- Go to the Unsubscribed tab at the top to view email lists you unsubscribed from.
Benefits of using the Unsubscriber:
- You can unsubscribe from multiple emails on iPhone at once for faster email management.
- You can unsubscribe from emails without an unsubscribe link, a feature many email providers don't offer.
- You can see all emails on the Unsubscribed tab for easy resubscribing or for retrieving messages you unsubscribed from by mistake.
- Your unsubscribed emails, and future ones you receive before the request is accepted, are sent directly to the Trash folder which keeps them out of your inbox.
| Capability | Apple Mail | Clean Email |
|---|---|---|
| Bulk unsubscribe | ❌ No | ✅ Yes |
| Unsubscribe without a link | ❌ No | ✅ Yes |
| View unsubscribed senders | ❌ No | ✅ Yes |
| Resubscribe later | ❌ No | ✅ Yes |
| Auto-trash future messages | Limited | ✅ Yes |
How to Unsubscribe from Emails on iPhone in Gmail
The Unsubscribe option in Apple Mail works with Gmail and other email provider accounts added to your iPhone.
If you use the Gmail app instead, the process works as shown below:
- Open the Gmail app and select the email.
- Tap the Unsubscribe link at the top of the message (if available).
- Confirm by tapping Unsubscribe again.
You can also manage subscriptions in Gmail following these steps:
- Open the Gmail app.
- Tap the menu icon (three lines) in the top-left corner.
- Scroll down and tap Manage subscriptions.
- Review the senders and tap the unsubscribe icon.
- Confirm by clicking Unsubscribe.
Read more about unsubscribing from emails in Gmail in our detailed guide.
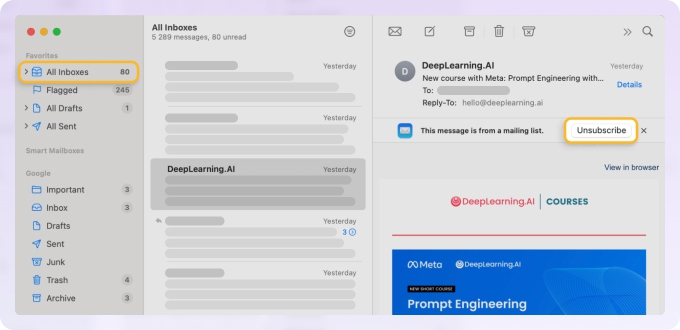
How to Unsubscribe from Emails in Apple Mail on Mac
- With the Mail app open, head to a specific mailbox or choose All Inboxes in the left-hand menu and select a message.
- Click Unsubscribe at the top of the email.
- Choose OK to unsubscribe from future mailings.

Again, you should allow a few days for the request to process and remove your email address from the sender’s mailing list.
Wrap-Up
Keeping your inbox tidy so that you don’t miss important messages doesn’t have to be difficult. You can easily unsubscribe from emails you no longer want using Apple Mail or opt out with automations, flexibility, and extra features using Clean Email.
| Method | Where it works | Best for |
|---|---|---|
| Apple Mail unsubscribe banner | Apple Mail on iPhone & iPad | Quickly stopping a single recognized mailing list |
| Sender’s footer unsubscribe link | Any email app | When the unsubscribe banner doesn’t appear |
| Clean Email Unsubscriber | iPhone & iPad (all IMAP accounts) | Bulk unsubscribe, visibility, and resubscribe control |
Either way, you can also unsubscribe from emails using your preferred email service’s built-in feature.
Read More:
FAQs
Can you unsubscribe without opening an email on iPhone?
In Apple Mail, this isn’t possible, and you need to open the message to access the Unsubscribe option. In the Gmail app on iPhone, you can unsubscribe without opening individual emails by using the Manage subscriptions view.
Can you unsubscribe using swipe actions on iPhone?
No. Swipe actions in the Mail app don’t include an unsubscribe option. You need to open the email to access it.
Does Unsubscribe work with Hide My Email (iCloud+)?
Yes, but with limitations. When you use Hide My Email, unsubscribe requests are sent from the generated alias, not your real address. You can also disable or delete the alias entirely in iCloud settings to stop all emails sent to it.


