


How to Use Outlook Effectively
Like it or not, email is probably an important part of your life. If you’re like most people, you use it for staying in touch with friends and family (at least those who are not active on social media), for communicating with colleagues from work, for buying things online, and for many other things.
Since 2012, over 400 million people have selected Outlook.com as their email service of choice, and it’s easy to see why. By combining email, contacts, tasks, and calendaring services, Microsoft created one of the best email software in the world and convinced many users of other email services, namely Gmail, to jump ship.
Unlike Gmail, Outlook doesn’t scan emails or attachments for advertising information, and it doesn’t display distracting ads (check out the full comparison of Gmail vs. Outlook). It also helps its users fight inbox clutter with its Focused Inbox feature, which automatically separates important emails from unimportant ones, much like Clean Email sorts emails according to their type (more about Clean Email in the next chapter of this article).

How to Organize Emails in Outlook
To enable Focused Inbox, follow the instructions below:
- Go to Outlook.com.
- Sign-in with your Microsoft account. You can also sign in with your old Hotmail account if you still have one.
- Click the Settings button (gear icon) in the top-right corner.
- Turn on the Focused Inbox toggle switch.
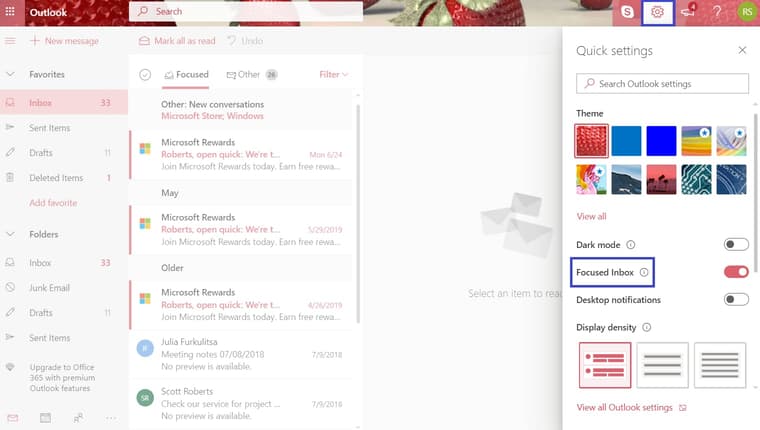
Your inbox will now be split into two: Focused and Other. As their names suggest, the Focused inbox is where all important emails reside, while less important emails are automatically moved to the Other inbox.
Even though Outlook is very smart when it comes to determining which emails should go the Focused inbox and which should go to the Other inbox, it does make a mistake once in a while. Fortunately, you can easily correct any such mistake by teaching Outlook to always move the email in question to the right inbox:
- Open the wrongly categorized email.
- Click Move to from the top panel.
- Choose Always Move to Focused/Other inbox.
If you want to move the email just this one time, you can select Move to Focused/Other inbox instead. As you can see, learning how to use Outlook email more effectively can be as simple teaching Outlook which emails you consider to be important and which you can live without.
How to Use Outlook Calendar
Located in the bottom-left corner of Outlook.com is a calendar icon that can take you straight to Outlook calendar. Even though the calendar looks simple, it’s actually more powerful than most people realize.
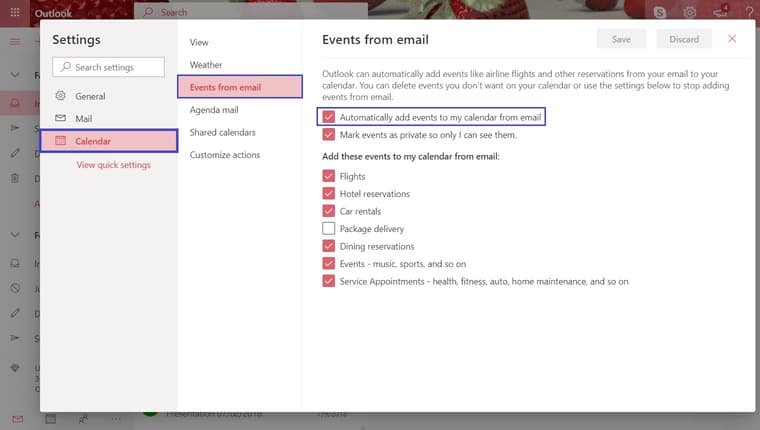
Outlook calendar can, for example, automatically add events, such as airline flights, hotel reservations, car rentals, package delivery, dining reservations, or service appointments, from emails you receive, saving you a lot of time and making it far less likely that you miss something important.
How to use Outlook calendar’s automatic event management:
- Sign-in with your Microsoft account.
- Click the Settings button (gear icon) in the top-right corner.
- Click View all Outlook settings.
- Go to Calendar → Events from email.
- Check “Automatically add events to my calendar from email” and select each event you want to add.
How to Use Tasks in Outlook
Outlook users have been traditionally relying on Outlook calendar to manage their tasks, but some tasks are much better suited for to-do lists. Microsoft understands this, and the company announced that a Microsoft To-Do integration was coming to Outlook.com at the end of 2018. Fast forward to today, the integration, called Outlook Tasks, is here, and it works great.
This is how to use Tasks in Outlook:
- Sign-in with your Microsoft account.
- Click on the three dots located in the bottom-left corner and select Tasks.
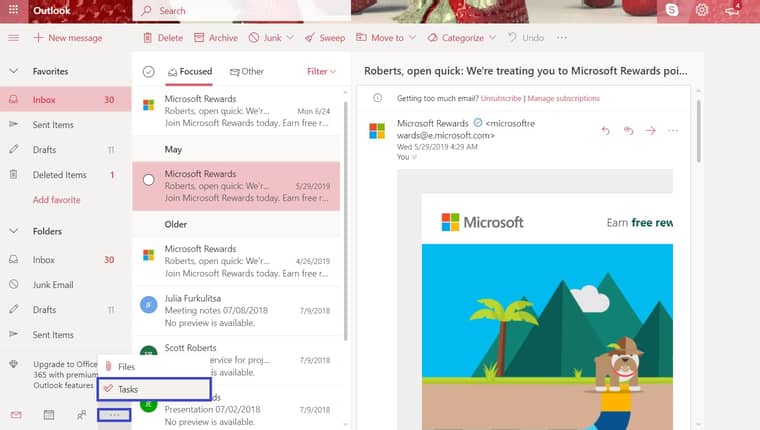
- To add a new task, simply click Add a task, start writing, and hit Enter on your keyboard when you’re finished.
You can also easily edit your tasks on your mobile device using Microsoft To-Do (iOS and Android), which is a great way how to use Outlook tasks effectively.
How to Add a Gmail Account to Outlook
Since the end of 2019, Outlok.com users can send and read email messages from their Gmail accounts without leaving Outlook.com.
This is how you can add your Gmail account to Outlook.com:
- Sign in to Outlook.com with your email address and password.
- Go to Settings and then click View all Outlook settings and Sync email.
- Find the Connected accounts section and click Gmail.
- If you want to add a non-Gmail account, select Other email accounts instead.
- You will be taken to the Connect your Google account page. There, enter a display name for your Gmail account and click OK.
- Select the Gmail account you want to access from Outlook.com. You may be asked to provide your Gmail username and password. If you protect your Gmail account with two-factor authentication, you'll need to create an app password for it.
- Select Allow to finish adding your Gmail account.
Outlook.com doesn't send any information back to Gmail. If you delete an email from your Gmail account using Outlook.com, the email won't actually be removed from your Gmail inbox. If you don't keep this in mind, your Gmail account might soon require a bulk email organizer like Clean Email.
How to Manage Contacts in Outlook
You can manage your contacts directly in Outlook.com. With all your contacts in one place, you won't have to struggle ever again to remember the right email address or face the embarrassment of getting it wrong.
To access contacts in Outlook.com:
- Sign in to Outlook.com with your email address and password.
- Select the People icon located in the bottom-left corner of the page.
To create a new contact:
- Click the blue New contact button.
- Add as much information about your contact as you can.
- You click Add more to add more information than what's available by default.
- Click Create.
Alternatively, you can create a new contact from an email message:
- Go back to your inbox.
- Open any email message from the contact you want to add.
- Select the name of the sender or recipient you want to add to your contacts.
- Go to the Contact tab.
- Click Add to contacts.
When you accumulate a larger number of contacts in your Outlook.com account, you might find it useful to create a contact list, which is a collection of contacts. Contact lists are useful for sending Outlook group emails, and it takes almost no time to create one:
- Select the People icon located in the bottom-left corner of the page.
- Select the arrow next to New contact and then select New contact list.
- Enter a name for the list.
- Type any name or email address you want to add to the contact list.
- Click Create.
Read our full guide on how to create a group in Outlook
.How to Manage File Attachments in Outlook
For some reason, even seasoned Outlook users who know all kinds of Outlook tips and tricks are not aware that they can easily manage all attachments on a dedicated page.
To manage file attachments in Outlook:
- Sign in to Outlook.com with your email address and password.
- Select the Files icon located in the bottom-left corner of the page.
- Using the Filter option on the toolbar, you can display only files of a specific format or age.
All you need to do to open an attachment is click on it. A pop-up window will appear, with the attachment on the left and the original email message on the right (find out what the Outlook file size limit is).
How to Get a Personalized Email Address in Outlook
If you have a Microsoft 365 subscription, you can get a personalized email address from GoDaddy and associate it with your Outlook.com email account. A personalized email address can help you improve your professional image and attract more customers.
To get a personalized email address in Outlook.com:
- Sign in to Outlook.com with your email address and password.
- Click the diamond icon on the top toolbar.
- Select Premium from the list of options on the left.
- Click Get started under Personalized email address.
- Click Get a domain.
- Follow the instructions on GoDaddy's website to find and purchase your domain name.
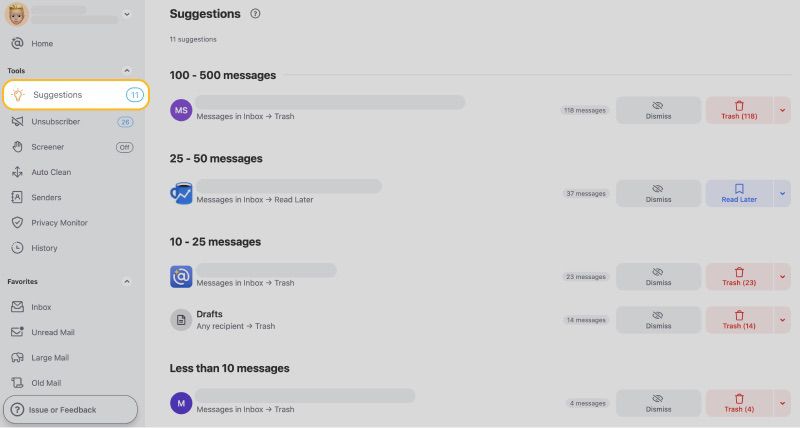
How Clean Email Can Help Outlook.com Users
Clean Email is a powerful inbox cleaner for Outlook and most other popular email services. Using intelligent and privacy-respectful algorithms Clean Email can group relevant emails together, making it possible to organize them in bulk instead of having to organize each email individually.

Just like Outlook’s Focused Inbox can learn which emails are important and which are not to automatically move them to the relevant inbox, Clean Email can automatically apply selected actions to remove, archive emails, move, or label messages as they arrive in the future.
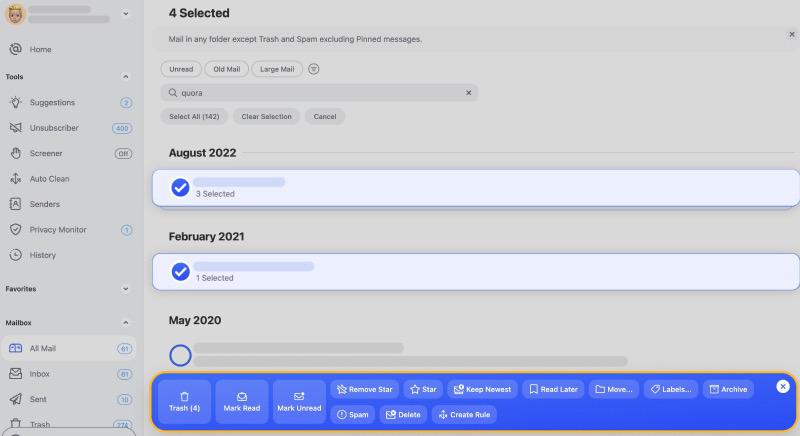
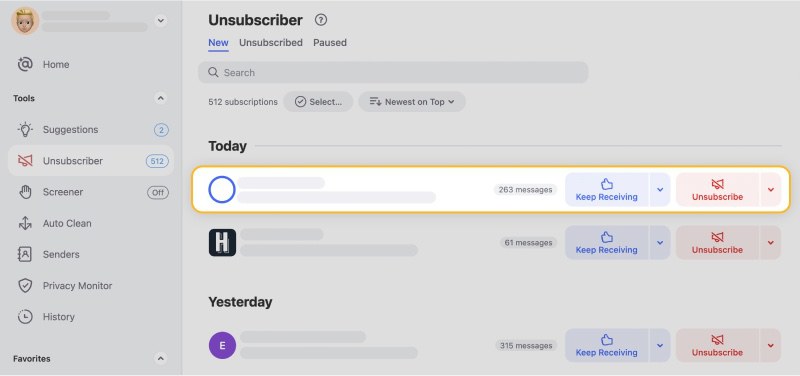
If you receive more newsletters and unwanted subscriptions than legitimate emails, you will love the fact that Clean Email can automatically unsubscribe you with a simple click so that you don’t have to hunt for unsubscribe links hidden at the very bottom of newsletters and unwanted subscriptions.
To get started with Clean Email:
- Go to: https://clean.email/
- Click Get Started for Free.
- Sign in with your Outlook email account.
- Look at the available options in the Quick Clean section.
- Select the default action or choose some other action to organize your Outlook inbox.
Don't worry: Clean Email won't see your Outlook password, and it will never touch the content of your emails or sell metadata to various third parties.
Conclusion
Now that you know how to organize Outlook like a pro and how Clean Email can help you keep your inbox clutter-free, there’s nothing stopping you from using your email to its full potential. Of course, there are a lot more Outlook tips and tricks to cover, but the ones featured in this article cover all the basics, and they should be enough for most people who want to learn how to use Outlook more efficiently.
Wondering how to get your inbox clean and organized? Check out our guides on how to create folders in Outlook and how to stop junk mail in Outlook.


