


Best Gmail Organization Hacks
Does it sometimes feel that the Gmail notification badge on your phone never goes away? If so, you need to familiarize yourself with essential tips on how to organize your Gmail.
Since its launch in 2004, Gmail has seen countless feature updates, and the free email service developed by Google now has a whole host of excellent Gmail inbox management features many of its users don't even know about.

1. Declutter Your Inbox
So, here's the deal: before you can get your inbox all nice and organized, it's super important to declutter it. Think of it like tidying up your room before rearranging the furniture - it makes everything much easier!

Start by clearing out all those unnecessary emails that have been hanging around for way too long.
- Delete what you don't need.
- Archive what you might want to keep but don't need right now.
- Unsubscribe from mailing lists.
- Sort out the rest.
You can also set up automated rules to make sure those pesky emails don't come creeping back in which we’ll walk you through below.
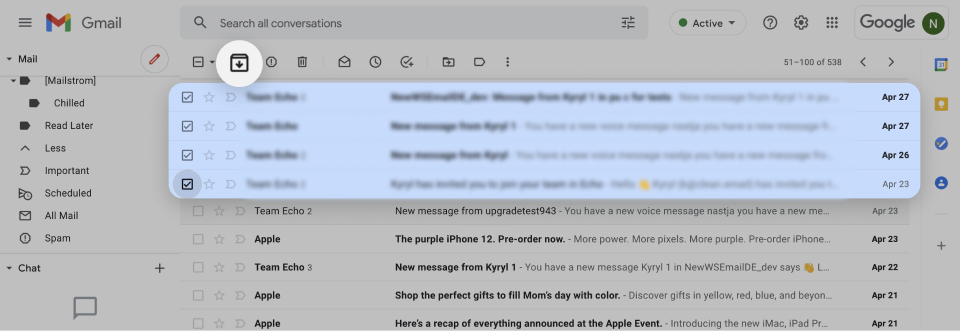
2. Archive Emails You No Longer Need
All Gmail users enjoy 15 GB of free storage space. With so much space for emails and attachments, it doesn't always make sense to delete emails in bulk to keep your inbox clean.
Instead, you can use the Archive feature, which basically hides emails from your inbox without deleting them. You can still view all archived emails by clicking the All Mail label located in the menu on the left.
To archive an email:
- Visit Gmail.
- Select an email.
- Click the Archive button in the toolbar under the search bar.
To unarchive an email:
- Select All Mail on the left.
- Choose the email you want to unarchive.
- Click the Move to Inbox button in the top toolbar.
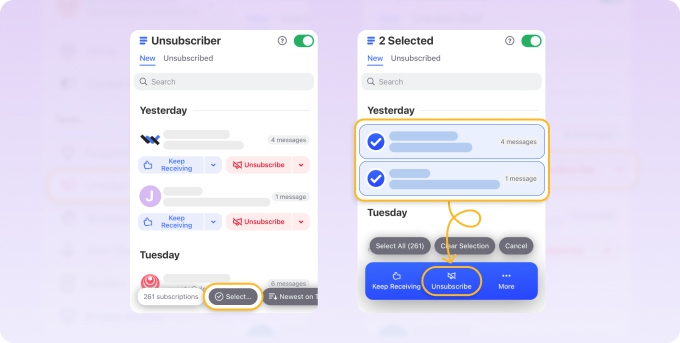
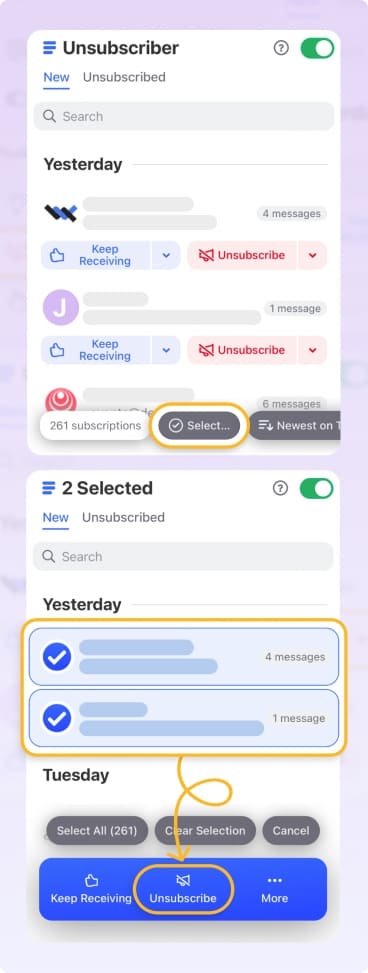
3. Unsubscribe From Mailing Lists
You may sign up for newsletters or allow companies to send you promotional or marketing messages. While this can be helpful, these types of emails can clutter your inbox quickly. Consider unsubscribing from those you no longer want to better organize Gmail.
You can use the Gmail Unsubscribe button to remove yourself from mailing lists. Keep in mind that the process can take a few days, so you may want to send these messages to Spam in the meantime.
- Open an email and click Unsubscribe at the top.
- In the pop-up window, select either Unsubscribe or Go to website. These options depend on the senders’ unsubscribe settings.
- Optionally, choose Move to Spam by clicking that link when the message appears.
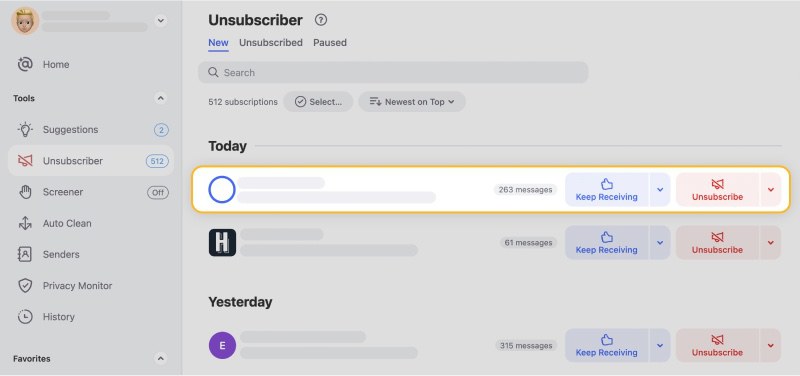
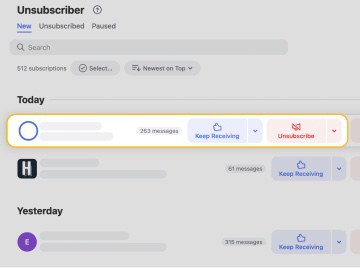
📌 To unsubscribe from multiple emails at once, check out Clean Email’s Unsubscriber feature. Simply select Unsubscriber in the left-hand menu and take action on the subscription emails to the right.
4. Make Unread Emails More Visible
Many people who receive multiple emails every day wonder how to organize Gmail inbox to make unread emails more visible. Nobody wants to receive an angry email from a boss, coworker, or client because of a missed message that's been buried 10 feet deep under a pile of newer emails. Fortunately, you can manage your Gmail inbox by putting unread emails on top, and all you have to do is change a single setting:
- Open Gmail.
- Go to Settings. Then click See all settings.
- Choose the Inbox tab.
- Change Inbox type from Default to Unread first.
You can also change it to Important first, Starred first, or Priority first.
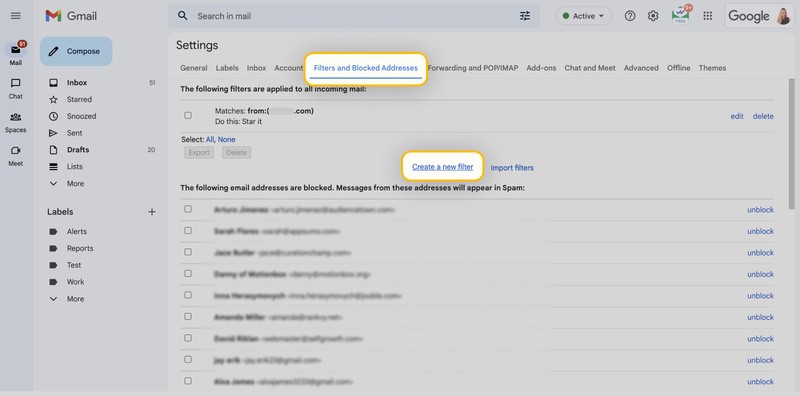
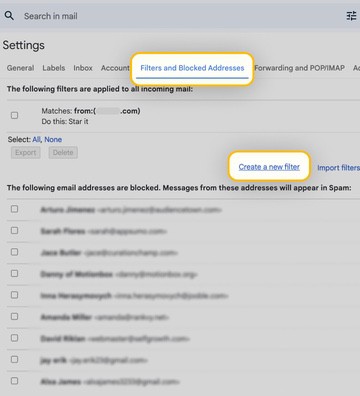
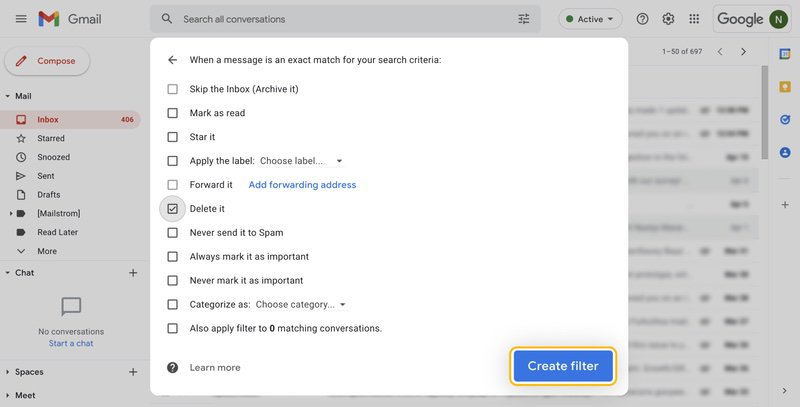
5. Set Up Inbox Rules
For one of the best ways to organize Gmail messages, consider setting up inbox rules. You simply select the conditions and pick an action to apply to future emails that match those conditions. You can do things like label messages, flag them for follow-up, or archive them.
Follow along with our video for how to create a rule to use Gmail effectively:
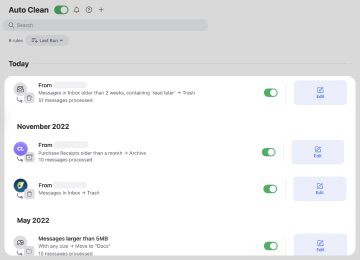
As an alternative, you can use Clean Email’s Auto Clean feature to create inbox rules. Select Auto Clean in the left-hand menu, click Create Rule on the right, and set up the conditions and action.
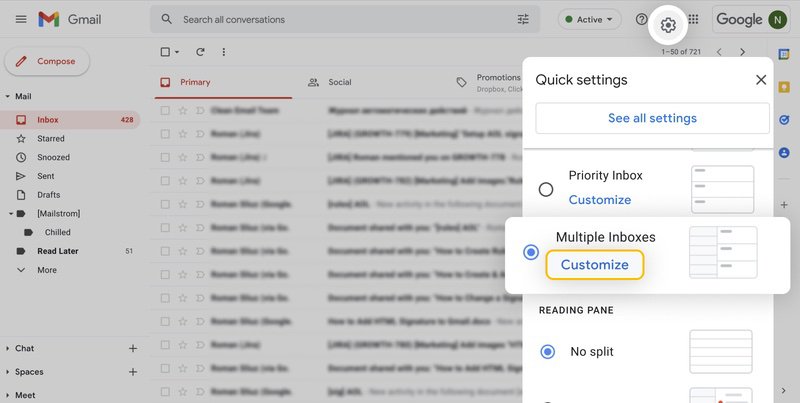
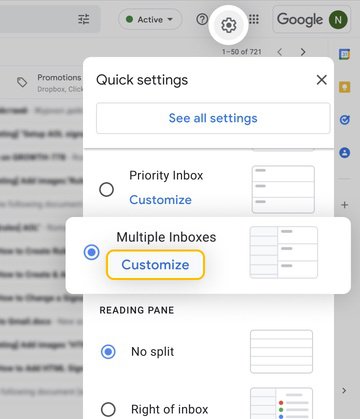
6. Use Multiple Gmail Accounts
You can create as many Gmail accounts as you want and for free, so there's absolutely no reason not to have multiple Gmail accounts to separate personal and work emails.
To be more effective, take advantage of an incredibly useful feature that gives you a unified inbox to manage and organize Gmail accounts. It’s called Multiple Inboxes and here’s how to set up your Gmail inbox to use it.
- Go to the Settings and select the Advanced tab.
- Choose Enable right next to Multiple Inboxes.
- Click Save Changes and wait for Gmail to reload.
- Go to the Multiple Inboxes tab under Settings to customize the Multiple Inboxes feature to show email sent to your other address.
7. Label Your Emails
Labels are like folders on steroids. A single message can have multiple labels, so you can arrange emails that are related with more flexibility than traditional folders. You can also customize the labels in Gmail to make different kinds of emails distinguishable at a glance.
To create labels in Gmail:
- Visit Gmail.
- Select an email by clicking on the checkbox to the left of it or open the message.
- Open the Label menu below the search bar. The label icon looks like an arrow pointing to the right.
- Click the Create new button located near the bottom of the drop-down menu.
- Enter a new label name. You can nest the new label inside of another label, which is the Gmail equivalent of placing a folder inside of another folder.
- When you're done, click the Create button.
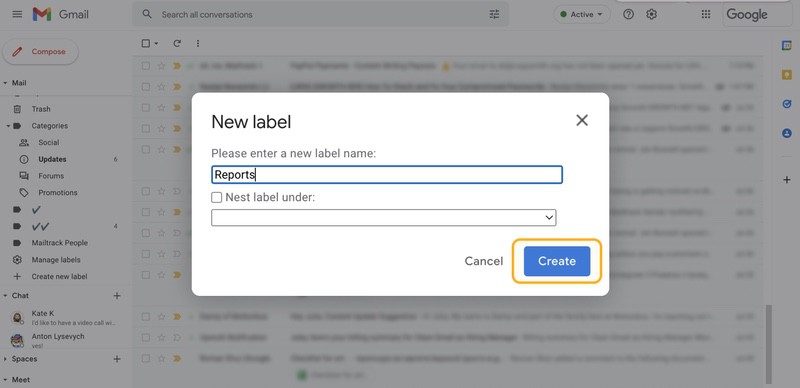
- The new label is automatically assigned to the email you've selected.
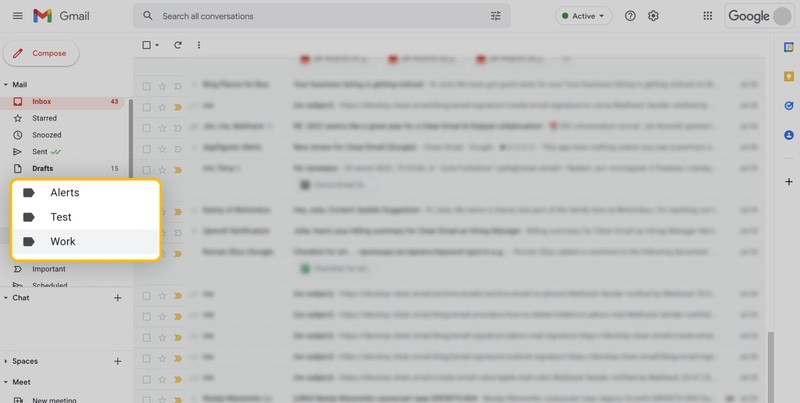
- All your labels are listed in the menu on the left. To display all emails with a specific label, simply click the corresponding label.

📌 Tip: Learn more about how to sort and organize labels in Gmail effectively.
8. Explore Gmail Add-Ons and Extensions
Gmail has many useful features for organizing emails, but there's still a lot that it can't do, and that's where Gmail add-ons and extensions come in. By installing the right Gmail add-ons or Chrome extensions, you can make Gmail even more powerful than it already is and organize your Gmail inbox in ways you never thought possible.
Here are three Gmail add-ons and extensions all users should know about:
- Inbox Pause: This simple Gmail add-on allows you to pause your Gmail inbox until you're ready to receive more emails. It's perfect for those who often feel overwhelmed by the number of email messages they receive and would like to check email only a few times a day to boost productivity.
- Checker Plus for Gmail: This Chrome extension lets you get instant notifications for multiple Gmail inboxes directly in your web browser. You can read or delete emails without opening Gmail, and the extension even has a built-in text-to-speech engine so you can listen to your emails and continue working on your task.
- Auto Text Expander: Tired of typing the same phrases over and over again? Auto Text Expander can save you keystrokes by replacing shortcuts with phrases or entire sentences.
9. Pick the Right Inbox Type for You
Gmail lets you customize your inbox in a number of different ways. Click the Settings cog icon in the upper-right corner and go to the Density section.
You can then switch between three different views:
- Default: The default view displays the names and file types of attachments under subjects. It lets you open attachments directly from your inbox.
- Comfortable: This view indicates the presence of attachments with a small paperclip icon, but you can't click the icon to open the attachment it indicates.
- Compact: Use this view if you want to see more email messages at the same time.
Next, go to Settings → See All Settings and open the Inbox tab. You can then decide which Inbox type you want to use from six options:
- Default: This is the layout you see when you create a brand-new Gmail account and allows you to Categorize emails in Gmail.
- Important first: Using its own prediction algorithms, Gmail will decide which emails you're likely to consider to be important and place them at the top of your inbox.
- Unread first: All unread messages display before read messages.
- Starred first: All starred messages display before all other messages.
- Priority inbox: By analyzing your email usage habits, Gmail learns which emails you open and respond to the most and place them at the top of your inbox.
- Multiple inboxes: Let's you add up to five custom sections to view alongside your inbox.
10. Use Dots in Your Gmail Address
You might have noticed that a misplaced dot in a Gmail email address doesn't cause the message to return to the sender undelivered. The reason why this happens is simple: dots don't matter in Gmail addresses.
From the point of view of Gmail, the following three email addresses are identical:
- davidmorelo@gmail.com
- david.morelo@gmail.com
- d.a.v.i.d.m.o.r.e.l.o@gmail.com
You can use this Google mail trick to your advantage by giving different email addresses to different people. For example, you can use the cleanest version of your email address for work, a version with a dot between your first name and your last name for communicating with friends.
Even though Gmail ignores dots in email addresses, it's aware of their presence, so you can create filters to automatically separate different versions of your email address when they arrive and assign them colorful labels.
💡 Note: You cannot place dots in the domain name, which is the part of your email address that comes after the @ symbol.
To filter a specific version of your email address:
- Select the Show search options icon (three lines) on the right of the Gmail Search bar.
- Enter the email address in the To field.
- Click Create filter.
- Choose what to do when a message that matches your filter arrives.
- Click Create filter again.
11. Create Email Aliases in Gmail Using the Plus Sign
You can also create additional versions of your email address by appending the plus sign and any combination of words or numbers after your Gmail username.
For example, you can modify the email address davidmorelo@gmail.com in the following three ways:
- davidmorelo+work@gmail.com
- davidmorelo+friends@gmail.com
- davidmorelo+mailinglists@gmail.com
There are two major advantages to using email aliases in Gmail. First, you can easily filter email messages from different senders. Second, you can instantly tell who leaked your email address when you suddenly start receiving a lot of spam.
All you need to do is create a unique email alias each time you sign up for an online service. We recommend you make your email aliases as self-explanatory as possible so that you immediately know which email alias is used for what purpose.
Once again, leveraging this feature can prove useful in managing your subscriptions, watching online activities, and organizing Gmail. Using variations of your email address with plus signs can help you identify if someone is selling your data, as each subscription will have a unique email address. Moreover, it allows you to group and organize your email subscriptions more efficiently.
You can also set up a filter to automatically label emails to your aliases when they arrive in your inbox. Read Tip #7 above to learn how to separate emails in Gmail with labels and automatically assign them to messages.
12. Use Hashtags Inside Your Emails
We've already explained how to organize Gmail using labels, but you can go a step further and use hashtags inside your emails to enable granular filtering. All you need to do is include as many hashtags as you want in the body of your message. Their placement doesn't matter, but we recommend you put them at the very end so they are not too distracting.
For example, you could include the following hashtags when emailing your client important project details: #follow-up, #project-details, #name-of-the-project. Gmail's powerful search functionality can quickly scan your entire inbox and track down all emails with the hashtag you're searching for.
13. Learn Gmail's Keyboard Shortcuts
You can save a lot of time by navigating Gmail using keyboard shortcuts. Although it’s one of the best efficiency tips, it will take some time to memorize them. But you'll thank yourself for making the effort once you discover just how easier it is to organize Gmail with keyboard shortcuts.
Just keep in mind that keyboard shortcuts work differently on PC and Mac computers. On Windows, use Ctrl and on Mac, use Command (⌘).
Here's a short list of some of the most popular keyboard shortcuts:
- Previous message in an open conversation: p
- Next message in an open conversation: n
- Send: Ctrl + Enter or Command + Return
- Bold: Ctrl/Command + b
- Italics: Ctrl/Command + i
- Underline: Ctrl/Command + u
- Archive: e
- Mute conversation: m
- Report as spam: ! (exclamation mark)
- Delete: # (number symbol)
- Reply: r
Bonus: Automate Your Gmail Management with Clean Email
As useful as the Google email organization features are, they pale in comparison to Clean Email. This popular bulk email cleaner automatically organizes all of your emails into easy-to-review bundles called Smart Folders. You can then delete or archive messages in bulk.
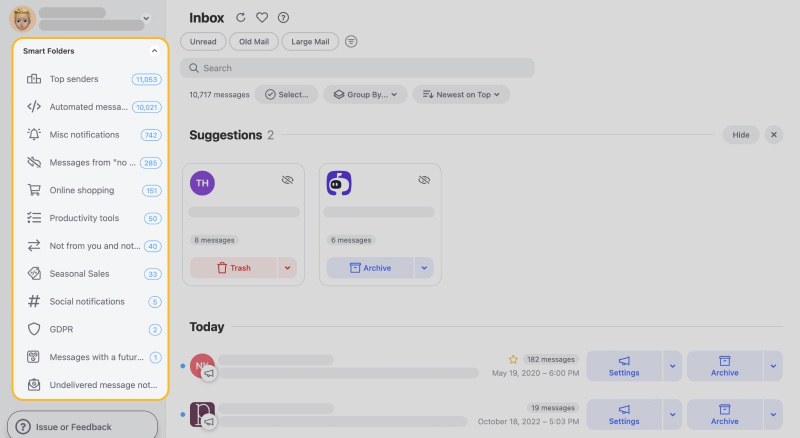
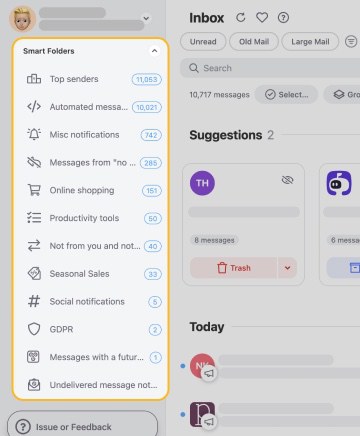
If you've ever wondered how to organize Gmail by sender so you could apply actions to multiple emails from the same person, you've just found the answer. With a single click, Clean Email organizes your Gmail inbox using rules and filters to simplify email management, allowing you to remove, archive, move, or label groups of messages instead of selecting them one by one.
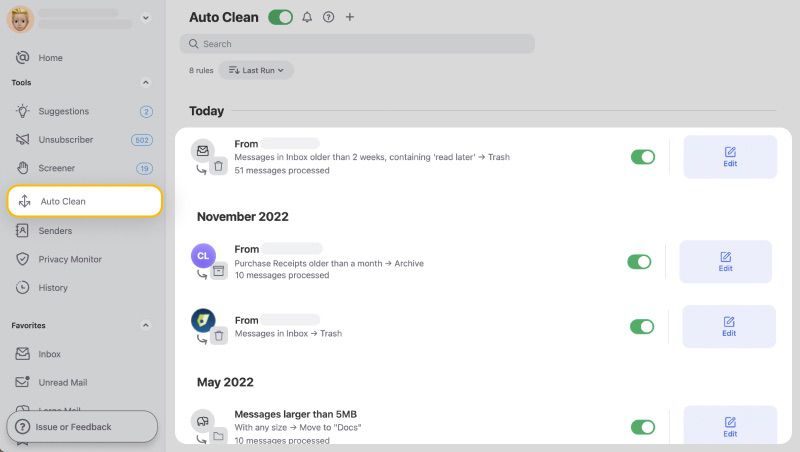
Any action you apply with Clean Email can be applied automatically in the future to new email messages thanks to the Auto Clean feature mentioned earlier. With it, you can sort out your Gmail inbox by automatically moving emails to folders as they arrive.
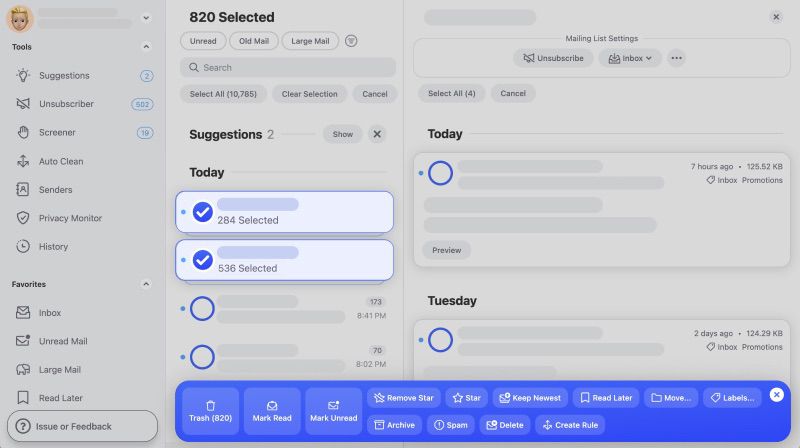
And just as easily, it's possible to block unwanted senders or unsubscribe from unwanted emails thanks to the aforementioned Unsubscriber feature. Click Unsubscribe and this email organizer removes you from mailing lists and sends messages to the Trash.
Clean Email is free to try and available as a web app, on Mac, and as a mobile app for iOS and Android—so you can clean and manage your inbox from any device.
Conclusion
Manage your Gmail inbox and learning how to use Gmail like a pro doesn’t have to be a hefty task. The amount of time you can save just by taking advantage of these email organization tips and using advanced Gmail organizers like Clean Email is significant.


